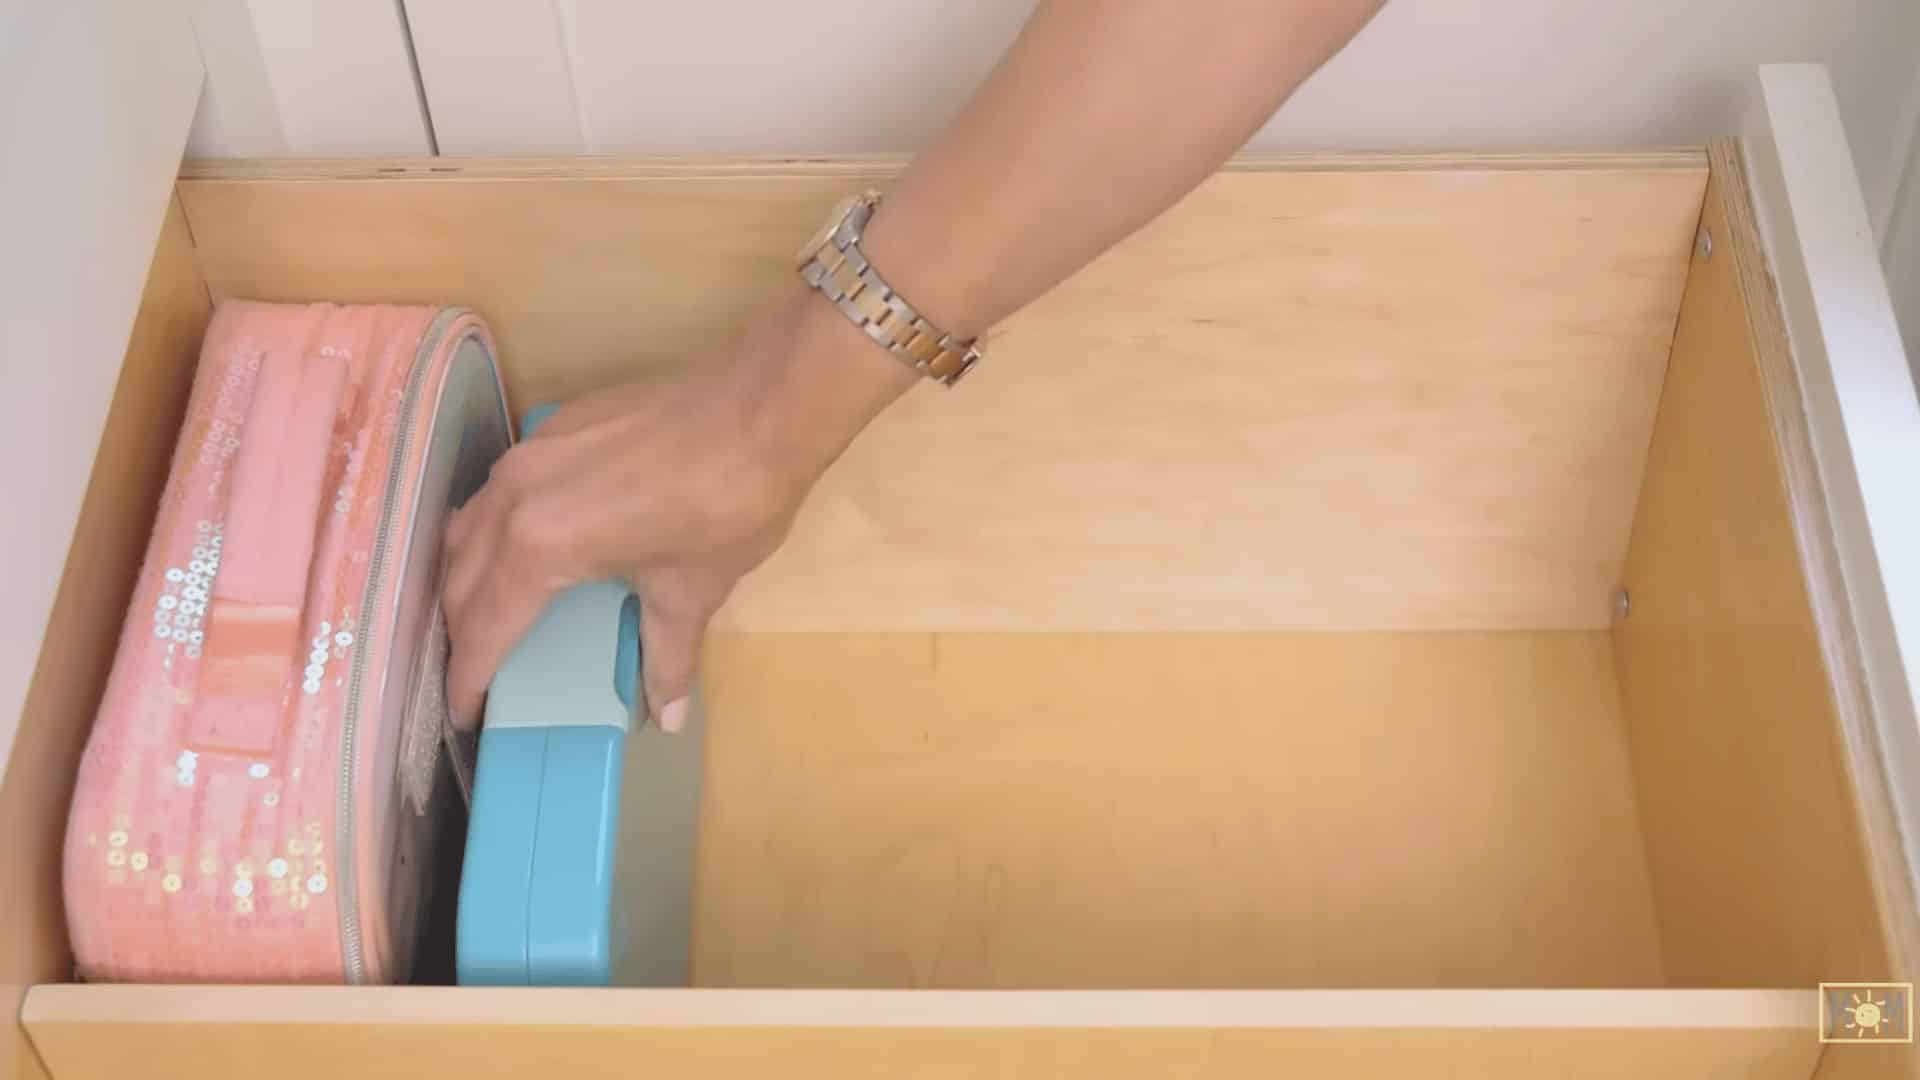
Kitchen drawers collect clutter quietly. One day everything fits, and the next you’re digging past three spatulas and a broken whisk just to find the peeler. I’ve tested storage solutions across all kinds of kitchen setups, and the problem is almost always the same: no real system, just stuff.
Knowing how to organize kitchen drawers makes daily cooking noticeably smoother. The right layout means less searching, fewer frustrations, and more time focused on the actual meal.
This guide covers 23 practical ideas, from drawer dividers to smart layout planning, plus tips on choosing organizers that genuinely fit your space and budget. Simple, realistic advice that holds up in everyday kitchens.
Why Prepping Your Drawers First Makes All the Difference
Most organizing attempts fail not because of bad ideas, but because the prep work gets skipped. I’ve seen it happen plenty of times. You add a nice bamboo tray and two weeks later, it’s buried under clutter again.
Good prep changes that. When you empty every drawer first, you see exactly what you’re working with. Cleaning the inside gives you a fresh start. Removing items you never use means you’re only organizing what actually belongs there.
Grouping similar tools together before buying anything helps you determine the storage you genuinely need. And measuring your drawers first means organizers fit the first time properly.
It takes twenty minutes. It saves hours of redoing things later.
Smart Ideas to Organize Kitchen Drawers
These ideas work for kitchens of all sizes and budgets. Pick one drawer to start with and build from there. Small changes add up fast.
1. Use Adjustable Drawer Dividers
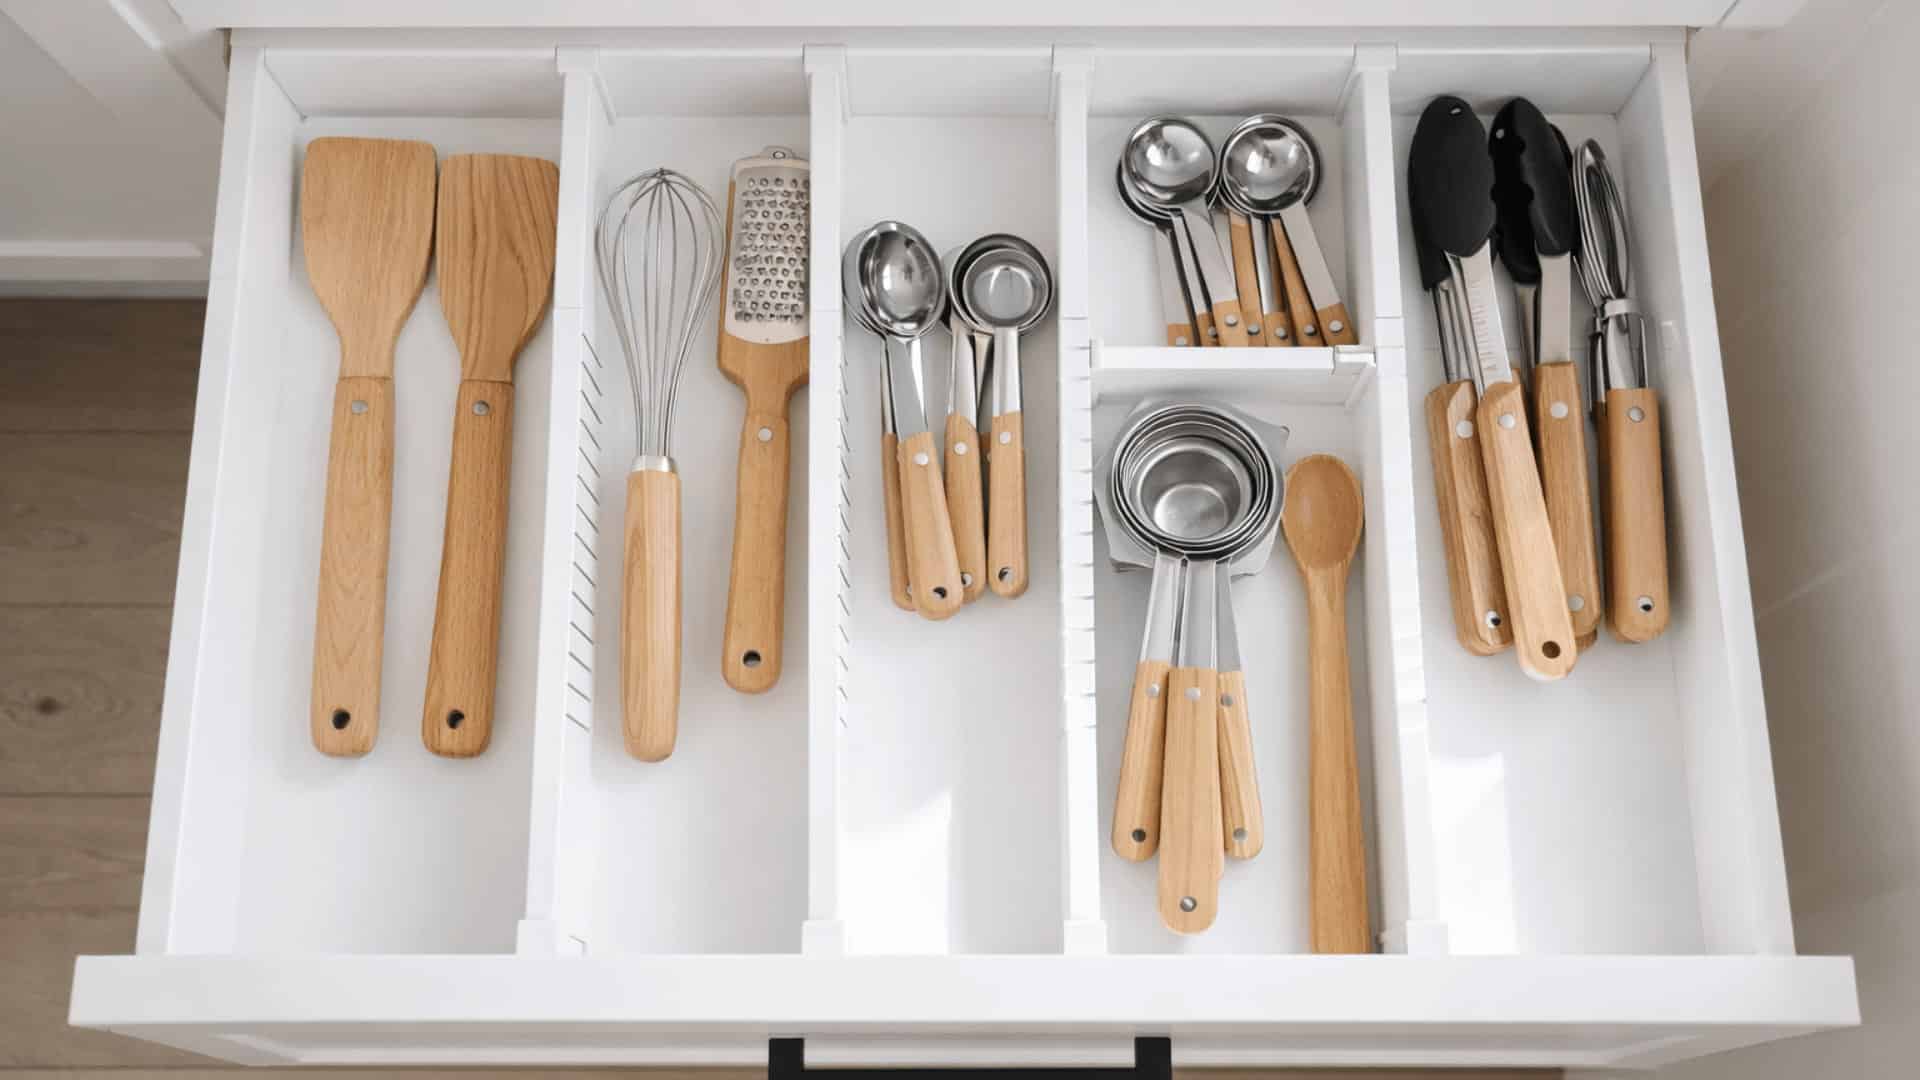
Adjustable dividers are one of the smartest investments for any kitchen drawer. I’ve used them in drawers of all sizes, and they work every time. You can shift the dividers as your storage needs change, no tools needed.
They’re especially useful in wide drawers where items tend to shift around. Most slide into place easily and hold firm without damaging the drawer walls.
2. Line Deep Drawers With Tension Rods
Tension rods aren’t just for curtains. Placed vertically inside a deep drawer, they create instant dividers for baking sheets, cutting boards, and pan lids, no drilling, no tools, no cost.
I’ve used this in rentals where I couldn’t install anything permanent, and it held up surprisingly well. You can reposition the rods anytime your storage needs shift. It’s one of the most budget-friendly drawer fixes I’ve come across.
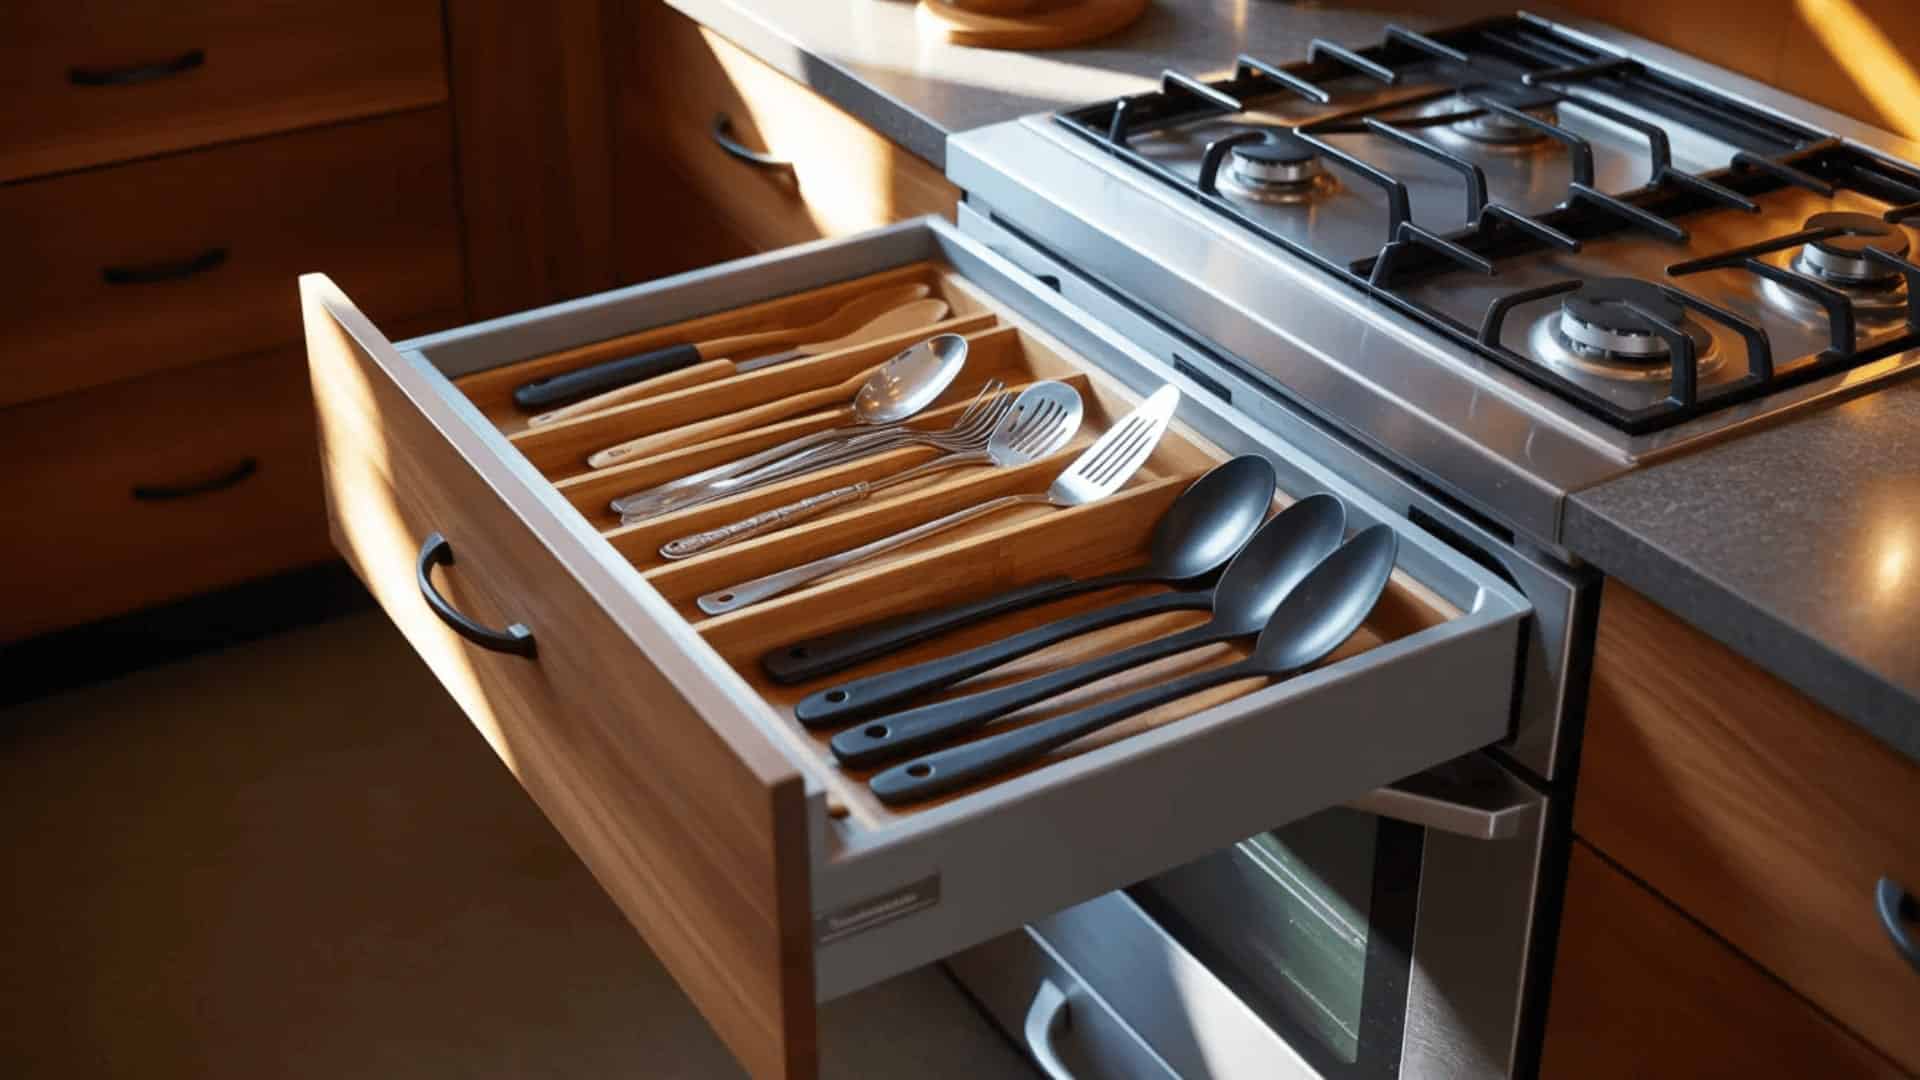
3. Separate Cooking Tools by Category
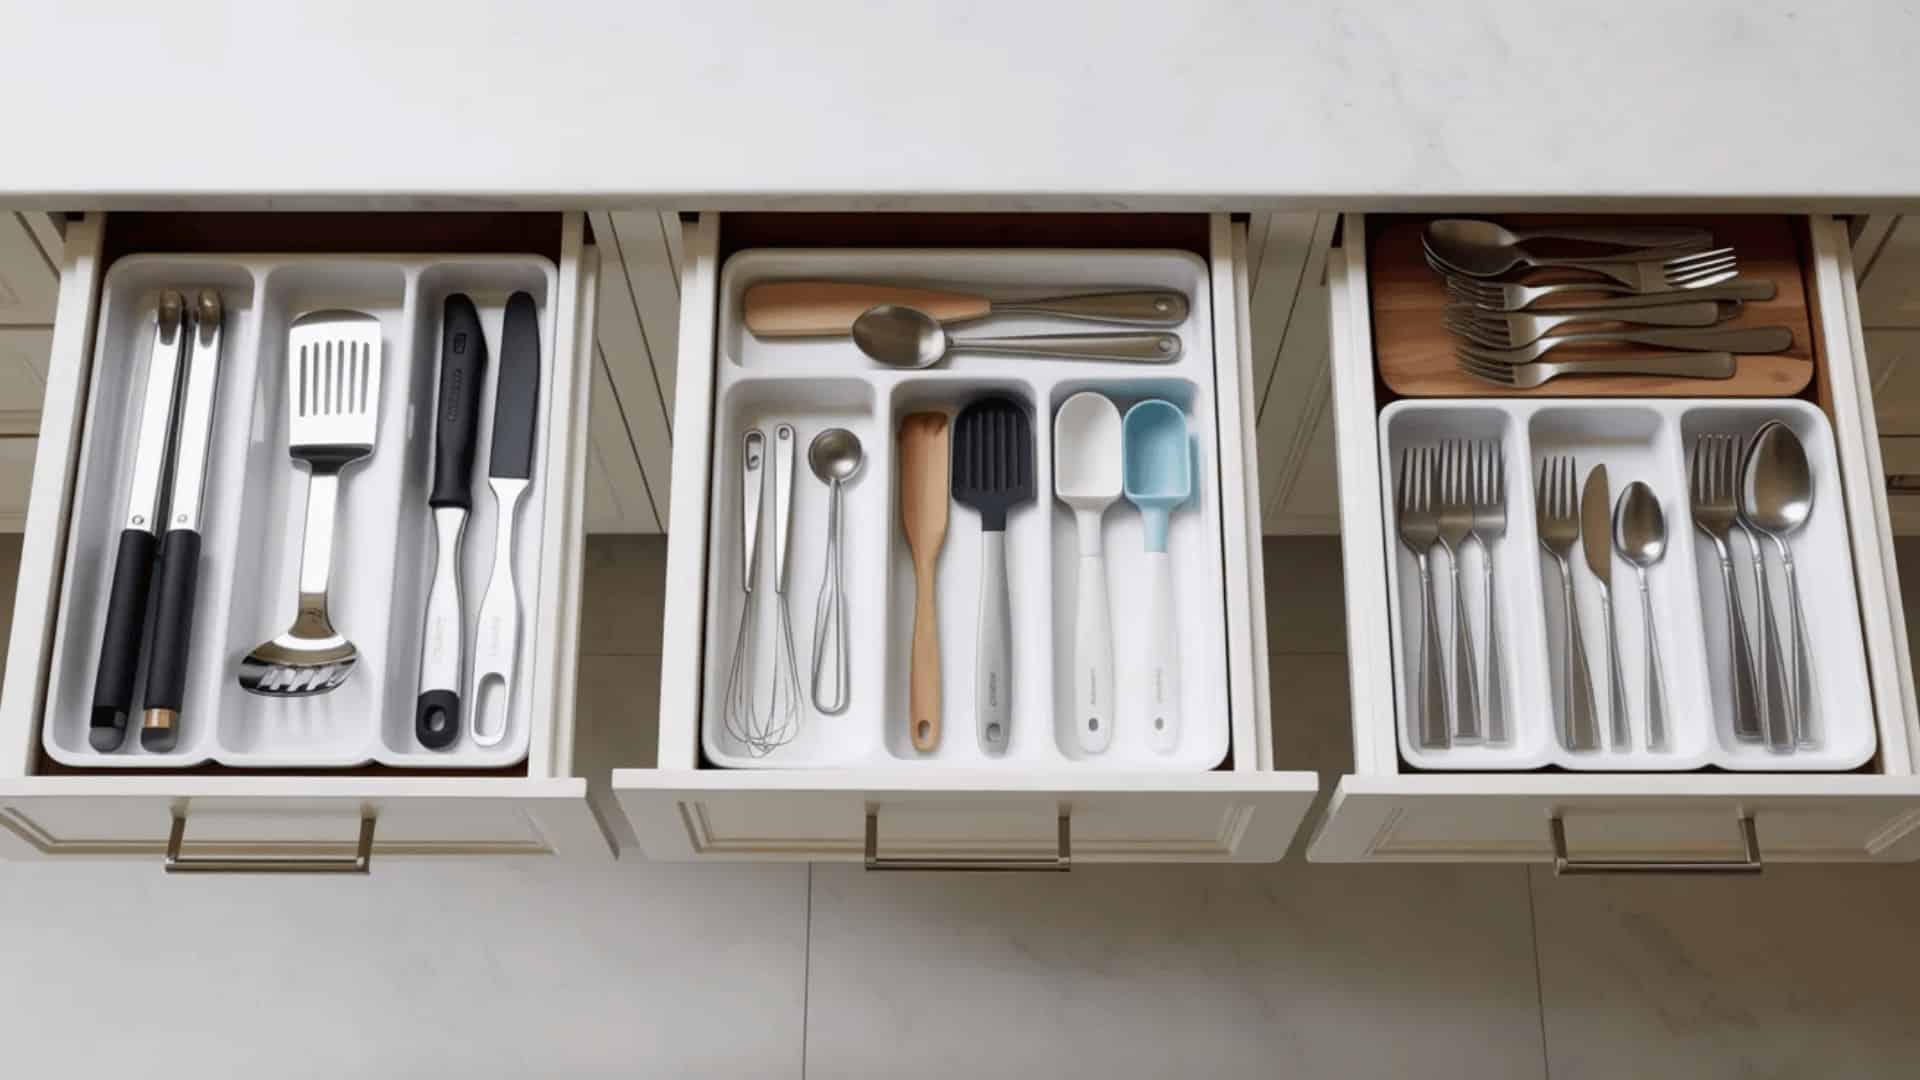
Grouping tools by category is one of the easiest habits to build. Keep grilling tools together, baking tools in one spot, and everyday utensils within arm’s reach.
I’ve found that once everything has a category, putting things back becomes automatic. You stop tossing items randomly and start placing them correctly. This one shift alone reduces the time you spend hunting for the right tool mid-cook.
4. Use Small Containers for Loose Items
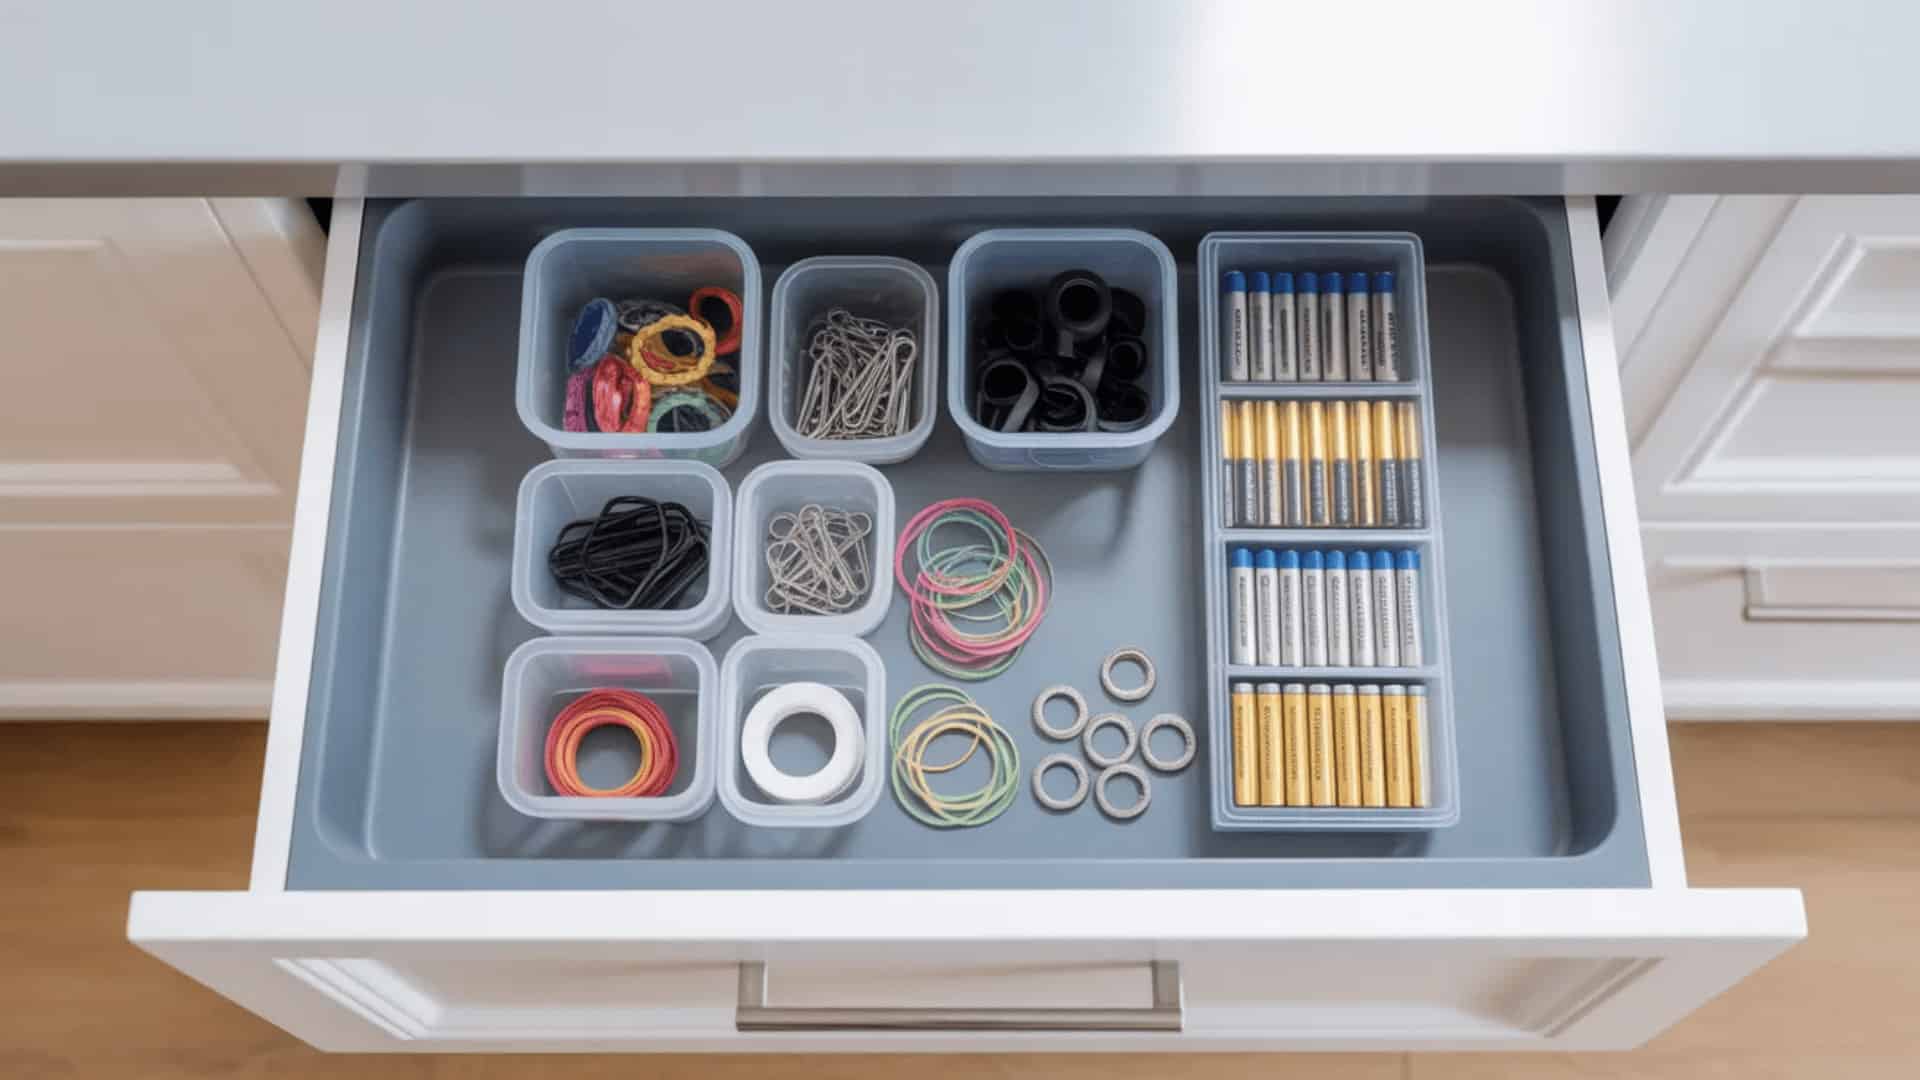
Loose items, twist ties, bag clips, batteries, and rubber bands are the main culprits behind junk drawers spiraling out of control. Small containers fix this fast. I use little bins or repurposed food containers to corral these odds and ends into defined spots.
Clear containers work best so you can see what’s inside without digging. Even a set of small Mason jars does the job well and costs almost nothing.
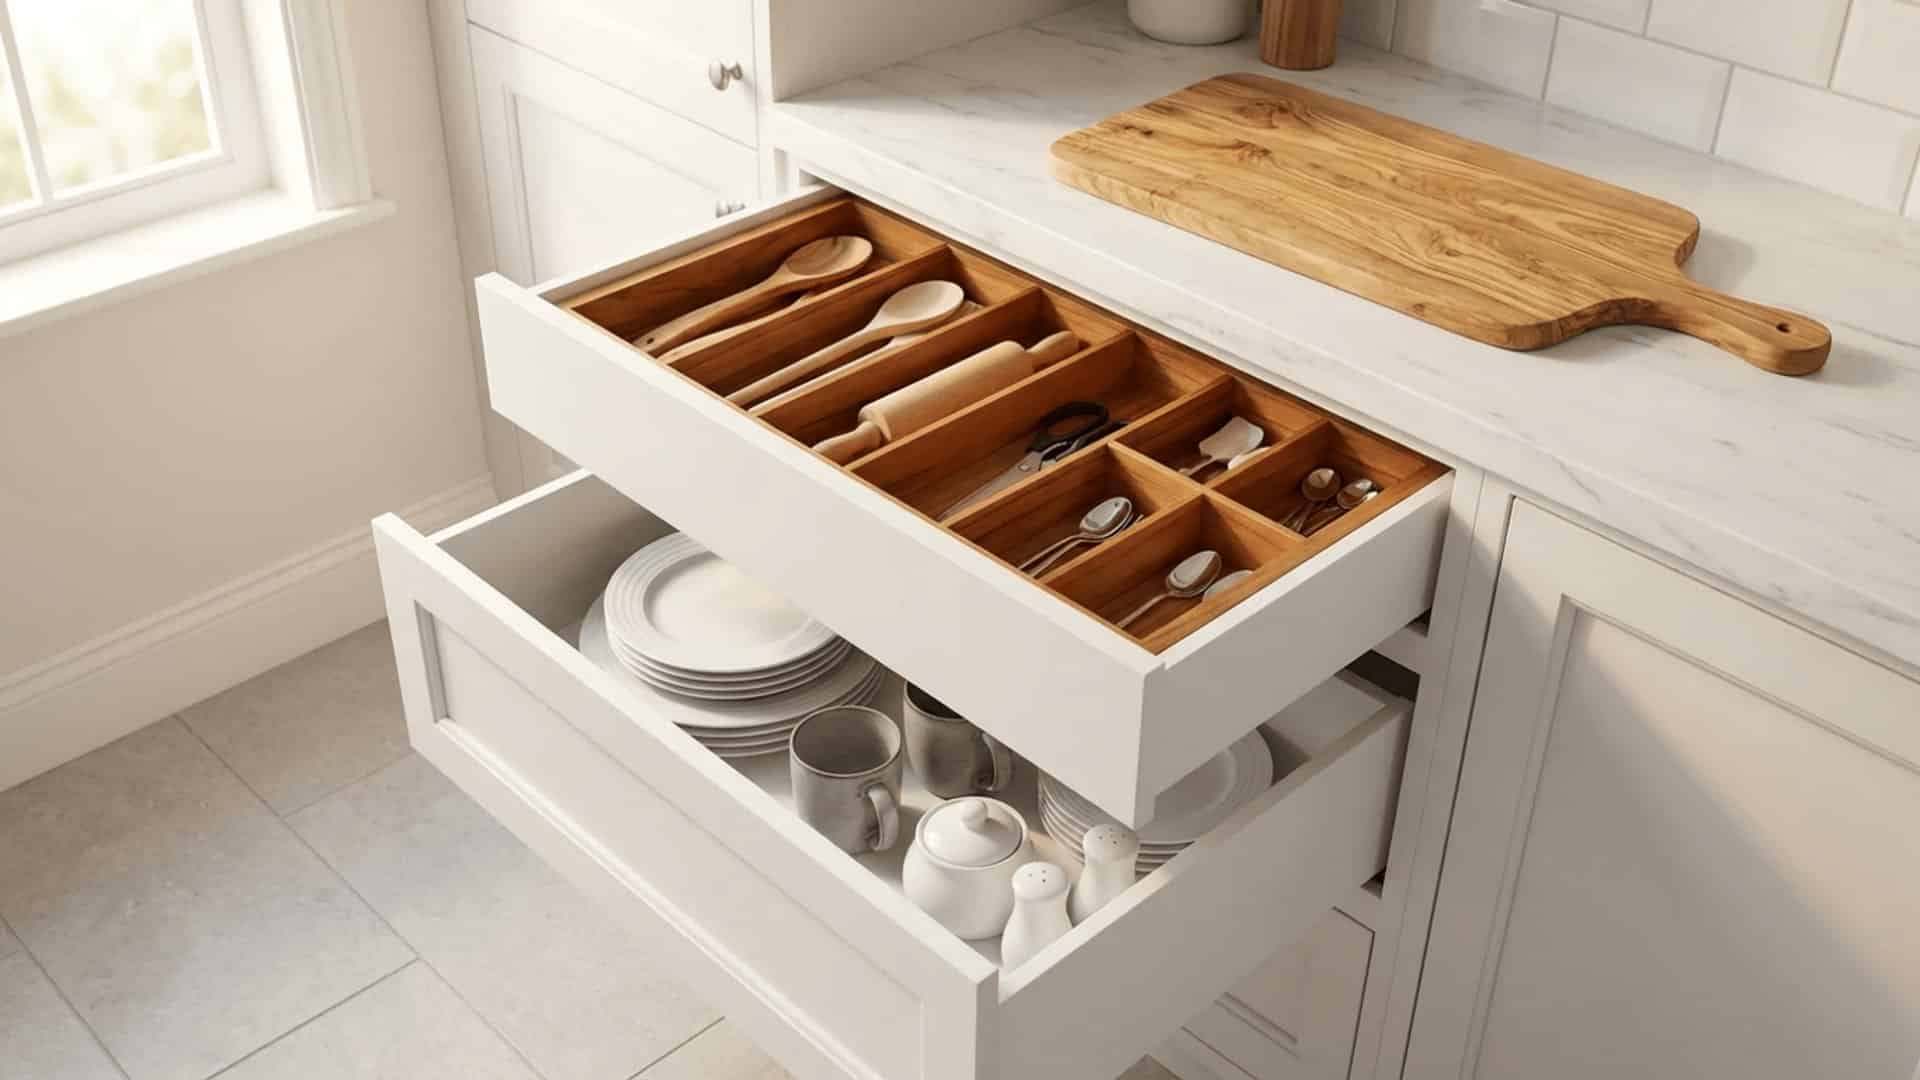
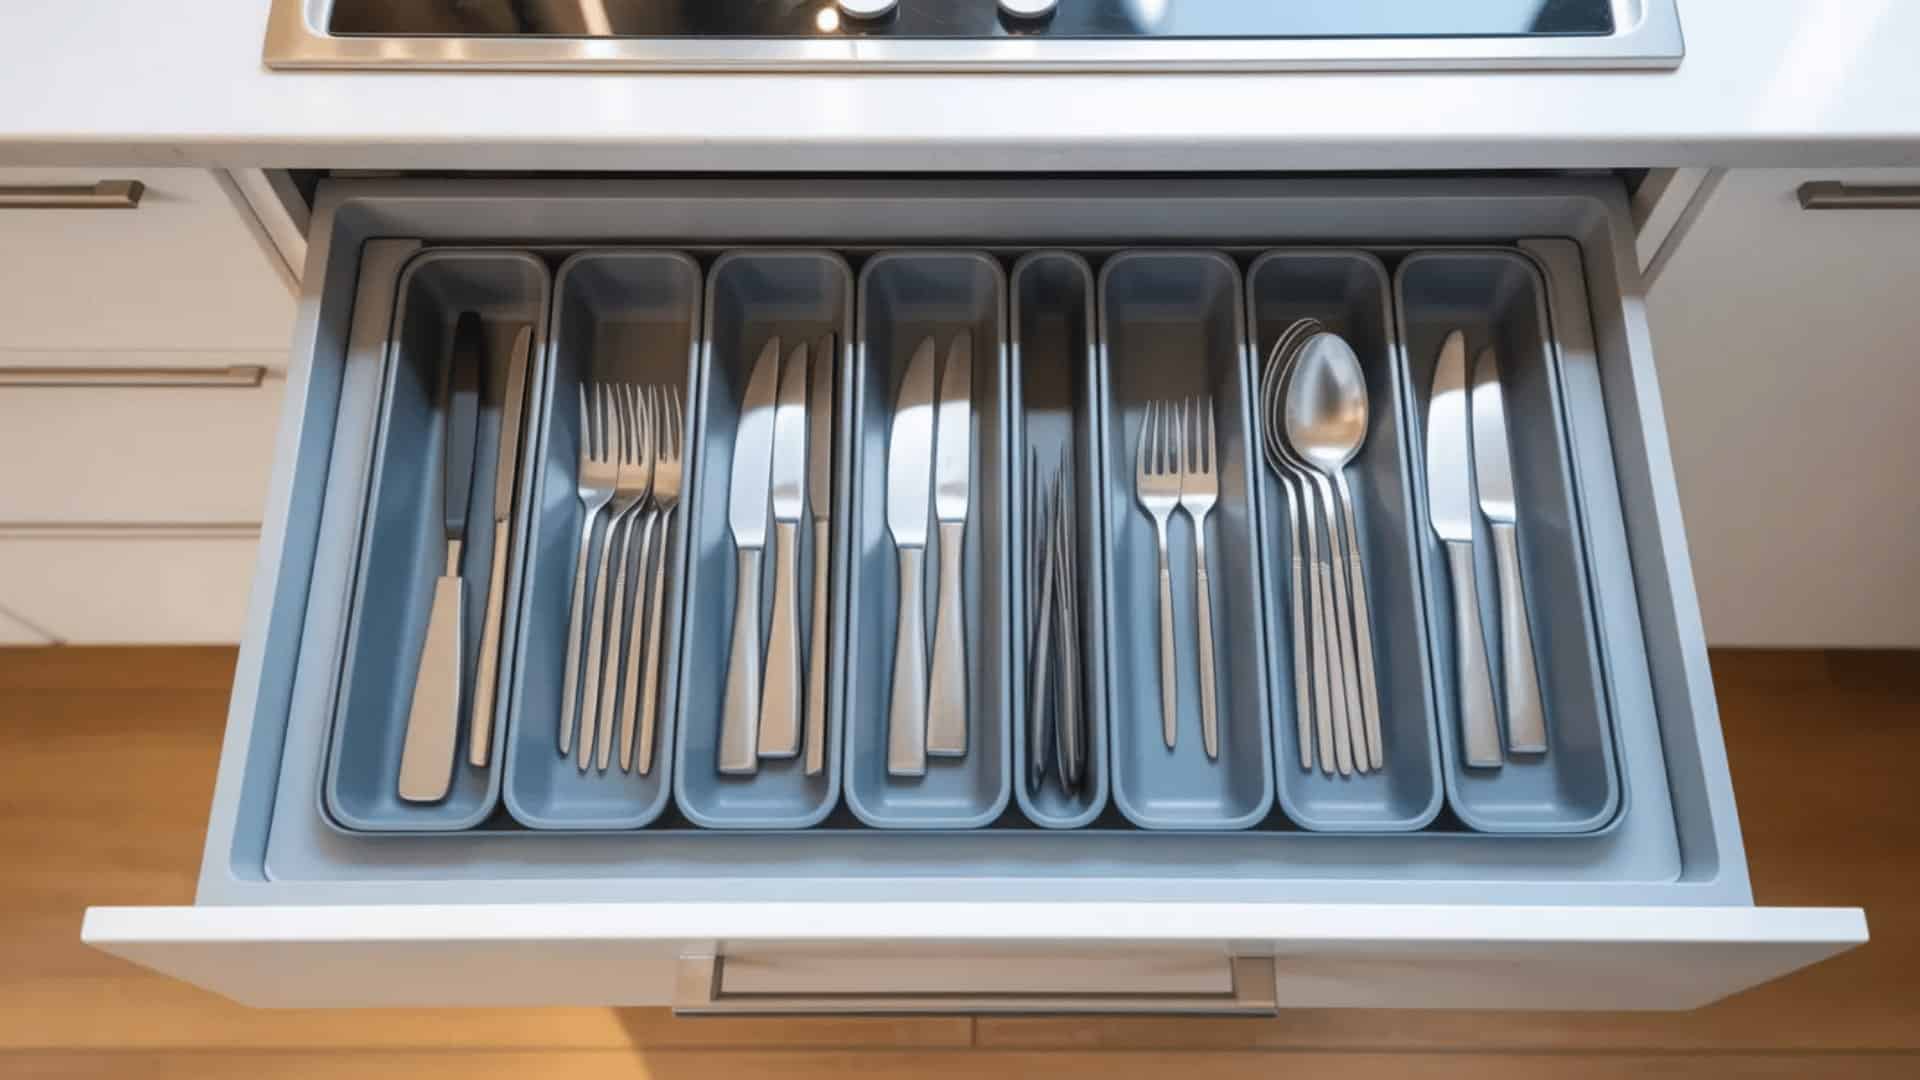
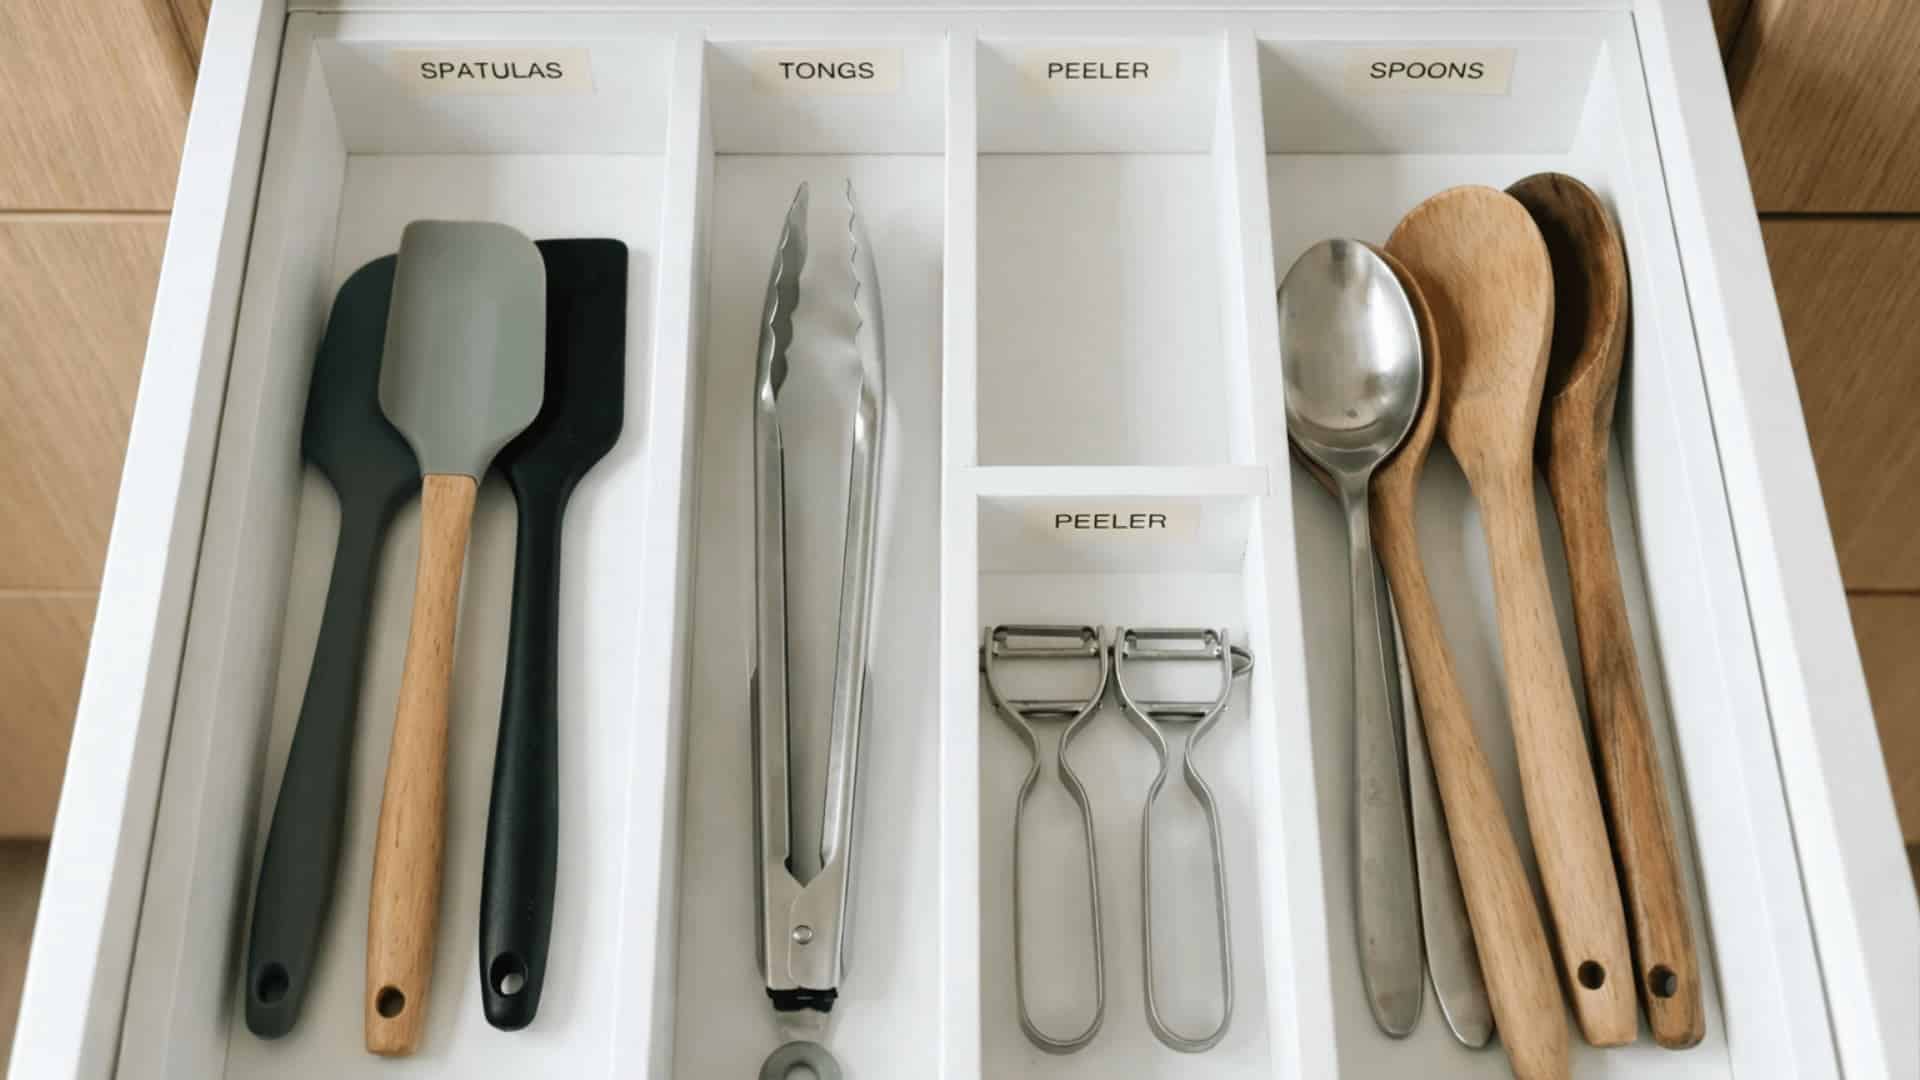
5. Store Daily Utensils in the Top Drawer
Your most-used tools deserve the easiest access. The top drawer, or the one closest to your prep area, should hold only what you reach for every day. Think spatulas, tongs, a can opener, and a peeler.
I keep this drawer simple and never overcrowd it. When daily tools are easy to grab, cooking flows faster. Reserve lower or deeper drawers for items you use less often.
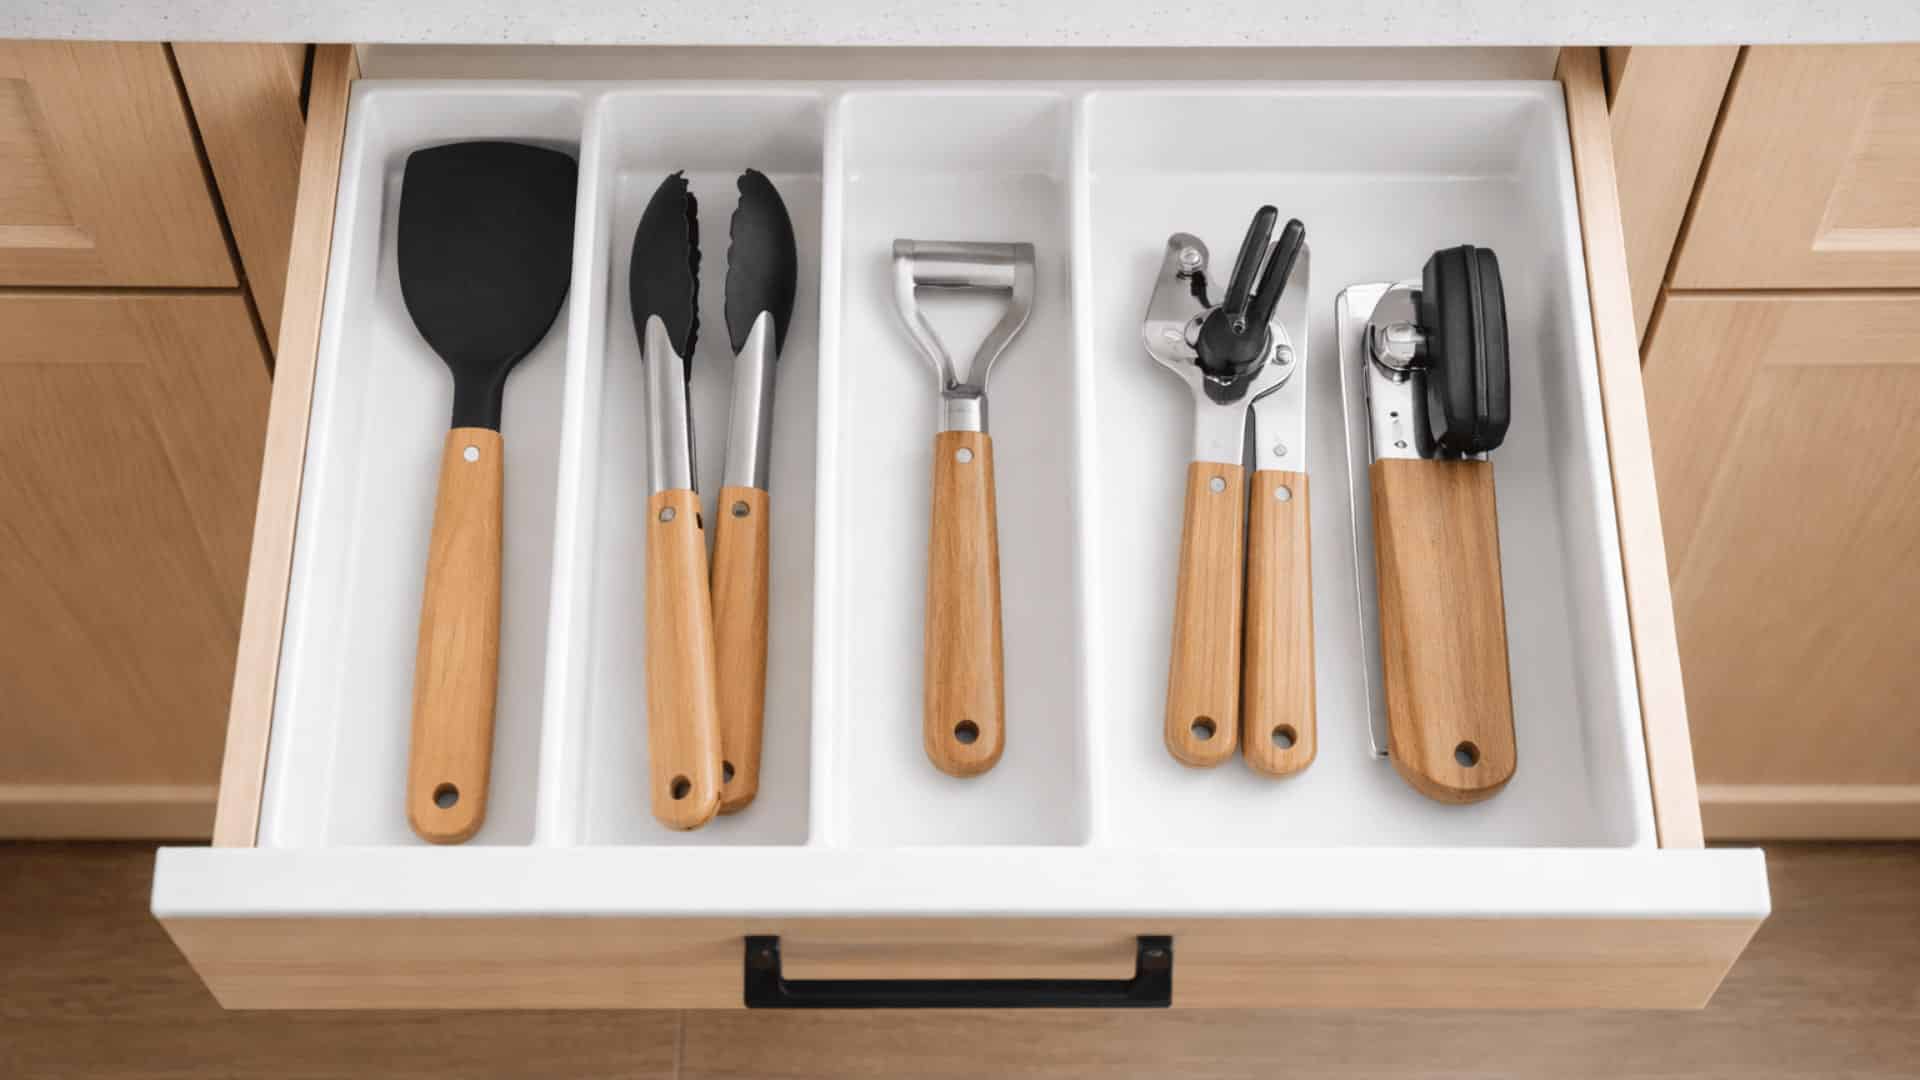
6. Create a Dedicated Food Prep Drawer
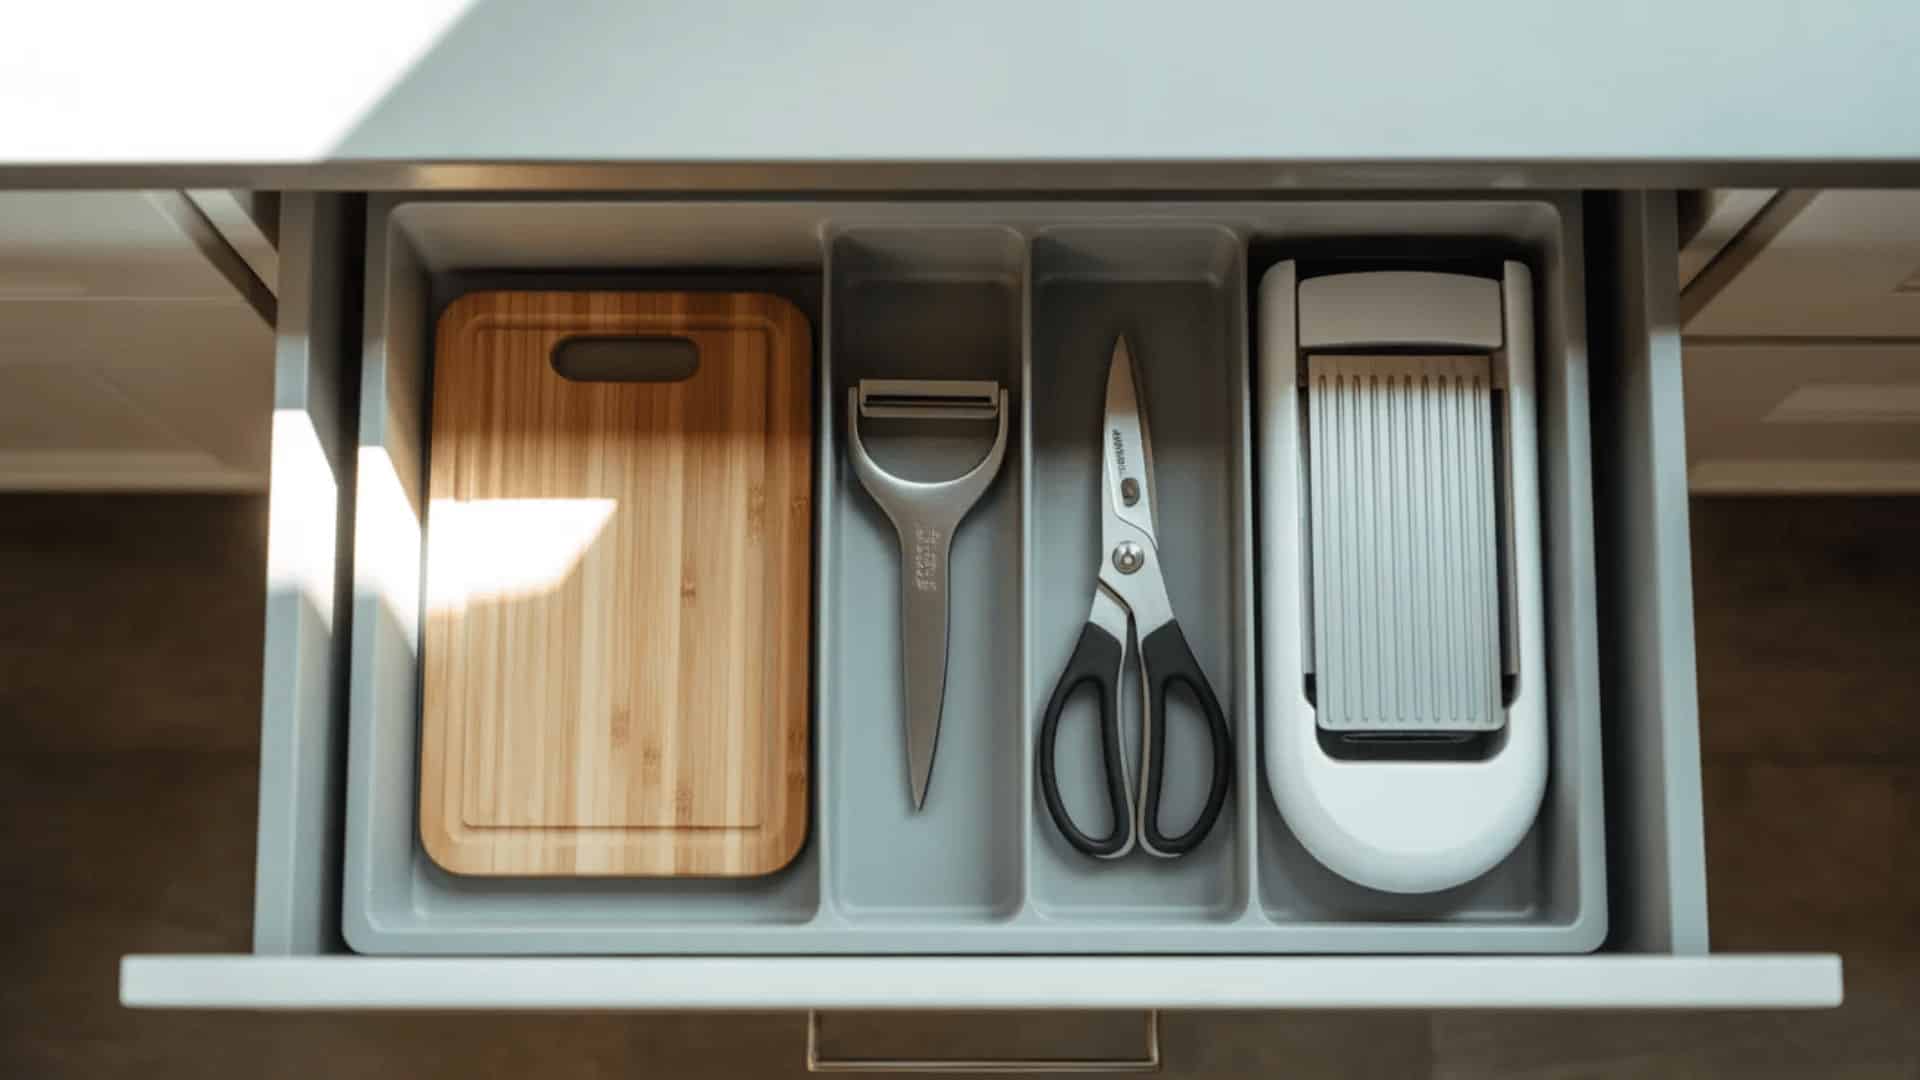
A food prep drawer keeps everything in one place when you’re actively cooking. Mine holds a cutting board, a vegetable peeler, kitchen shears, and a mandoline slicer. Having these tools grouped together means less back-and-forth across the kitchen.
It’s a small setup change that genuinely speeds up meal prep. If you cook regularly, a dedicated prep drawer quickly becomes one of the most useful spots in your entire kitchen.
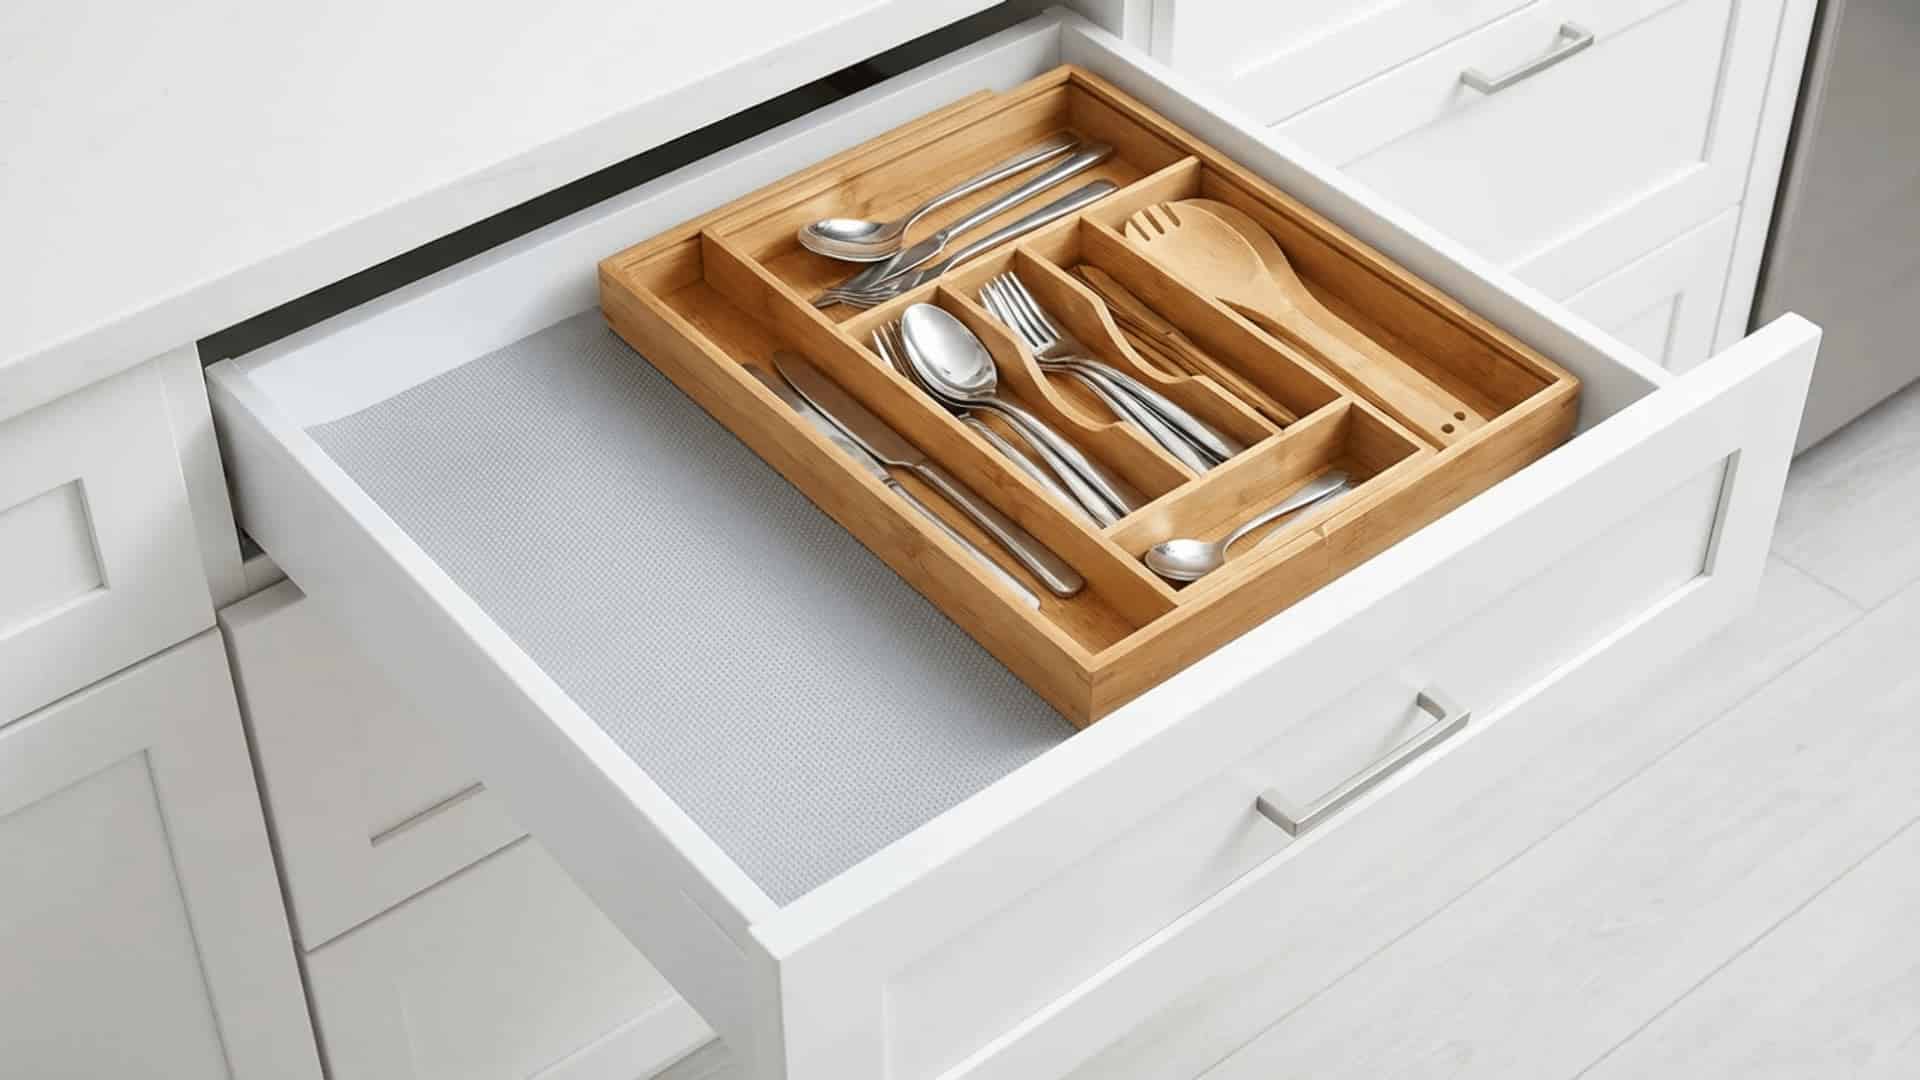
7. Organize Measuring Cups and Spoons Together

Measuring tools are small, easy to lose, and need to be used together. Keeping them in the same drawer section just makes sense. I use a small divided tray to hold both cups and spoons so nothing gets buried.
Hanging them on a ring inside the drawer also works well. Whichever method you choose, having them in one spot means you’re never searching for the quarter teaspoon right when you need it.
8. Use Vertical Dividers for Baking Sheets
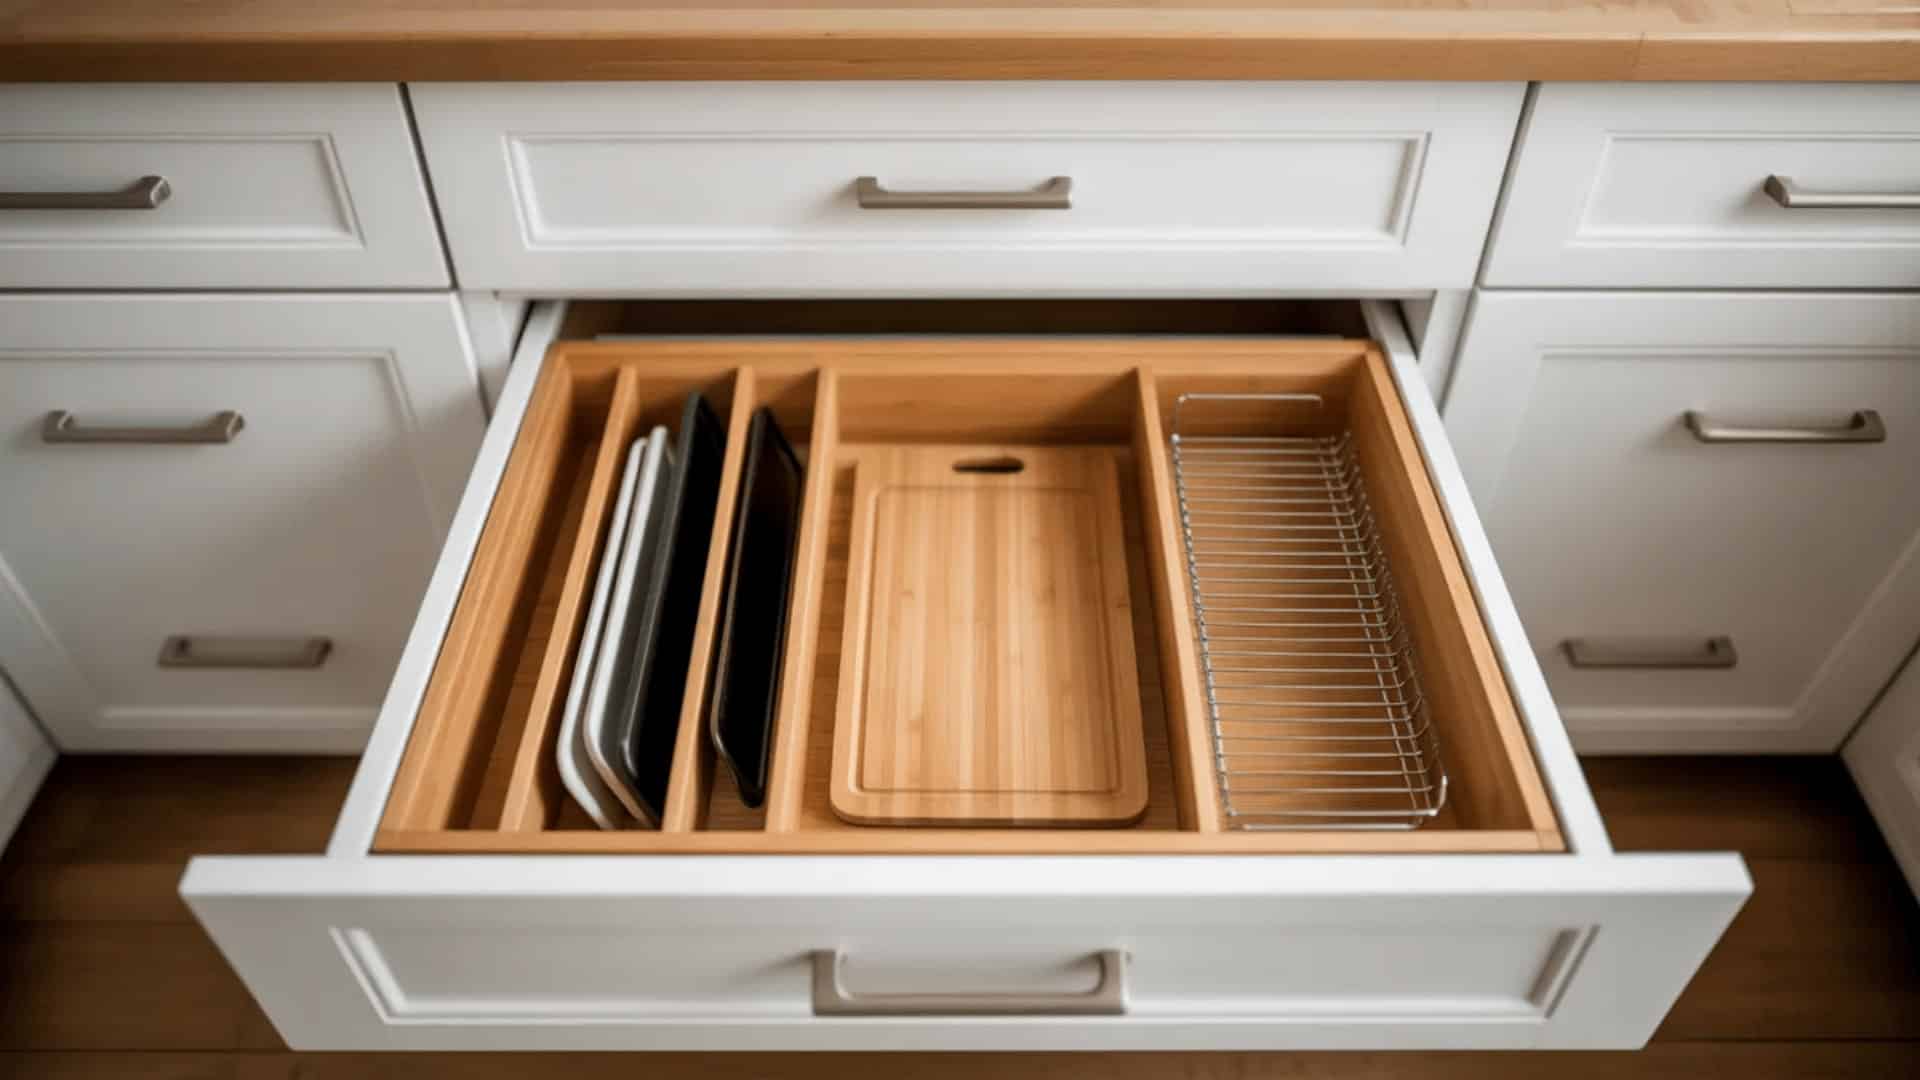
Flat items like baking sheets, cutting boards, and cooling racks are awkward to stack. Vertical dividers solve this completely. Instead of lifting a heavy pile to reach the one at the bottom, you simply pull out the sheet you need.
I’ve set this up in a deep lower drawer, and it works beautifully. Everything stays upright, organized, and easy to access without disturbing the other items around it.
9. Store Pot Lids in Deep Drawer Dividers
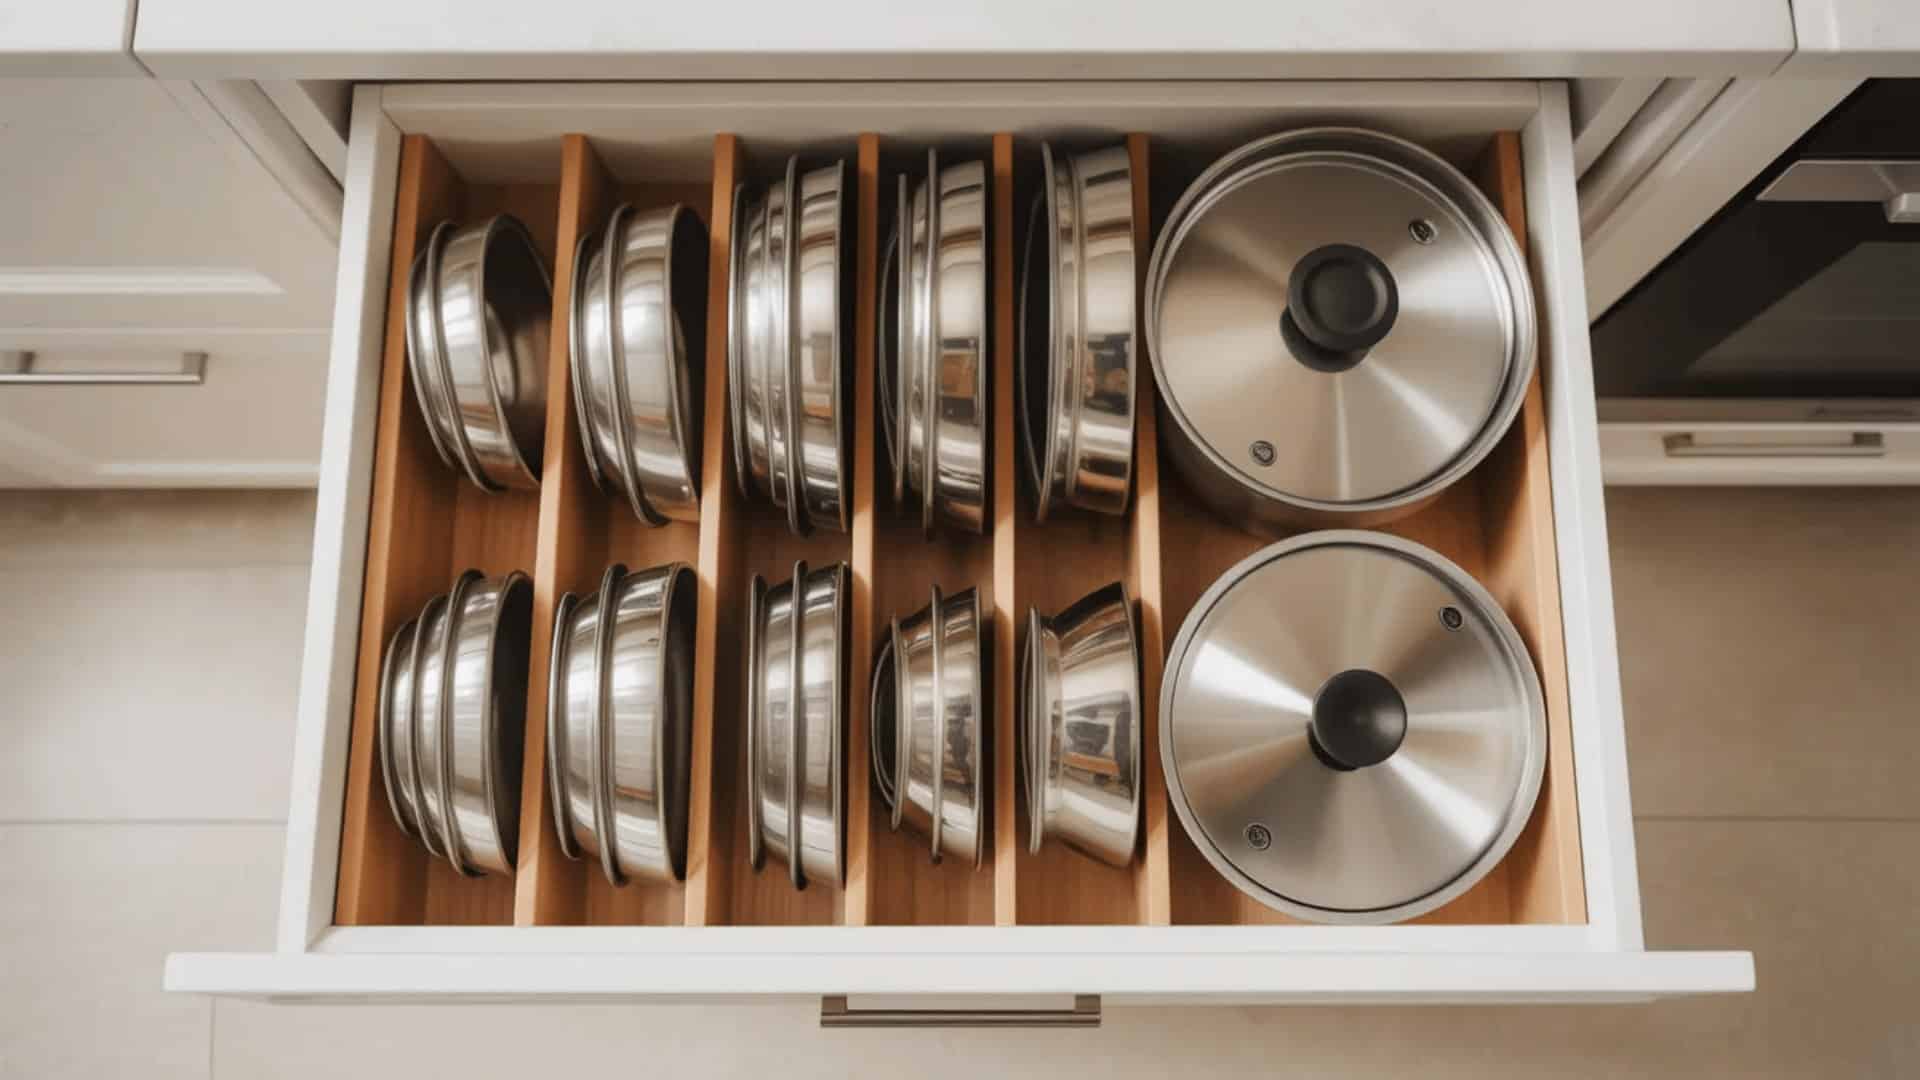
Pot lids are one of the most frustrating items to store. They slide, stack unevenly, and clatter constantly. A deep drawer with vertical dividers keeps each lid standing upright on its own.
I store mine sorted by size, small lids on one side, large ones on the other. It takes ten seconds to find the right lid instead of pulling out five wrong ones first. A genuinely satisfying fix for a common kitchen annoyance.
10. Organize Plastic Wrap and Foil in One Drawer
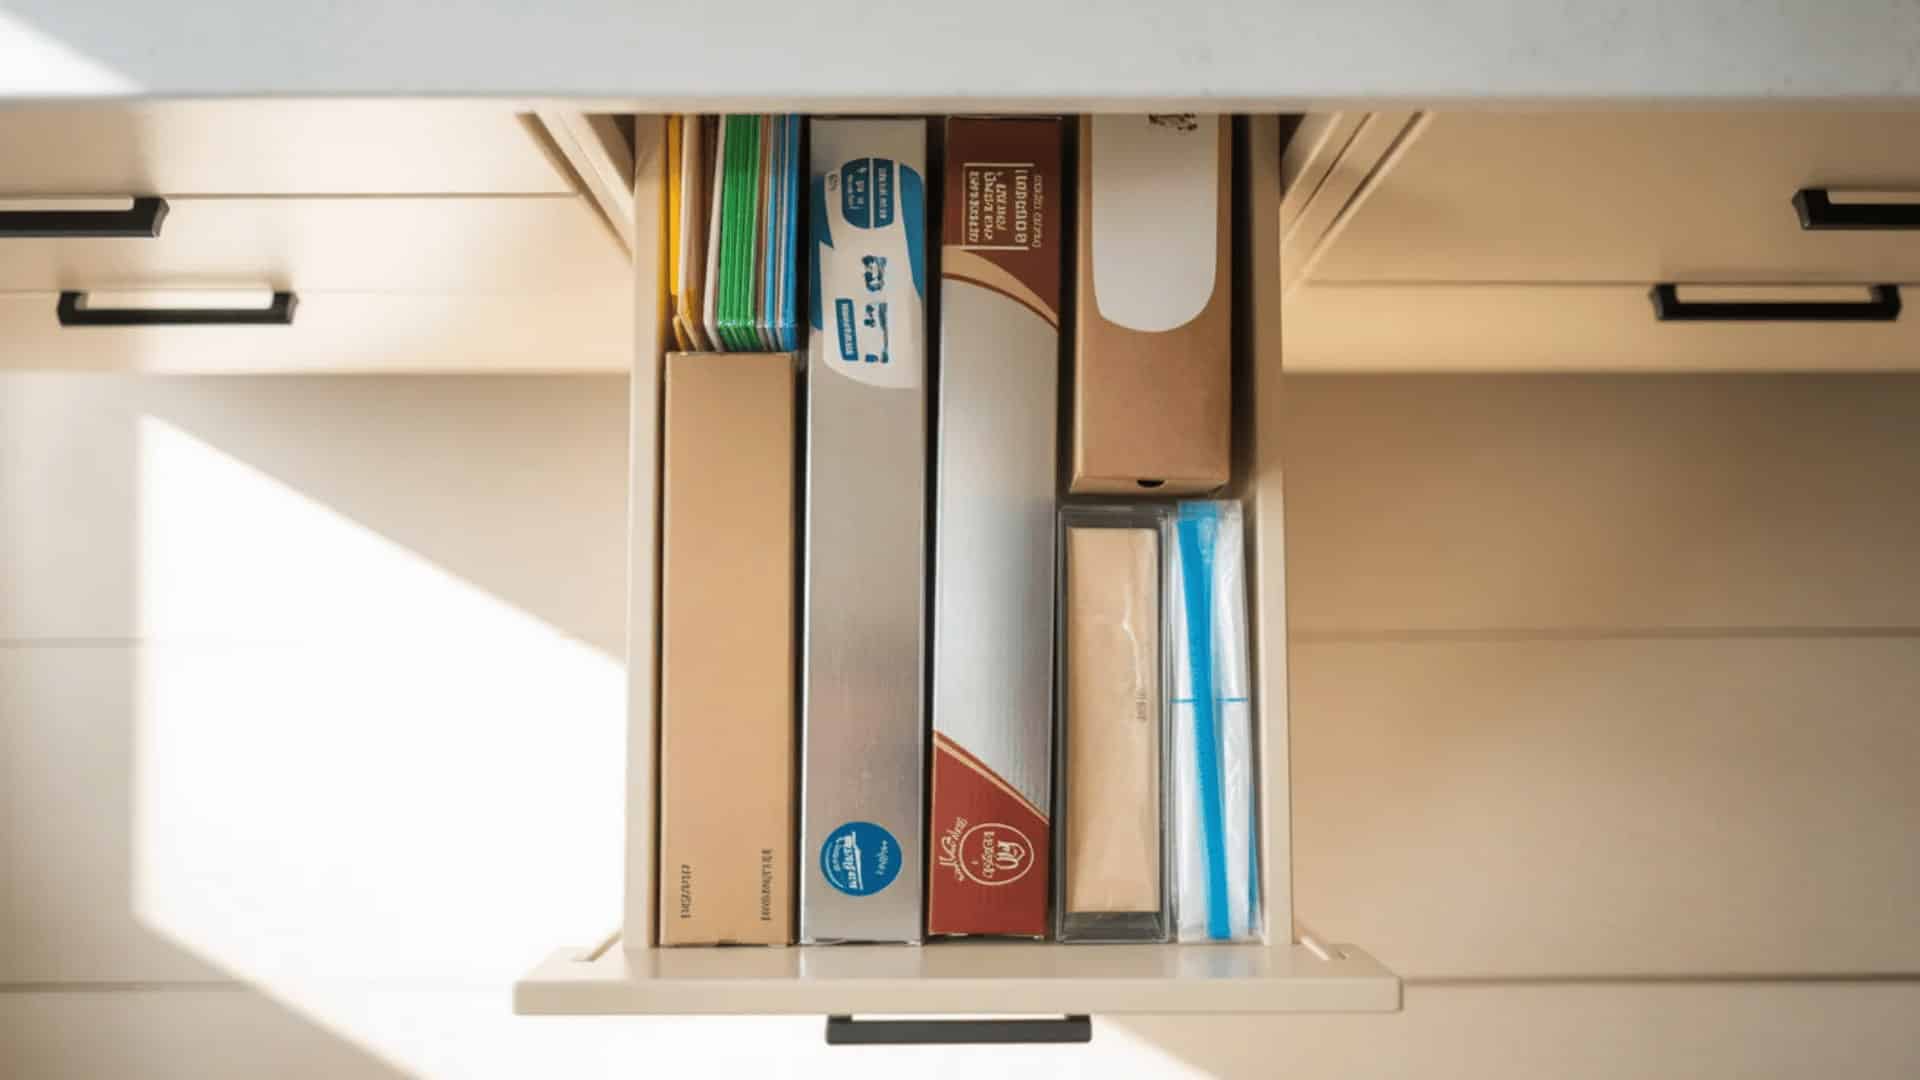
Plastic wrap, aluminum foil, parchment paper, and zip bags all belong together. Dedicating one drawer to these items keeps them from getting crushed or lost elsewhere. I use a narrow deep drawer for this and stand the boxes upright so the labels face out.
Some organizers are built specifically for this purpose and include a cutter rail. Either way, having one go-to drawer for wraps saves time every single day.
11. Use Expandable Drawer Organizers
Not all drawers are the same size, which is why expandable organizers are so practical. They stretch to fit your exact drawer width without leaving gaps on the sides. I’ve used these in rental kitchens where I couldn’t make permanent changes, and they worked perfectly.
Most come with multiple compartments and adjust with a simple slide mechanism. They’re widely available, affordable, and far more useful than fixed-size trays that never quite fit right.
12. Store Knives in a Drawer Knife Block
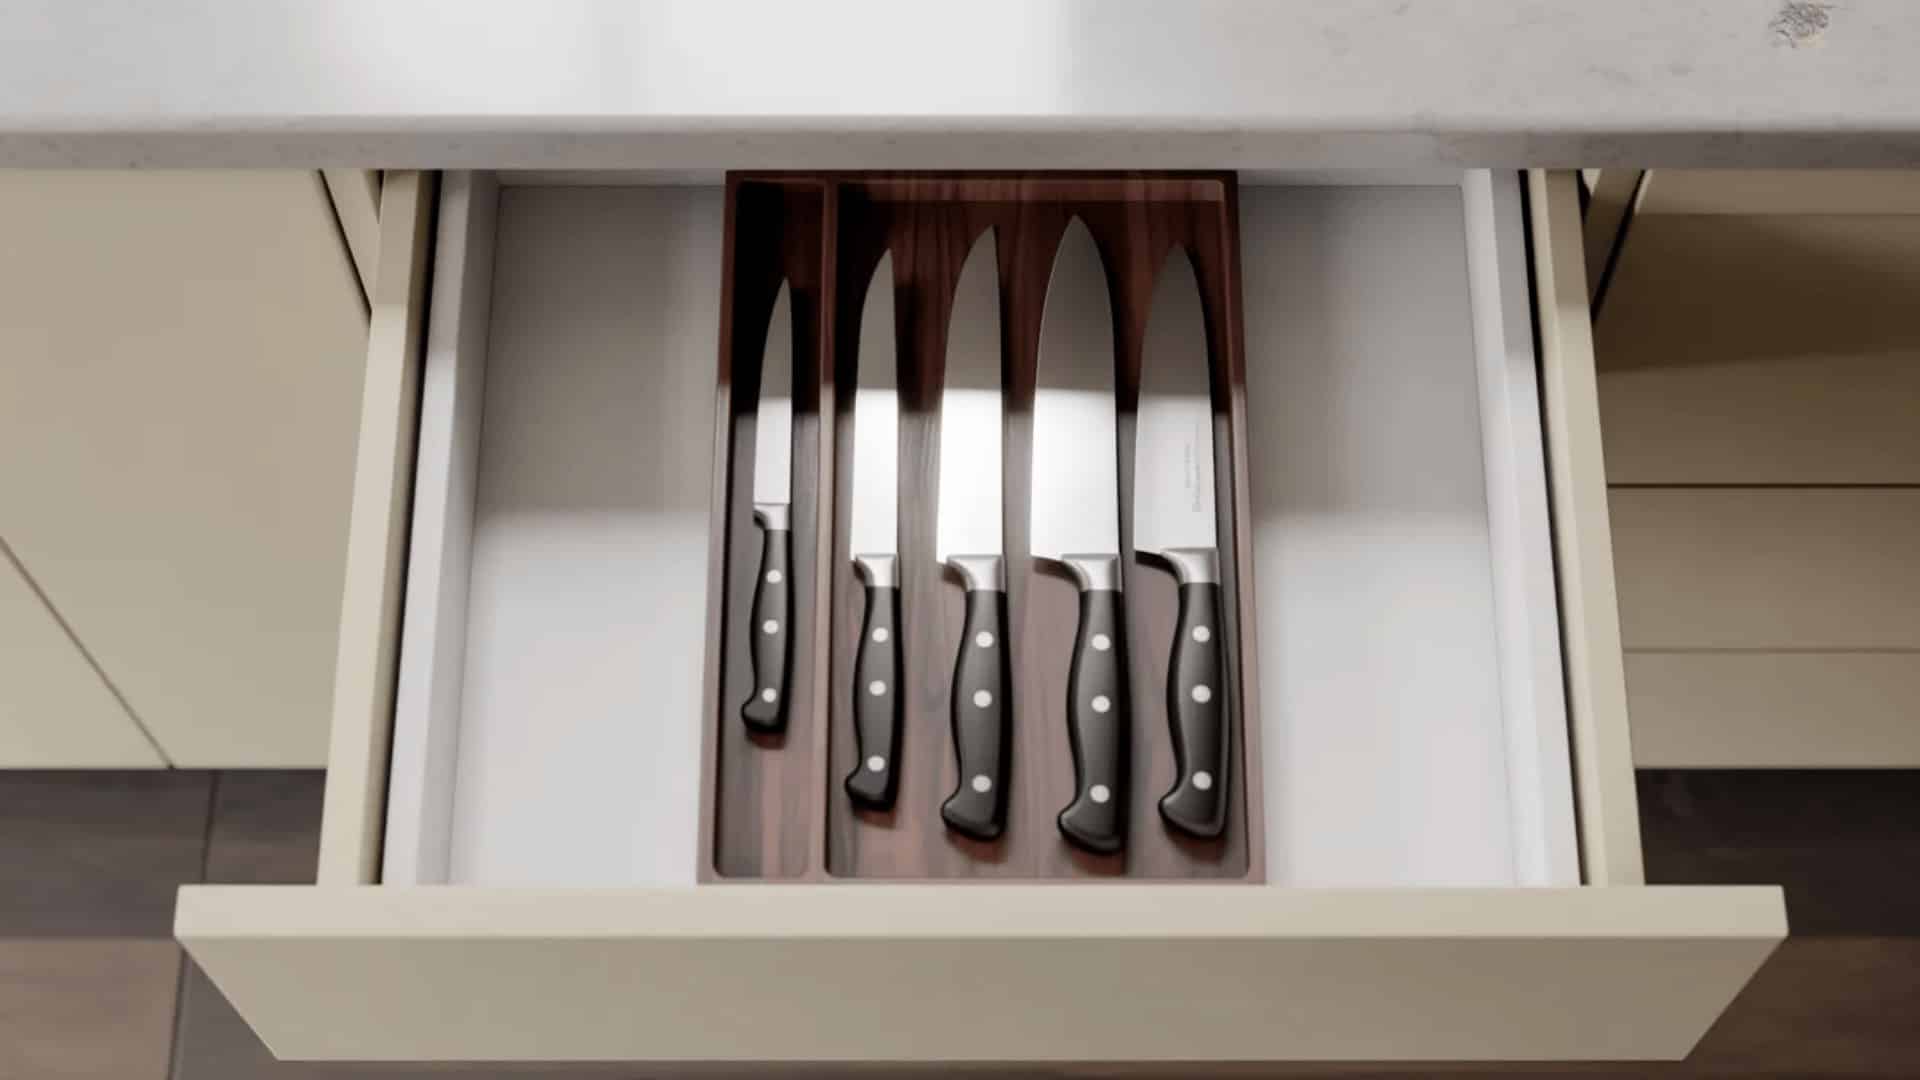
A drawer knife block keeps blades protected and fingers safe. Unlike countertop blocks, these sit flat inside a drawer and hold each knife in its own slot. I prefer this setup because it frees up counter space and keeps knives out of curious kids’ reach.
Look for one with a universal slot design so it fits different blade sizes. Always place the knife block in a drawer that’s out of reach for young children.
13. Add a Pegboard Drawer System

A pegboard drawer insert is one of the most flexible organizing tools available. Small pegs slot into a grid base, letting you create custom compartments for any combination of tools. I’ve configured mine three different ways over the years as my kitchen tools changed.
It’s ideal if you like having full control over layout. These systems are a bit pricier than basic trays, but the flexibility makes them worth every cent for serious home cooks.
14. Organize Tupperware With Container Dividers
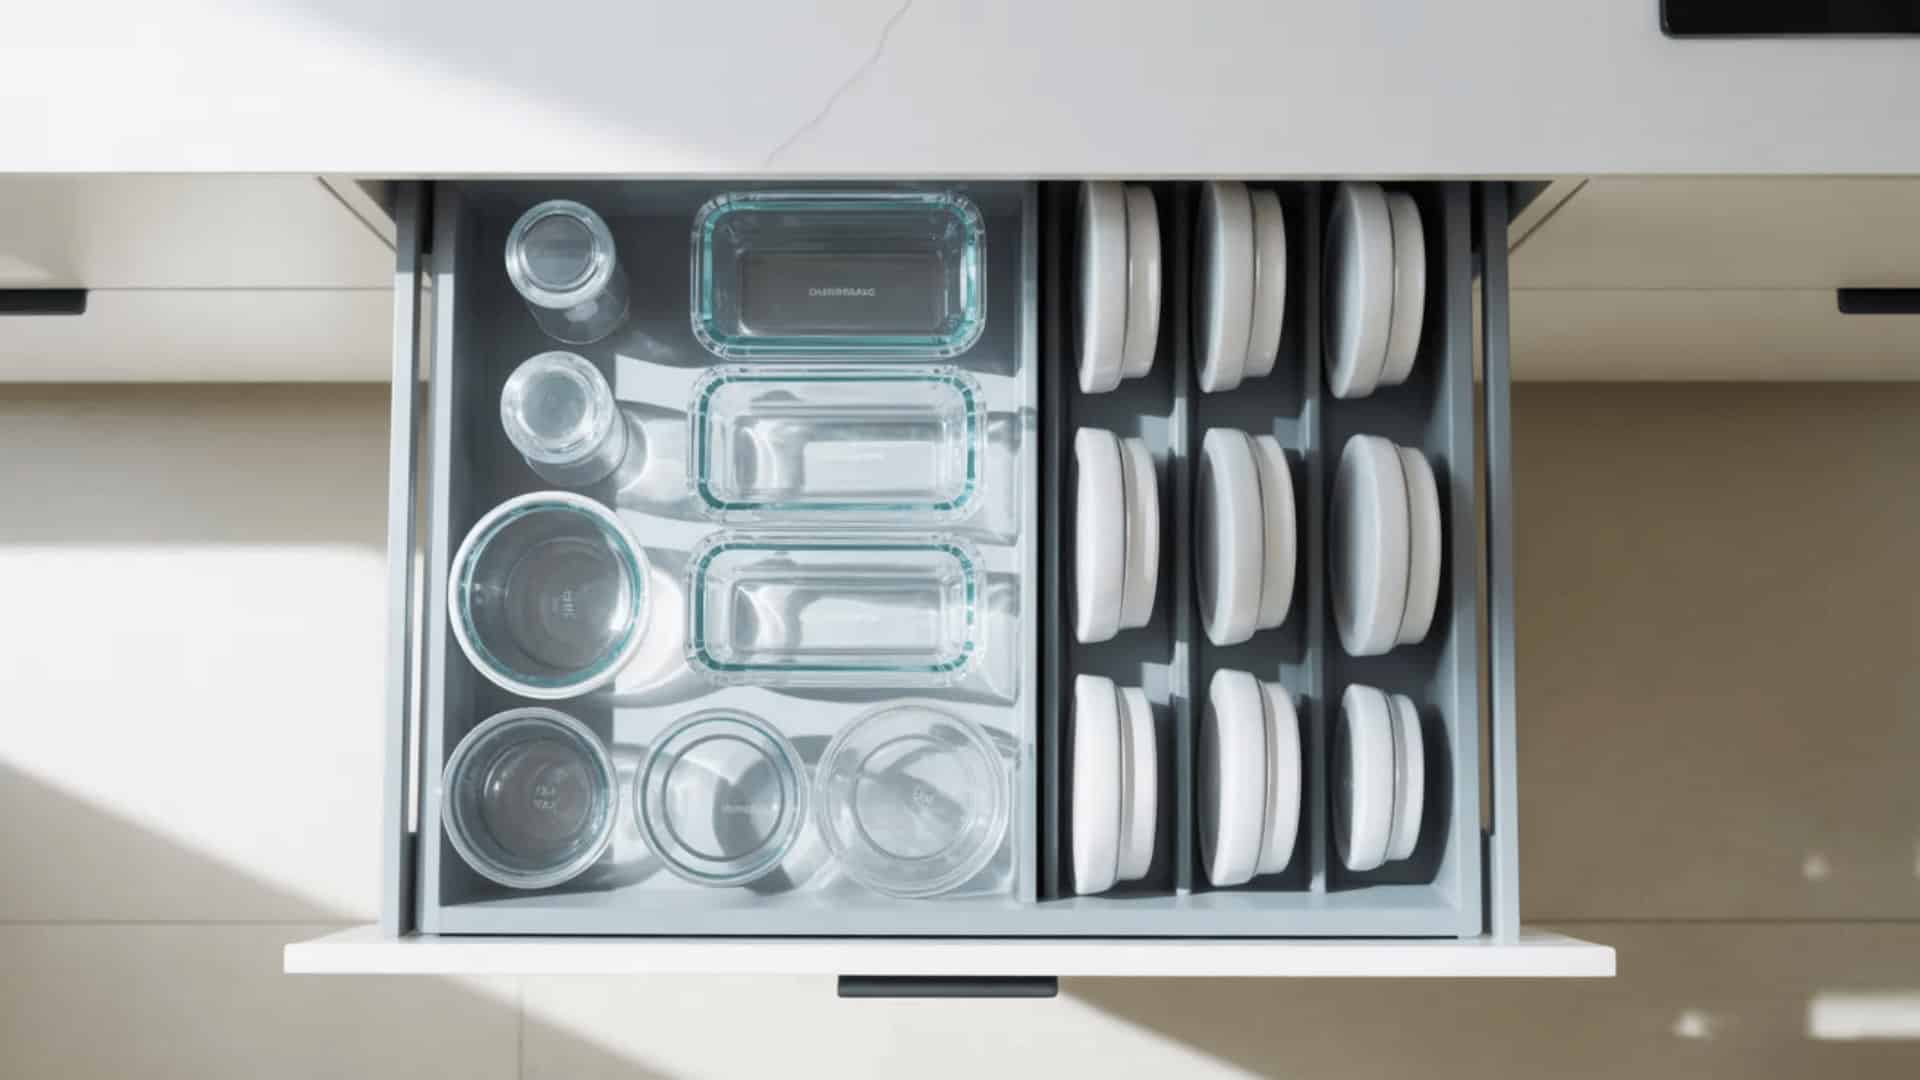
Tupperware drawers get messy fast when lids and containers aren’t stored together. Use dividers to create two clear zones, one for containers stacked by size, one for matching lids stored upright.
I sort mine by size so the right lid is always next to its container. This cuts down on that frustrating lid-hunting moment before lunch. It takes a few minutes to set up, but it saves time every single day after that.
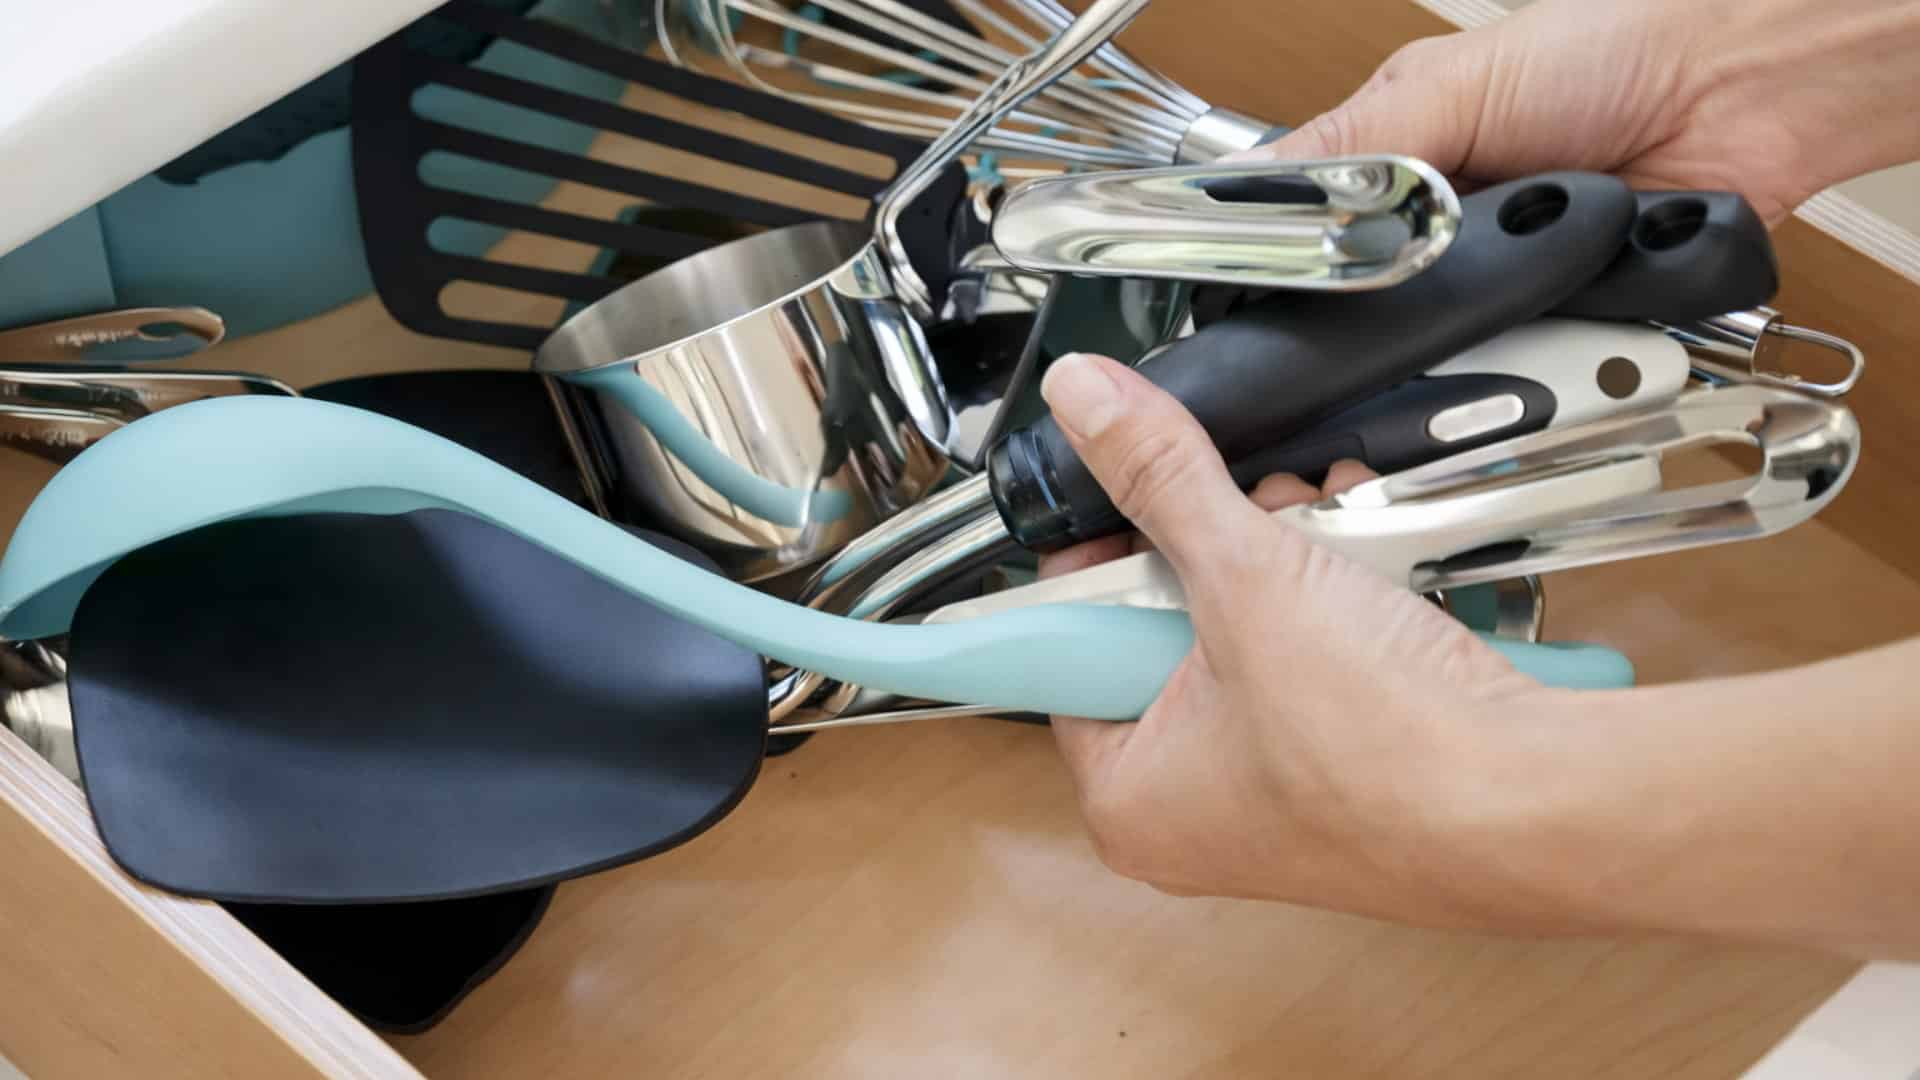
15. Keep Cooking Utensils Near the Stove
Location matters as much as organization. Cooking utensils, ladles, spatulas, and wooden spoons should live in the drawer closest to your stove. I rearranged my kitchen layout with this in mind, and it reduced unnecessary steps during cooking.
When your tools are right where you need them, the whole cooking process feels more natural. Think of it as building a logical workflow into your kitchen rather than just tidying up a drawer.
16. Use Stackable Trays for Small Tools
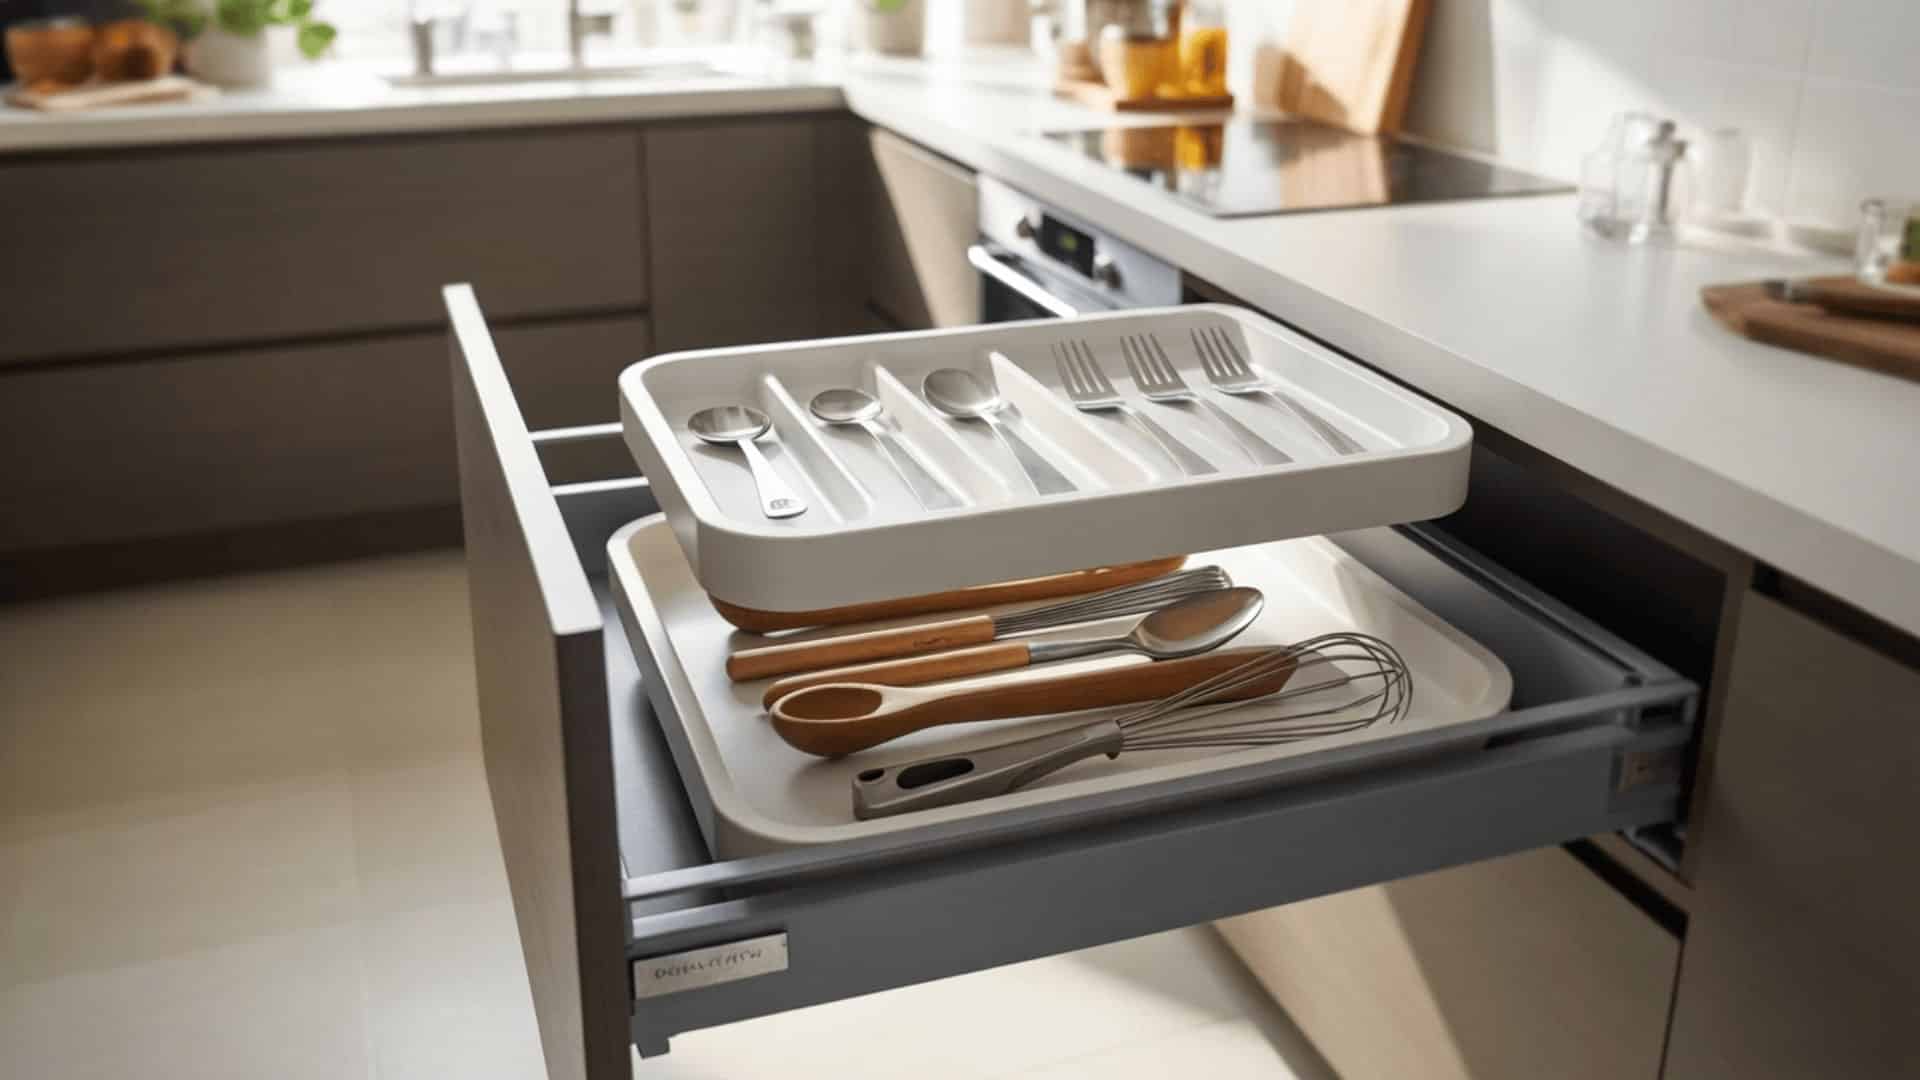
Stackable trays let you use vertical space inside deeper drawers. Place one tray on the bottom for larger items and stack a shallower tray on top for small tools like corn holders, cocktail picks, or butter spreaders.
I use this setup in a drawer that would otherwise feel half-empty. It doubles the usable space without adding any extra organizers to the outside of the drawer. A smart fix for drawers that are deeper than your tools are tall.
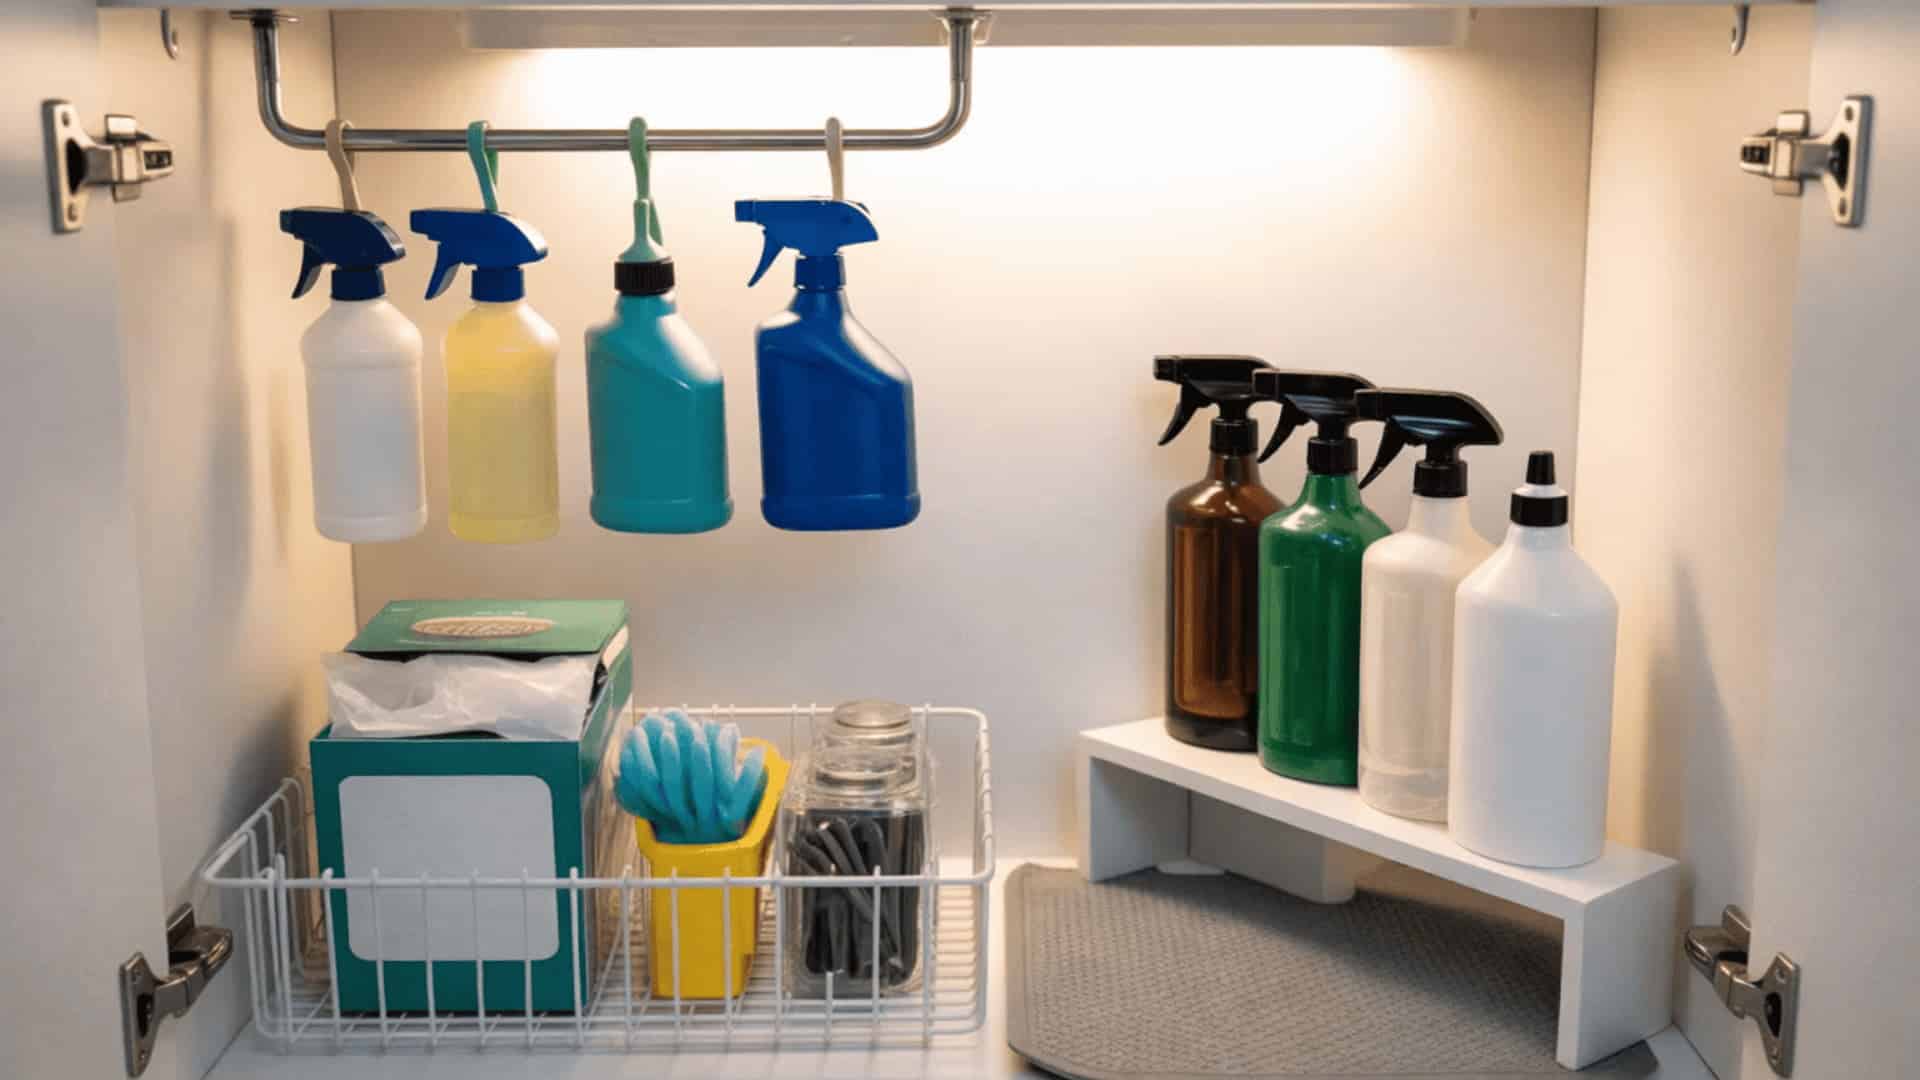
17. Create a Smart Kitchen Junk Drawer
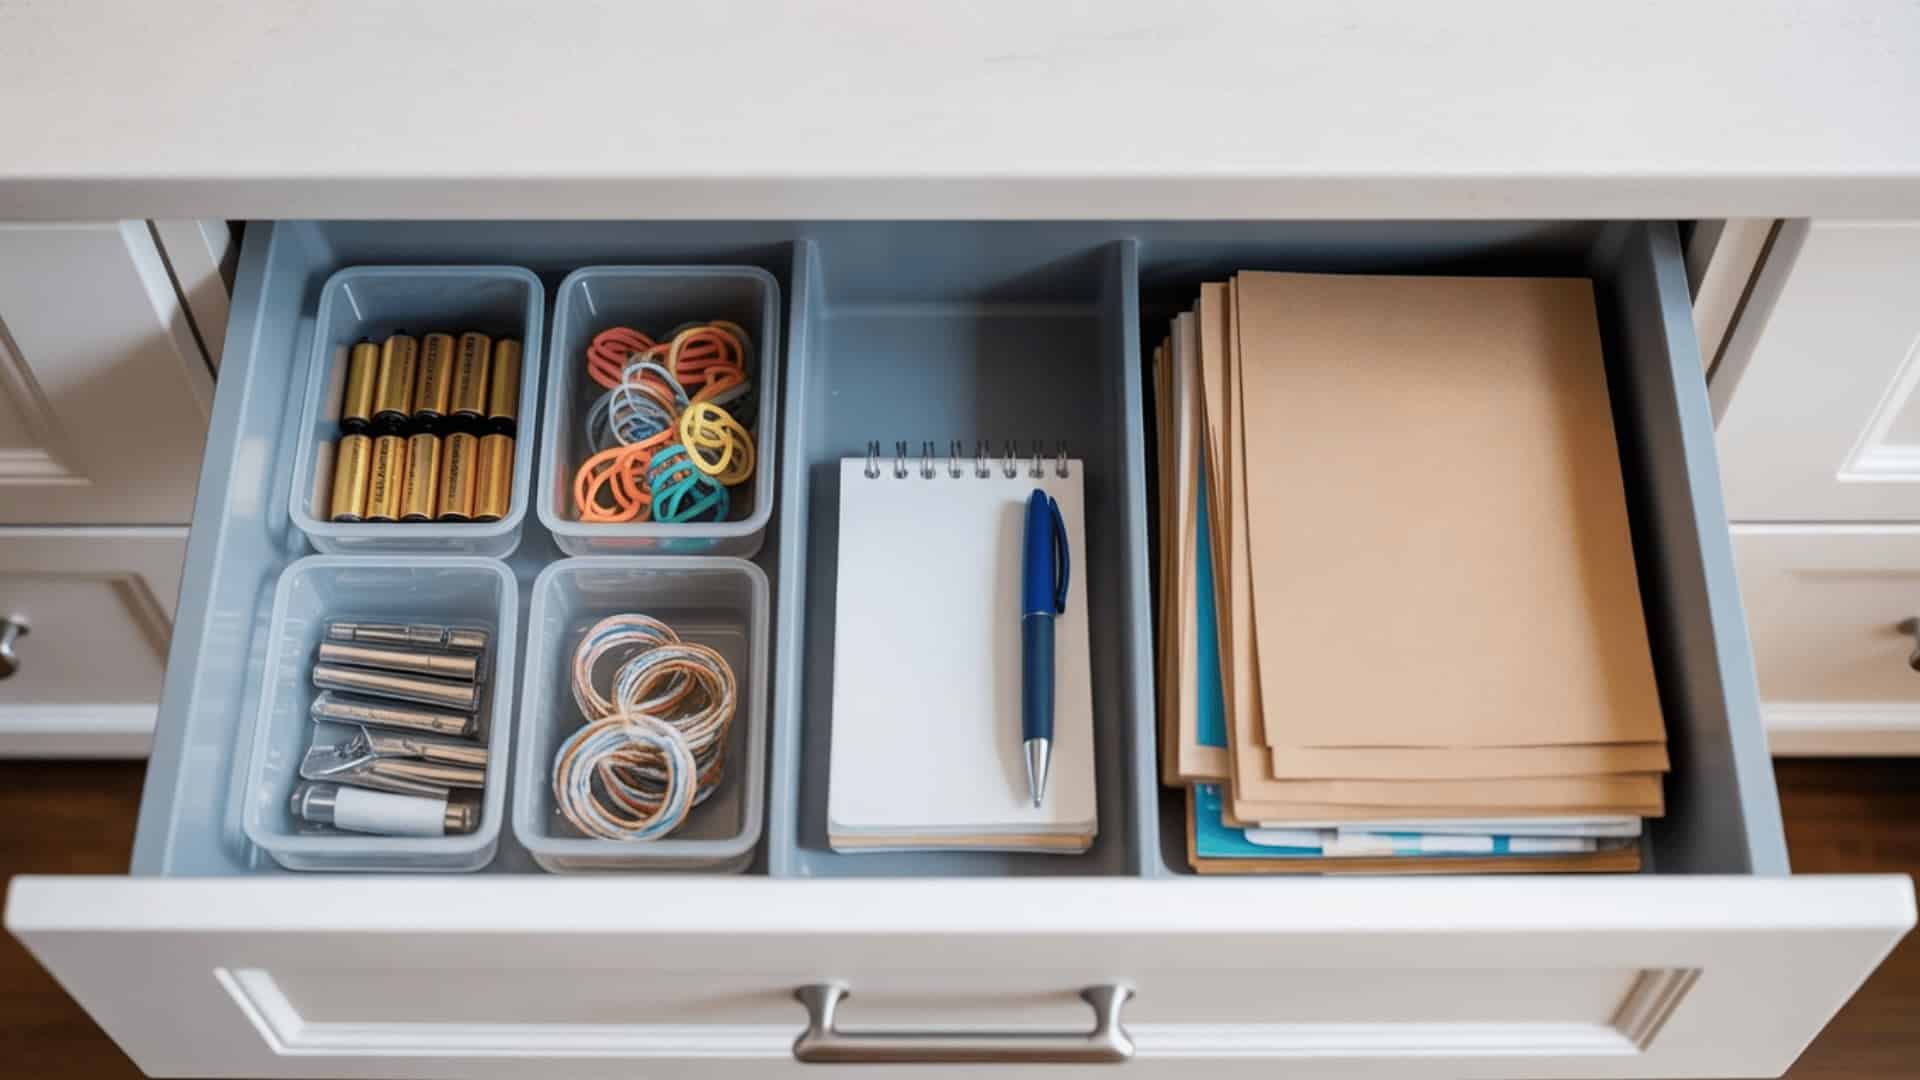
Every kitchen has a junk drawer; the trick is making it functional. Instead of letting it become a dumping ground, I give it structure. Small bins hold batteries, twist ties, and loose change separately.
A notepad and pen stay in a fixed spot. Takeout menus go in one section. The goal isn’t perfection, it’s knowing where things are. A well-organized junk drawer is actually used properly rather than avoided out of frustration.
18. Store Dish Towels in a Drawer Basket
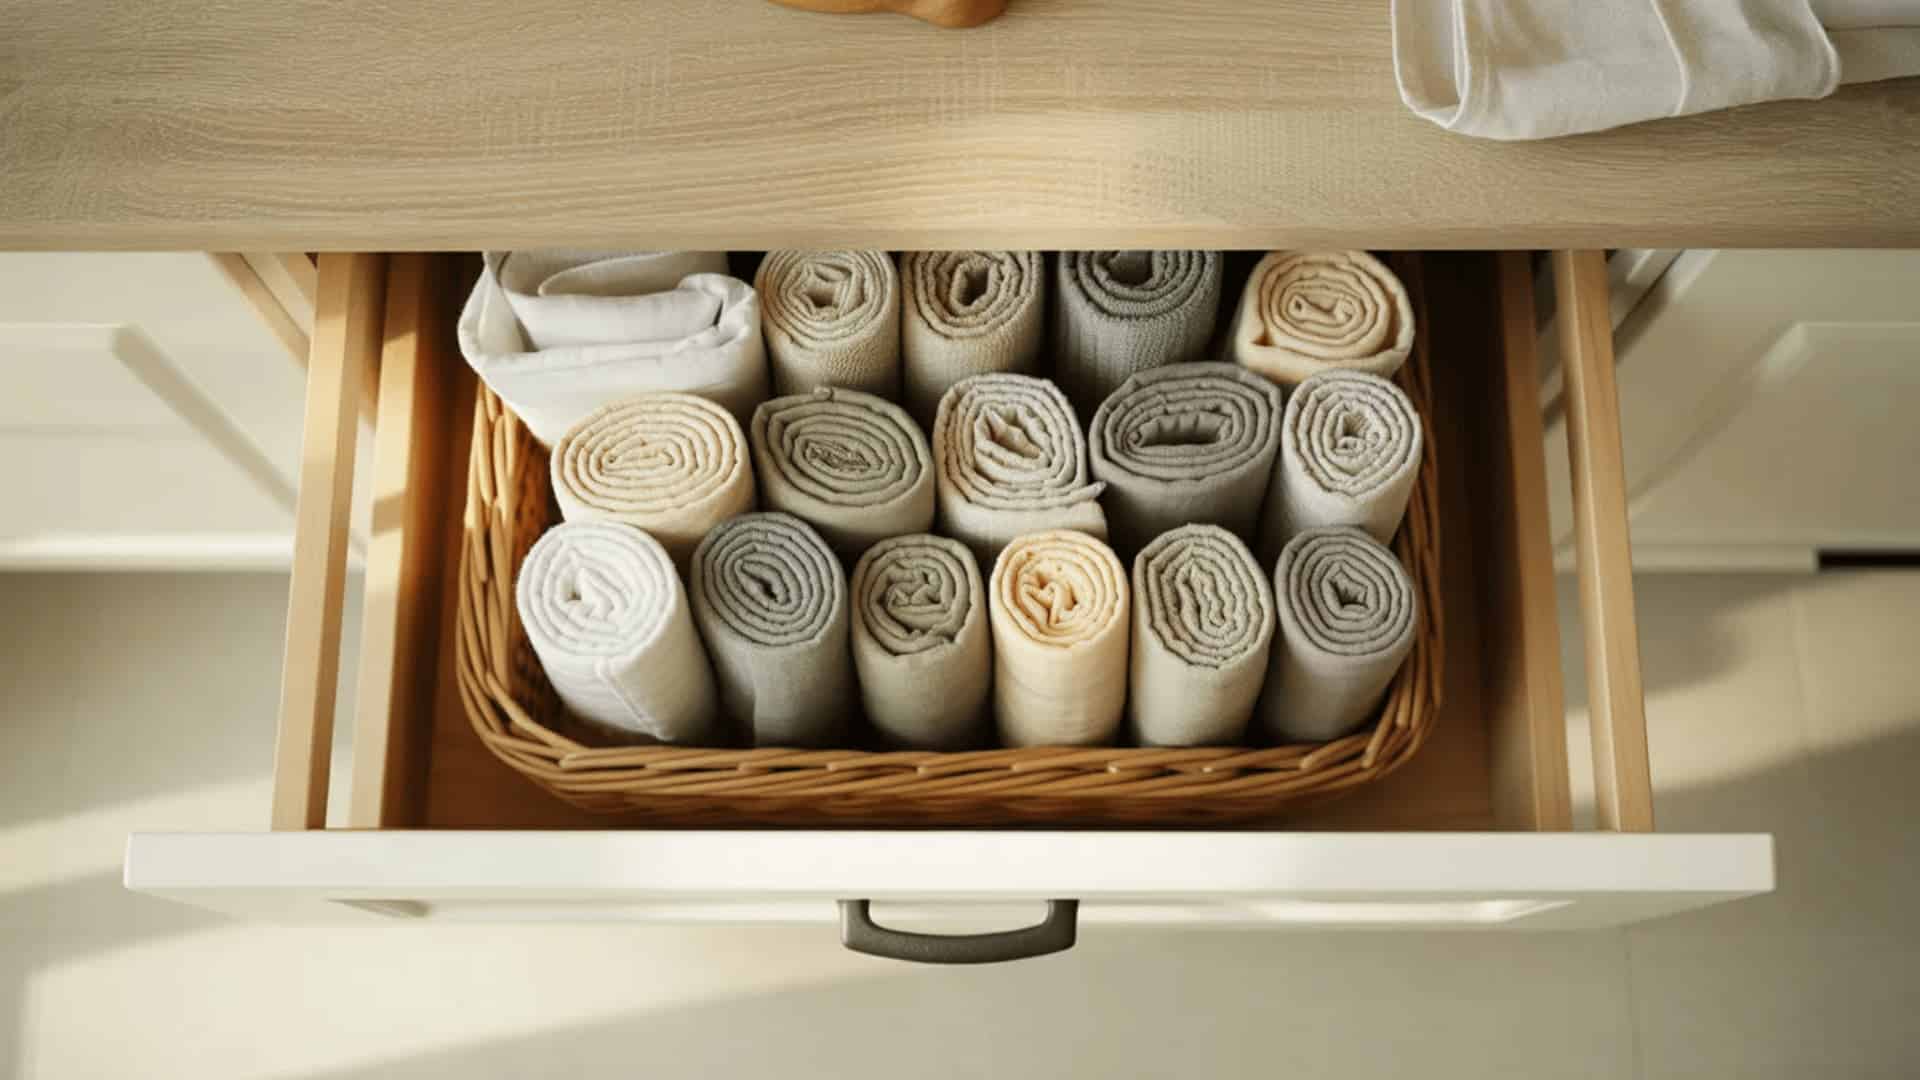
Dish towels folded and placed in a drawer basket stay neat and easy to grab. I roll mine vertically, the same way you’d store clothes in a suitcase, so every towel is visible at once.
A shallow basket keeps them contained without sliding to the back of the drawer. This also frees up hook space near the sink. It’s a small change, but having tidy, accessible towels makes the kitchen feel noticeably more put-together day to day.
19. Use Acrylic Bins for Spice Packets
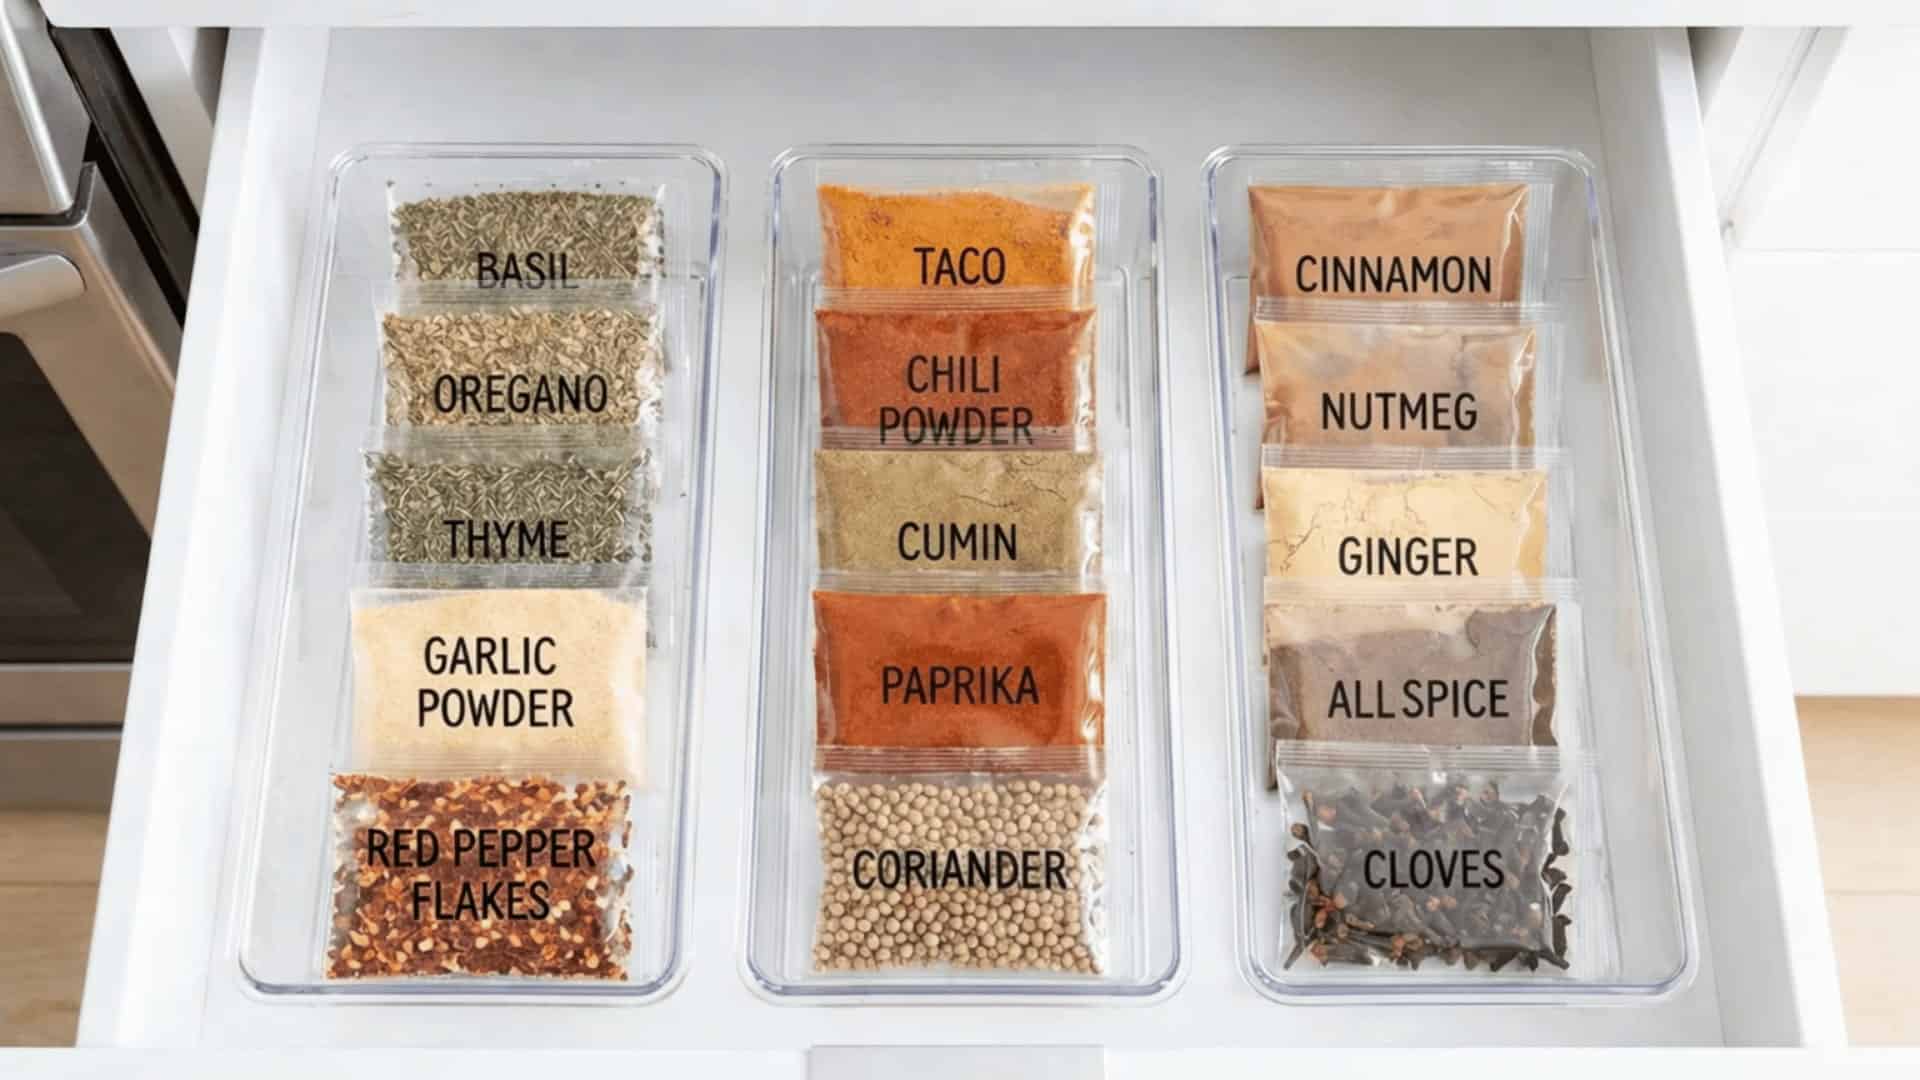
Loose spice packets, seasoning mixes, and sauce sachets pile up quickly. Clear acrylic bins keep them sorted and visible. I group mine by type, taco seasonings together, gravy packets together, so I can spot what I need instantly.
Acrylic bins are easy to wipe clean when packets leak, which they inevitably do. They also look clean and uncluttered inside a drawer, which makes the whole kitchen feel more organized, even if nothing else has changed.
20. Label Drawer Sections for Easy Access
Labels do one important thing: they make the system stick. When every section has a label, everyone in the household knows exactly where things belong. I use a simple label maker for this, though handwritten labels on masking tape work just as well.
Labels are especially helpful in shared kitchens or after a reorganization when habits are still forming. They remove the guesswork and make it far easier to maintain order over the long term.
21. Use Drawer Liners to Prevent Sliding
Drawer liners grip the bottom of the drawer and prevent organizers and tools from shifting when you open or close it. I use non-slip rubber liners in every kitchen drawer I organize.
They’re inexpensive, easy to cut to size, and simple to clean. Beyond keeping things in place, they also protect the drawer surface from scratches. Available in dozens of patterns and materials, liners are one of the simplest and most overlooked upgrades for any kitchen drawer setup.
22. Turn Deep Drawers Into Pot and Pan Storage
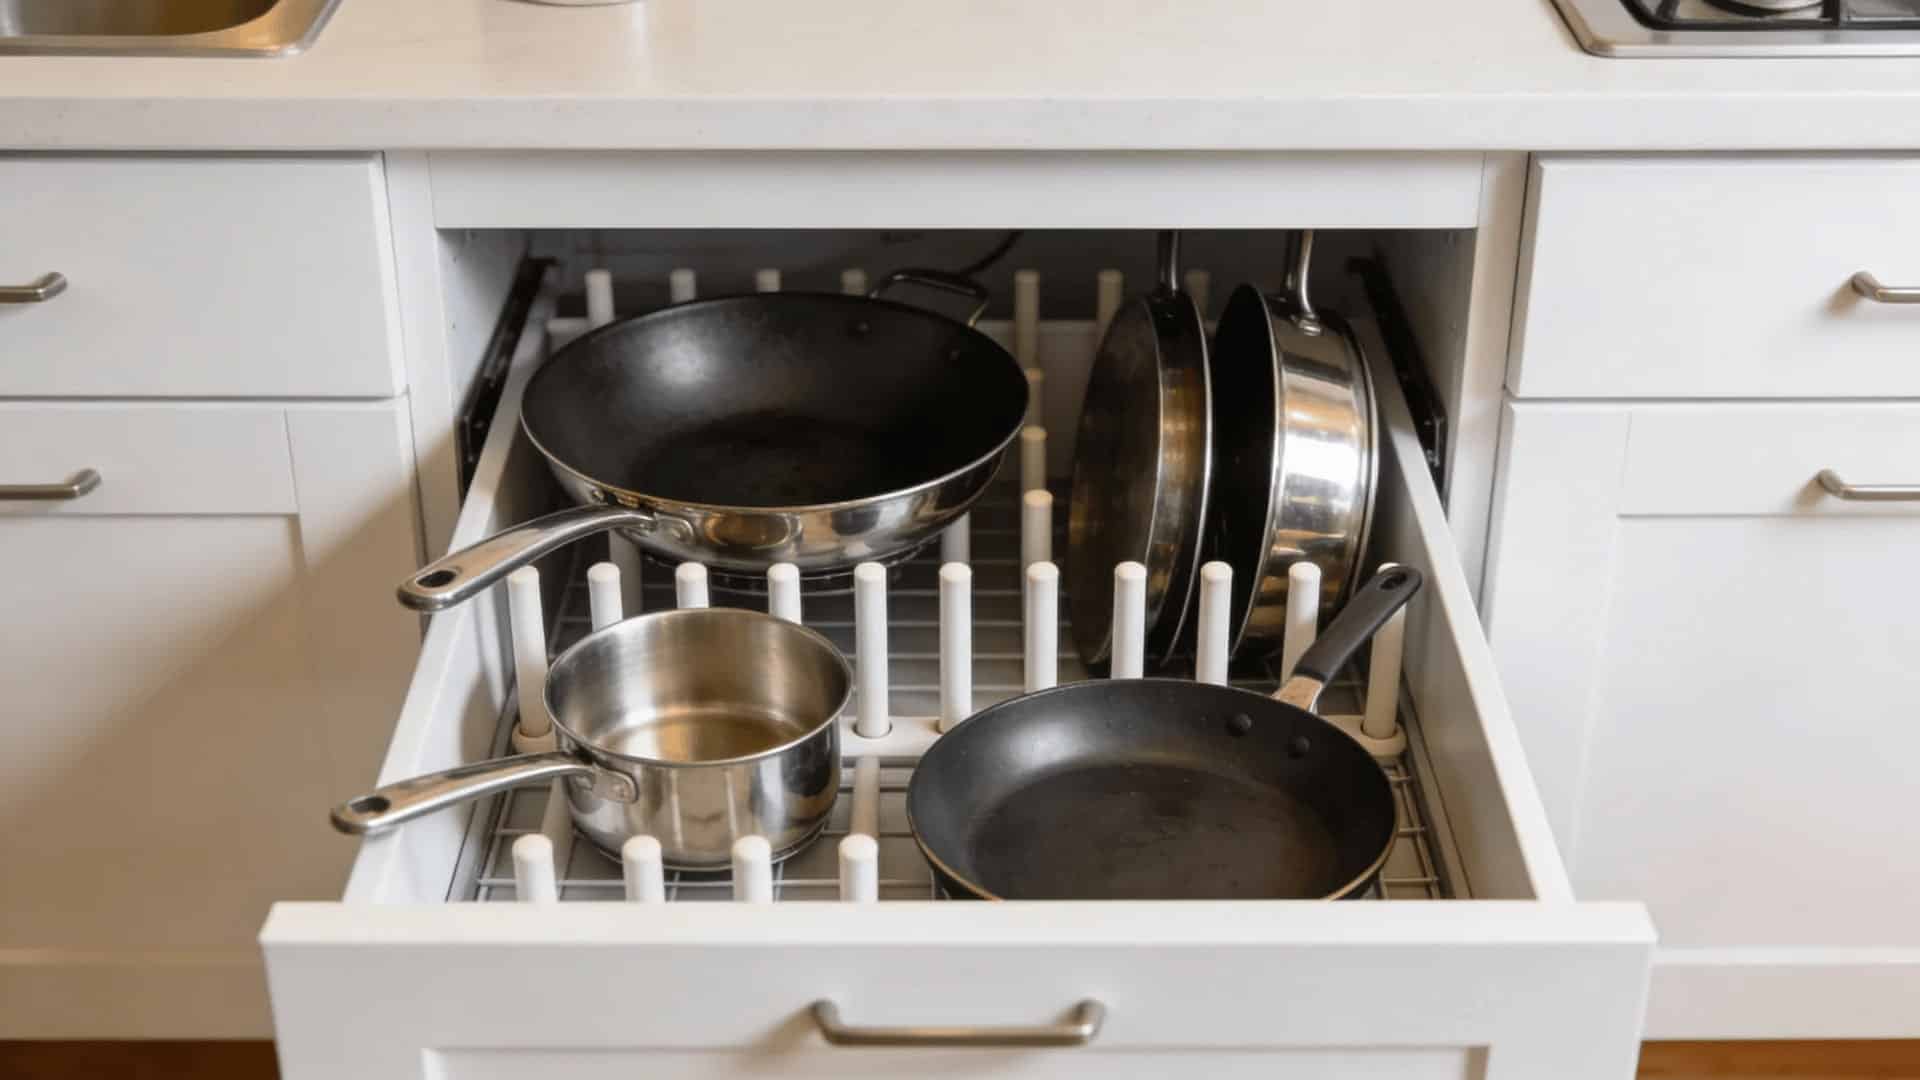
Deep drawers are perfect for pots and pans when fitted with the right dividers. Standing pans upright rather than stacking them keeps every piece accessible without lifting anything off the top.
I added vertical peg dividers to a lower cabinet drawer, and it completely changed how I access cookware. Pair this with a separate lid drawer, and you’ll never deal with an avalanche of pans again. It’s one of the most practical layout changes you can make.
23. Repurpose Ice Cube Trays for Tiny Kitchen Tools
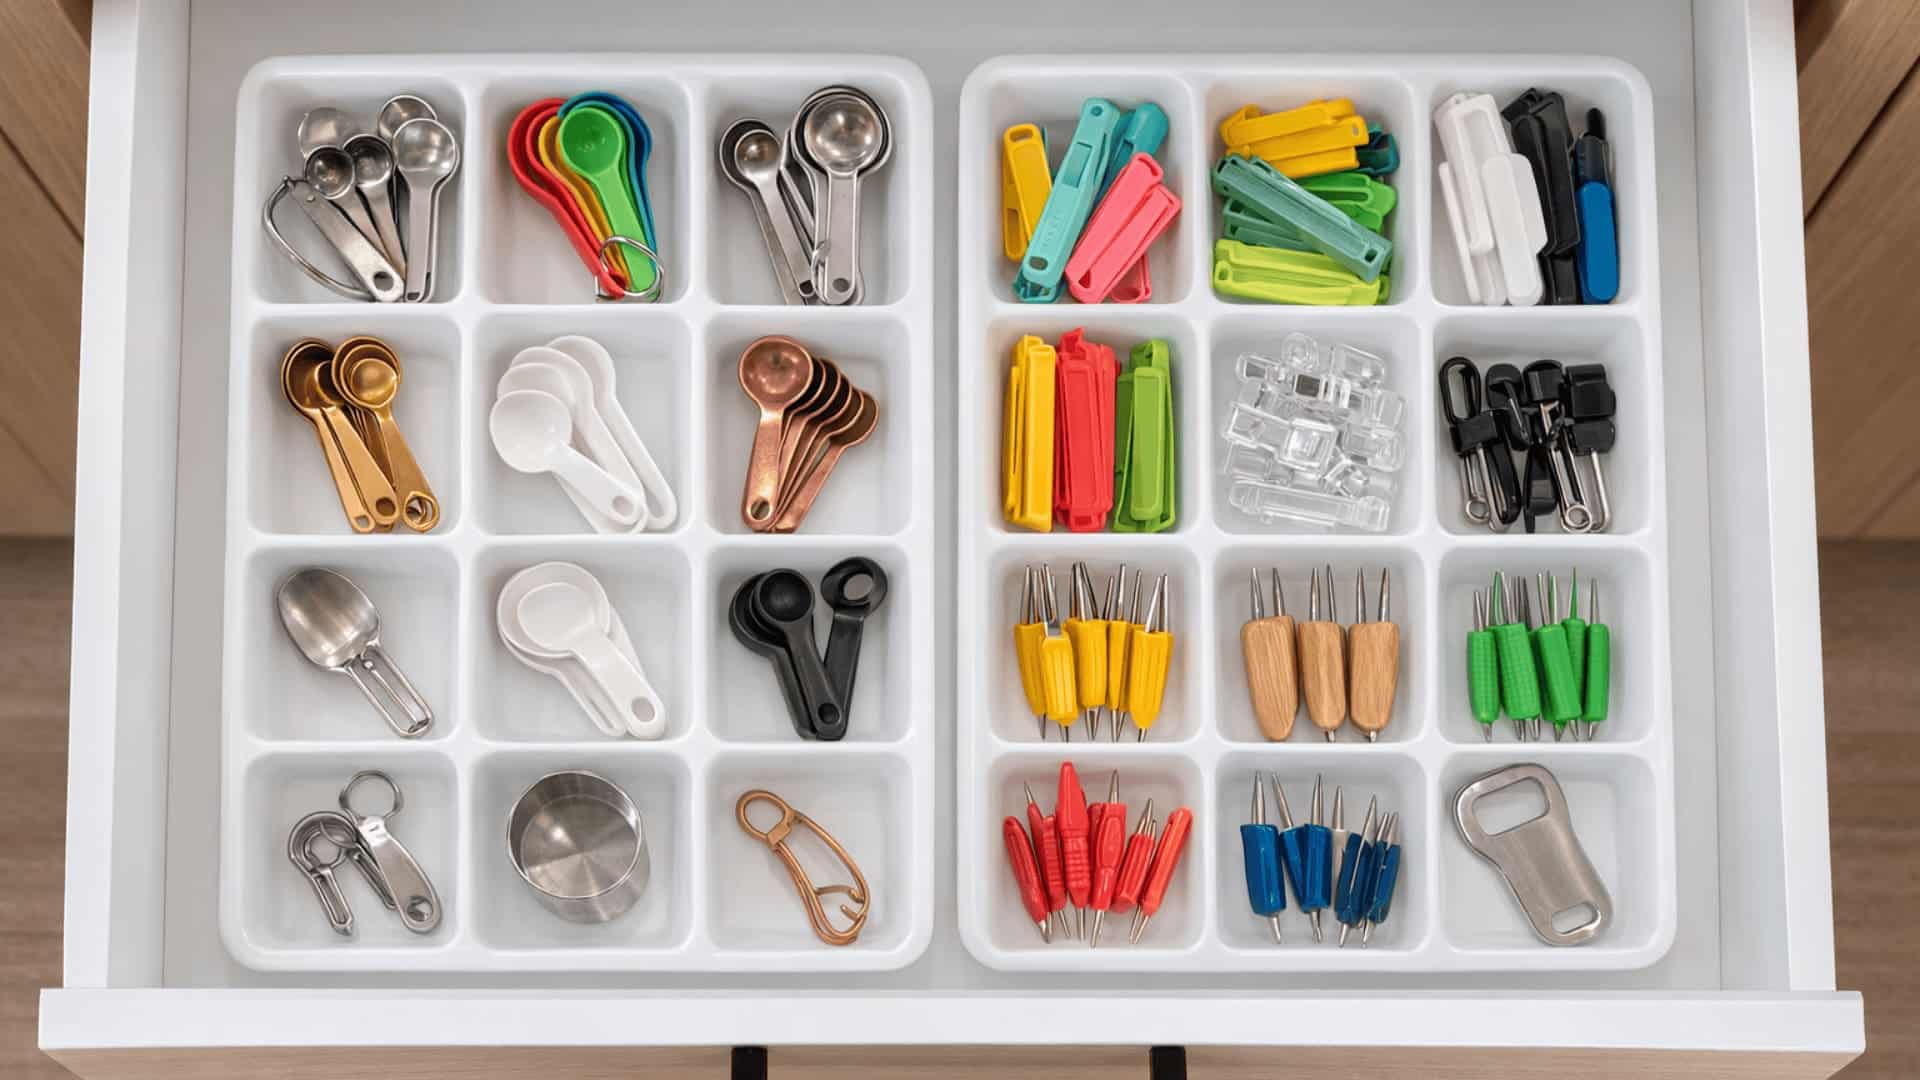
Ice cube trays are one of the most overlooked drawer organizers in any kitchen. Each square holds exactly one small item: a single measuring spoon, a bag clip, a bottle opener, or a corn holder.
I’ve lined two trays side by side in a shallow drawer, and it works perfectly for corralling tiny tools that usually end up scattered everywhere. Costs nothing, requires zero effort, and uses something you likely already own.
Step-by-Step Kitchen Drawer Organization
Tools and Materials
| Tools | Materials |
|---|---|
| Hand saw or small saw | Plywood boards |
| Iron | Wood veneer edge banding |
| Sandpaper or an electric sander | Wood glue (optional) |
| Measuring tape | Clear wood stain or finish |
| Pencil | Plastic bins or drawer organizers |
| Clamps or reusable adhesive strips (optional) | Drawer contents to organize |
Step 1: Empty the Drawer, Clean It, and Plan the Layout
Start by removing everything from the kitchen drawer. Take a moment to look at the space and notice what types of items are stored there. This helps you understand how the drawer is currently used.
Next, wipe the drawer clean and remove broken or unused items. Use a measuring tape to check the drawer’s width, depth, and height.
Then think about how you want to group items like utensils, containers, or kitchen tools. Sketch a simple layout so you know where each divider will go.
Step 2: Cut Plywood Strips for the Dividers
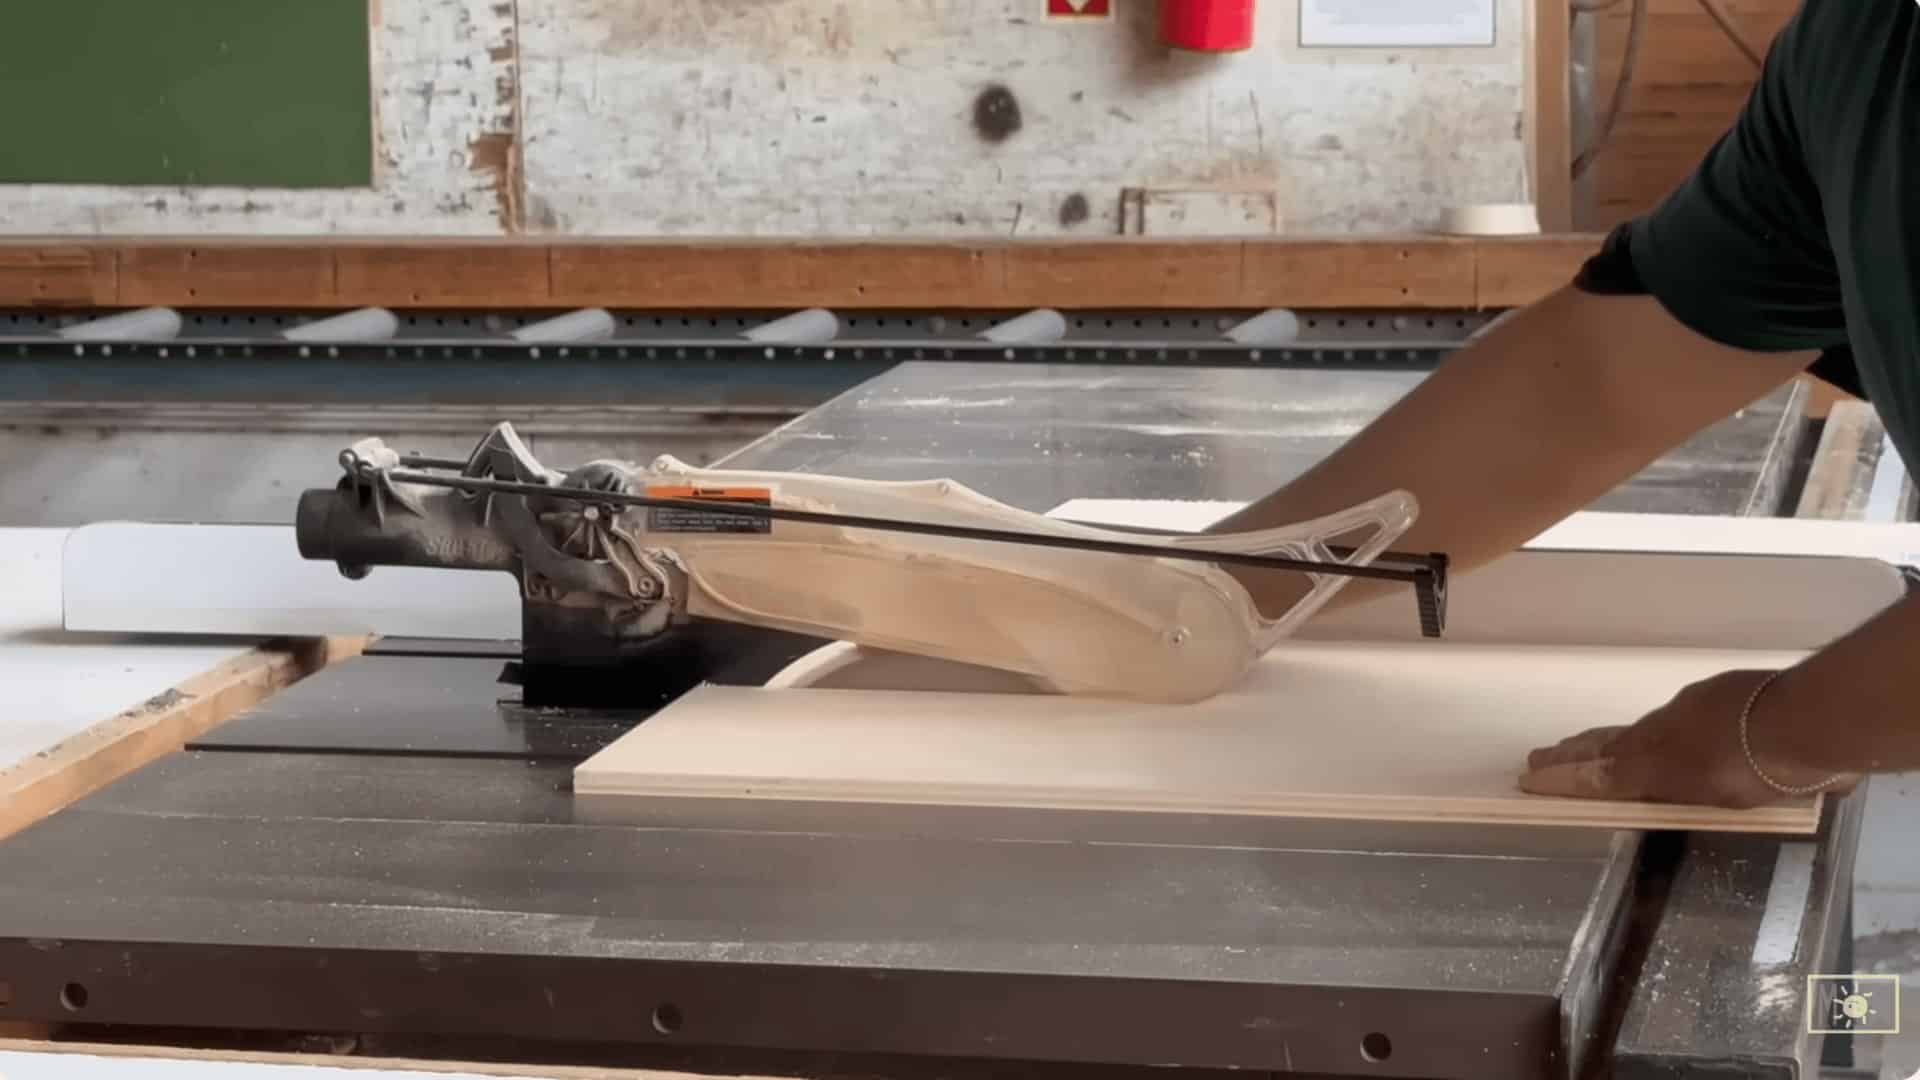
Cut the plywood into narrow strips that are the same height as the drawer. These strips will act as the dividers. Use a saw to trim them to the exact lengths needed for each section.
Cutting carefully ensures the pieces fit tightly and stay stable inside the drawer.
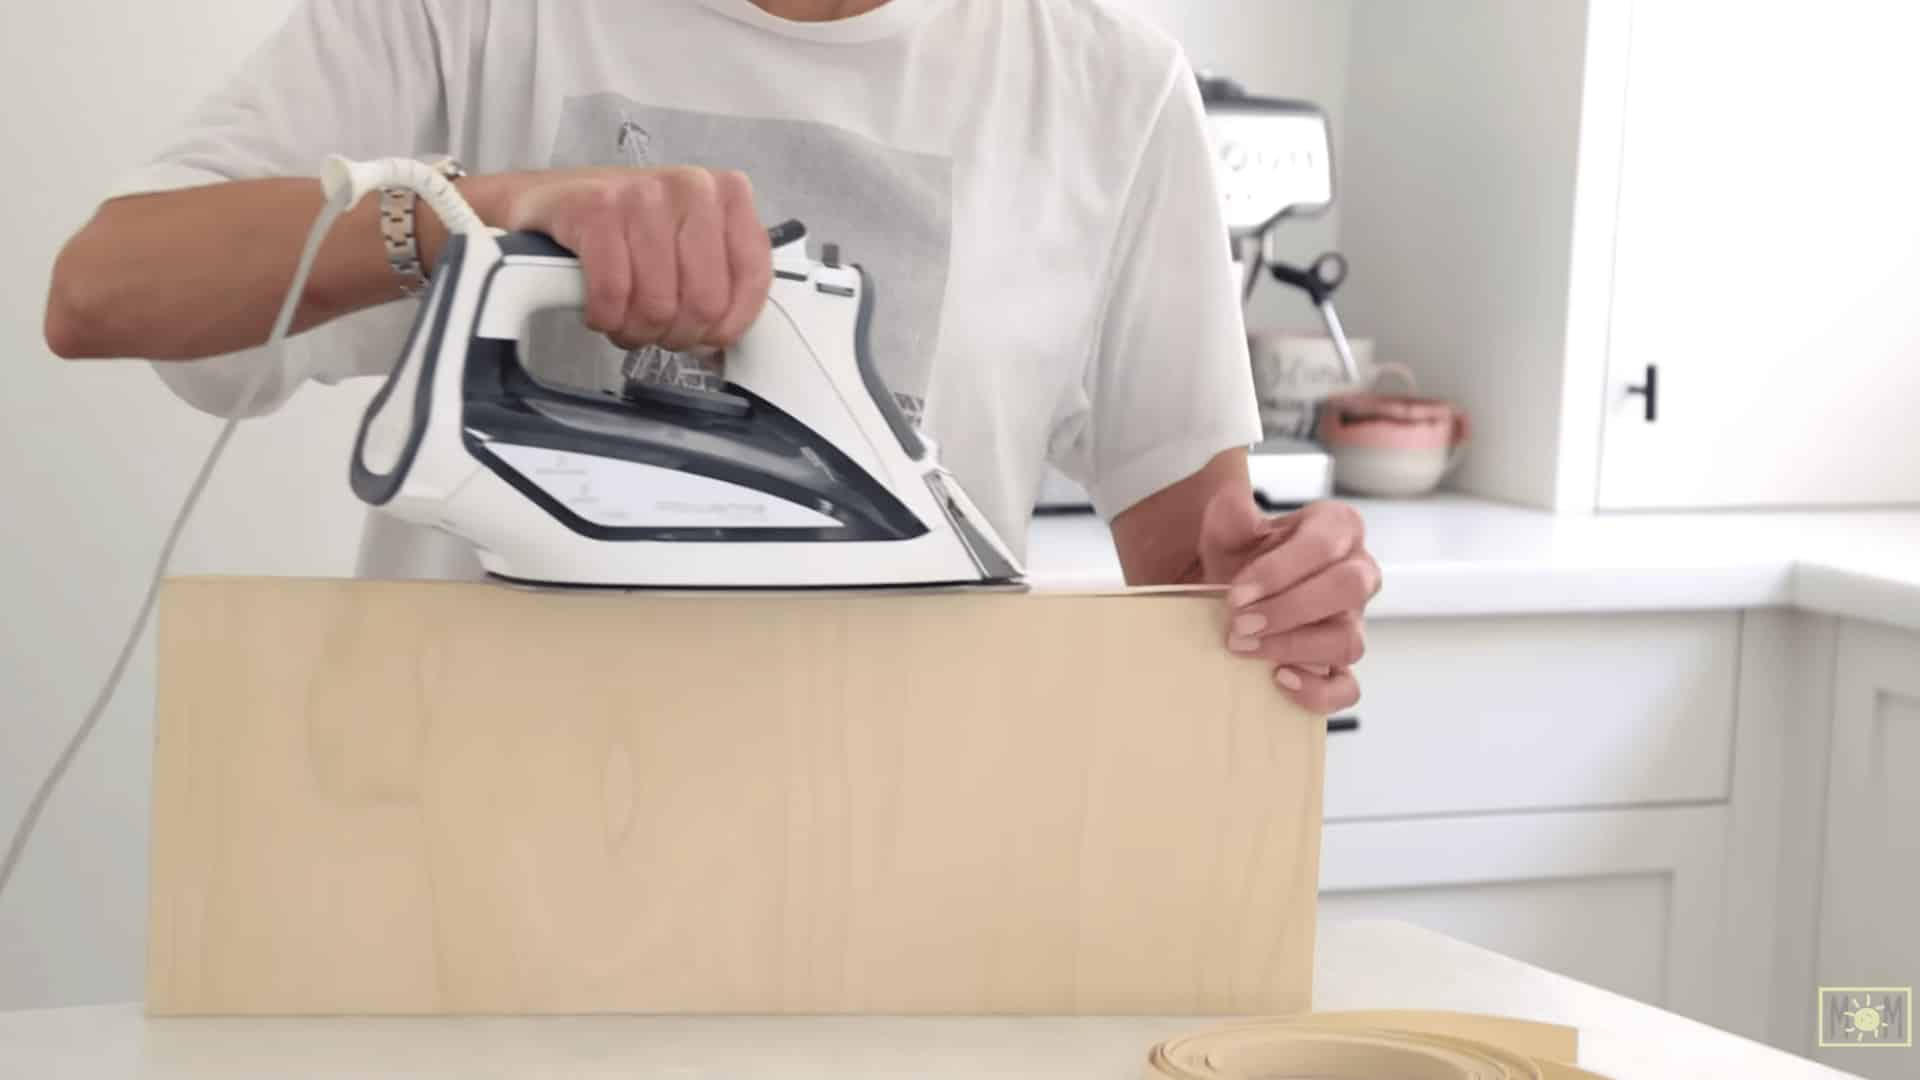
Step 3: Apply Edge Banding for a Clean Finish
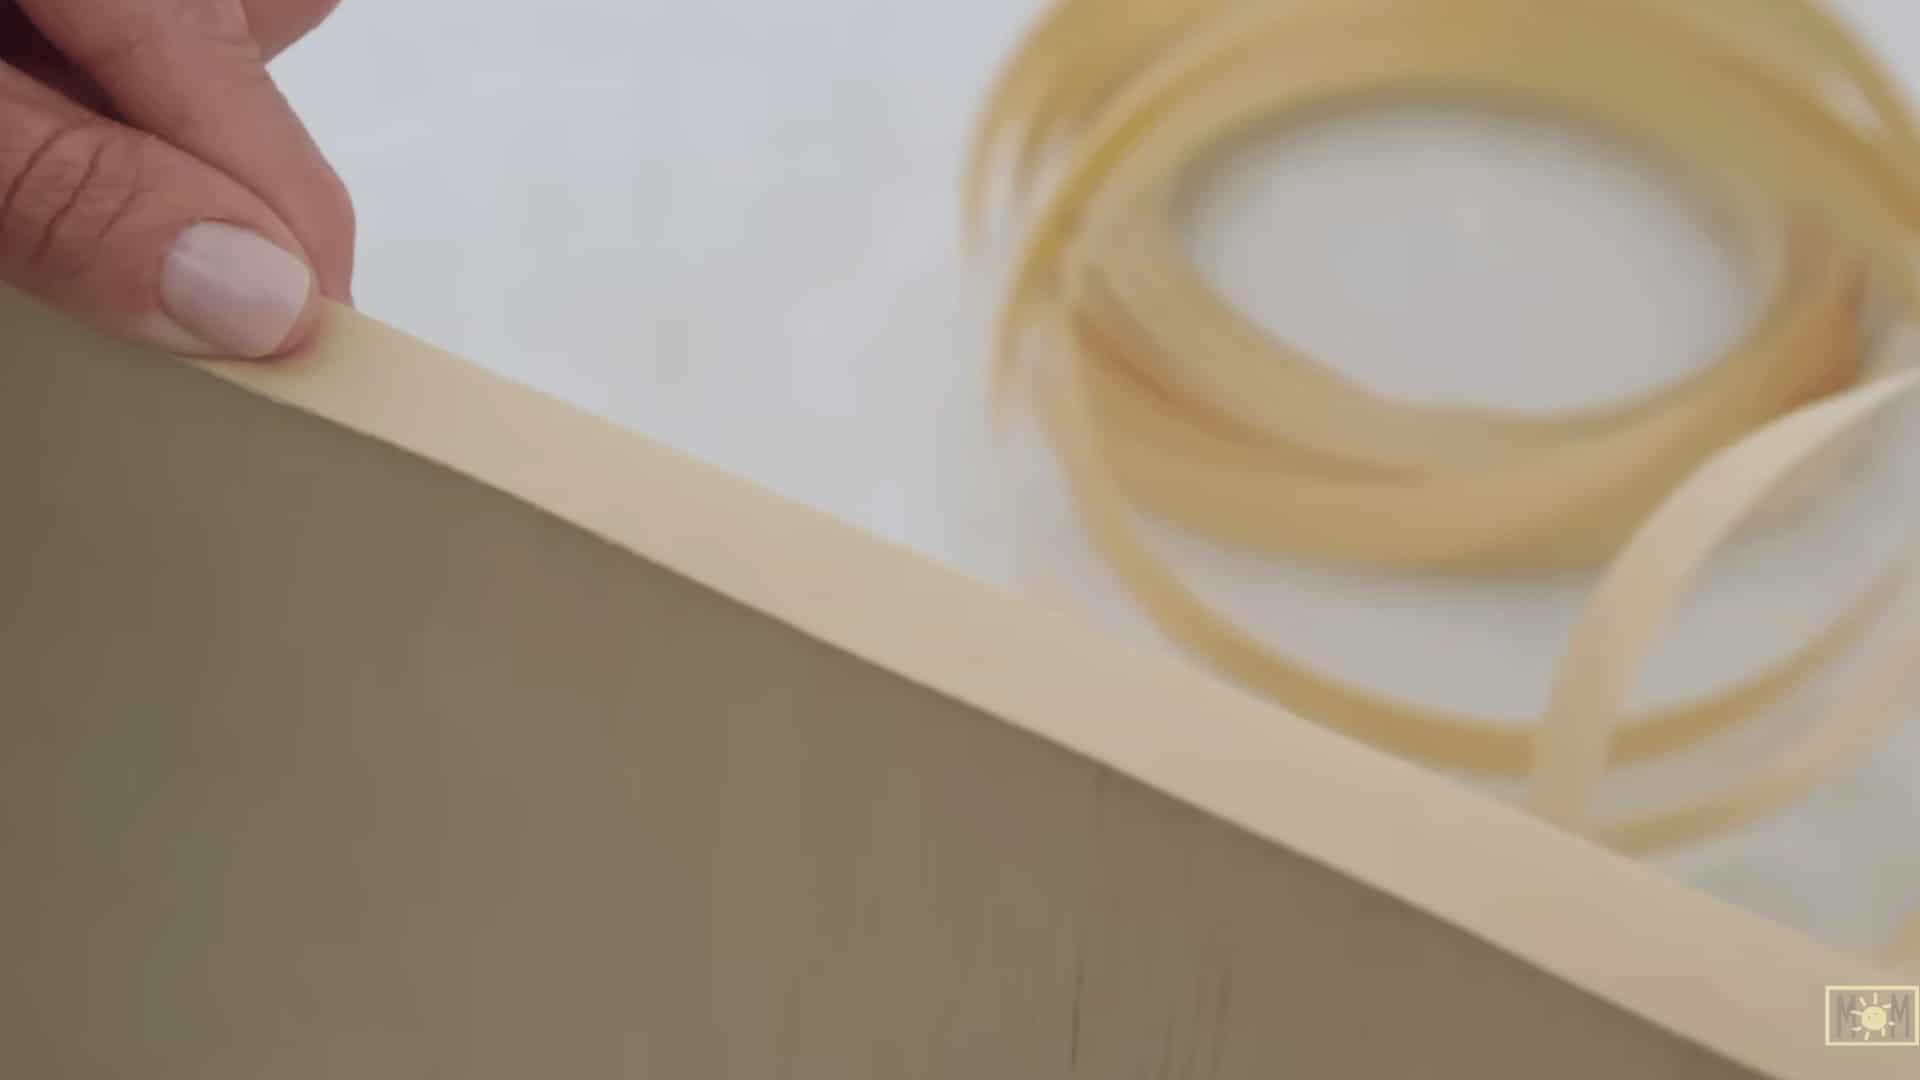
Place wood veneer edge banding along the exposed plywood edges. Run a warm iron slowly across the banding to melt the glue and attach it to the wood.
After it cools, sand the edges lightly so the dividers look smooth and finished.
Step 4: Sand and Seal the Wood
Smooth the wood surfaces with sandpaper or a sander. Then apply a thin coat of clear wood stain or protective finish. This step helps the dividers last longer and gives them a polished appearance.
Allow the finish to dry fully before placing them inside the drawer.
Step 5: Install the Dividers in the Drawer
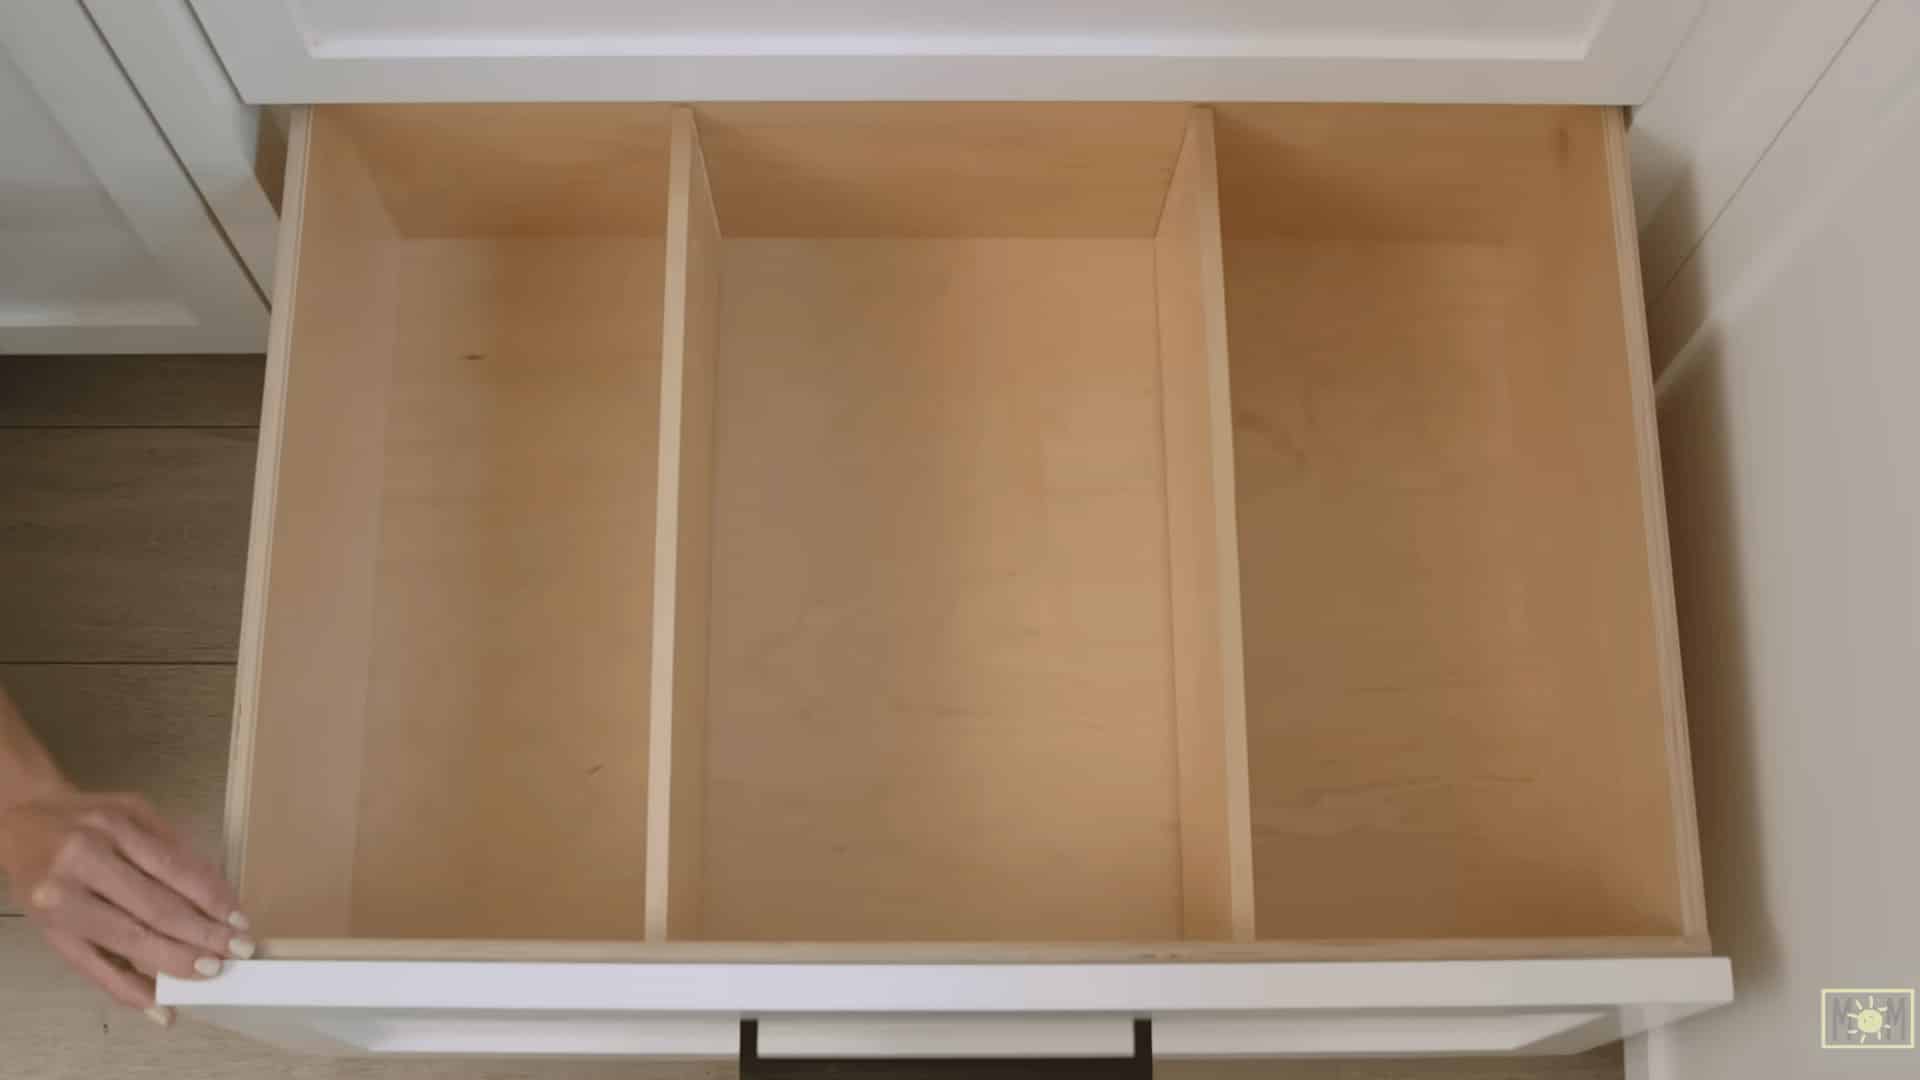
Place the wooden strips inside the drawer according to your planned layout. If the measurements are accurate, the tension between the sides should hold them in place.
For extra stability, you can add small amounts of wood glue or reusable adhesive strips.
Step 6: Sort and Return Items to the Drawer
Organize your kitchen items into the new sections. Store similar items together, such as containers, utensils, or cooking tools. Use small bins or organizers to group loose items.
Adjust the arrangement until everything fits comfortably and is easy to reach.
For more information, refer to the video below:
How to Choose the Right Kitchen Drawer Organizers
The right organizer depends on your drawer and what you put in it. Here’s what to check before buying anything:
- Drawer size: Measure width and length first; organizers that don’t fit create more problems than they solve.
- Drawer depth: Shallow drawers need low-profile trays; deep drawers can handle stackable or upright divider systems.
- Type of kitchen tools: Bulky items like ladles need wider compartments; small tools like peelers need narrower, defined slots.
- Budget options: Bamboo trays and expandable organizers offer good value; acrylic and pegboard systems cost more but last longer.
- Adjustable vs fixed organizers: Adjustable options flex as your needs change; fixed organizers work best when your drawer contents stay consistent.
Take stock of what you own before spending anything. A well-chosen organizer lasts years; the wrong one just adds to the clutter.
The Bottom Line
Messy drawers slow you down more than you realize, until they don’t anymore. Once you have a system in place, cooking feels noticeably easier. The right tool is always where you left it, and you spend less time searching and more time actually cooking.
The ideas in this guide show that how to organize kitchen drawers doesn’t have to be complicated. A few dividers, some thoughtful grouping, and a drawer liner or two can completely change how your kitchen functions day to day.
Start with just one drawer this week. See how it feels. Then move to the next.
Found an idea that worked for you? Drop it in the comments, I’d love to hear what made the biggest difference in your kitchen.