I still remember thinking landscaping had to be complicated until I realized how powerful simple choices can be.
If you’re looking at your yard and wondering how to make it look clean, structured, and low-maintenance without constant effort, you’re in the right place.
In this guide, I’ll walk you through how rock landscaping ideas, why it’s such a smart long-term upgrade, and how you can start converting your own space step by step.
You don’t need a huge budget or professional help to get results that look intentional and polished. You just need the right ideas, a bit of planning, and the confidence to begin and build something you’re genuinely proud to come home to.
What Is Rock Landscaping and How Does It Work?
Rock landscaping is the practice of using natural or decorative stones to design and organize outdoor spaces with purpose and style.
Rocks change the look of your yard by adding structure, clean lines, and a polished layout that other materials simply can’t replicate. They bring a sense of order while still feeling natural and effortless.
They also create visual weight, helping define different areas of your space without the need for heavy construction. Whether you choose smooth river pebbles, jagged boulders, or crushed gravel, each type adds its own distinct character and texture.
You can use landscaping rocks throughout your entire property, including:
- Front yards: Create a strong first impression with clean, structured designs
- Backyards: Build a calm, low-maintenance space for relaxation
- Slopes and hillsides: Prevent soil erosion while maintaining a neat, grounded appearance
With the right placement, rocks do more than decorate; they shape, organize, and stabilize your outdoor space.
Benefits of Using Landscaping Rocks
Landscaping rocks aren’t just visually appealing; they’re one of the smartest long-term investments you can make for your outdoor space:
- Low upkeep: Rocks require virtually no watering, mowing, or replanting, saving you time and ongoing maintenance costs.
- Long-lasting: Unlike mulch or plants, rocks don’t decompose, fade quickly, or need frequent replacement season after season.
- Helps with drainage: Rocks allow rainwater to filter through naturally, reducing puddles, runoff, and waterlogging in problem areas.
- Works in small and large spaces: Whether you have a compact urban yard or a sprawling property, rocks scale beautifully to fit any size.
- Suppresses weeds: A solid layer of landscaping rock blocks sunlight from reaching the soil, significantly reducing unwanted weed growth.
- Water conservation: Rock-heavy landscapes use significantly less water than traditional lawns. For homeowners in drought-prone regions or areas with water restrictions, this is a practical and increasingly necessary choice.
- Property value: A well-executed rock landscape can improve curb appeal in ways that translate to real resale value. Low-maintenance outdoor spaces are consistently cited by real estate agents as a selling point for busy buyers.
From curb appeal to practical function, landscaping rocks deliver results that go far beyond looks: making them a reliable, cost-effective choice for homeowners who want a yard that works as hard as it looks good.
Rock Landscaping Ideas You Can Start With
You don’t need a big budget or a professional crew to transform your yard with rocks, just the right idea and a clear plan.
Here are seven simple, practical ways to get started and make an immediate visual impact on your outdoor space:
1. Gravel Pathway
If you’re starting from scratch, a pathway is often the easiest and most noticeable upgrade you can make.
What to add:
- Ideal depth: 2–3 inches of gravel
- Base layer: compacted soil or crushed stone
- Best gravel size: 10–20mm for comfort and stability
Upgrade line: Use edging (metal, plastic, or stone) on both sides to keep the gravel contained and maintain a clean, defined path over time.
Cost / Save money tip: Buy gravel in bulk from a local supplier instead of bagged versions, which can cut costs by 40–60% for larger pathways.
Once your pathway is in place, you’ll immediately notice how it brings structure and flow to your yard.
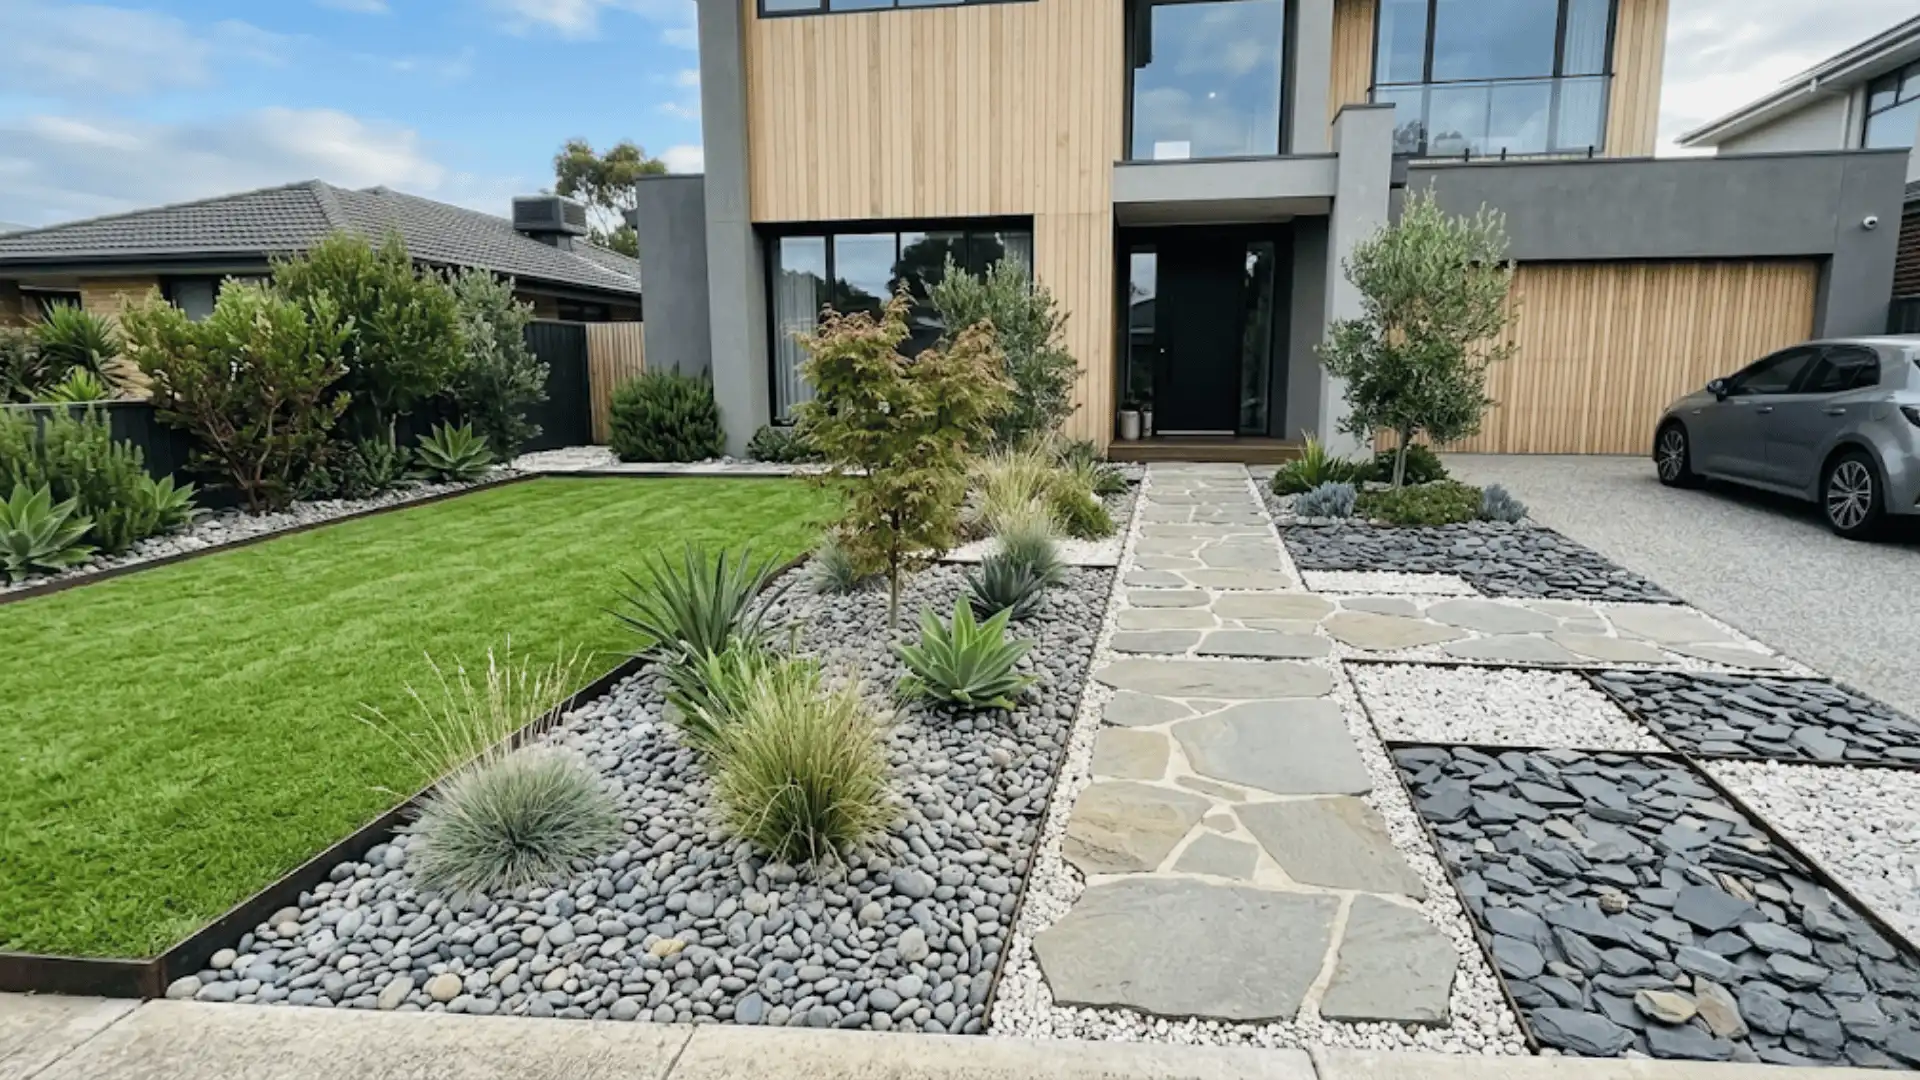
2. Rock Border Around Plants

After defining walkways, the next step is creating clean edges around your planting areas.
What to add:
- Recommended width: 4–8 inches
- Use medium-sized stones for balance (not too small, not bulky)
- Slightly bury the first layer for a natural look
Upgrade line: Keep spacing tight between rocks and maintain a consistent height to create a sharp, intentional border.
Cost / Save money tip: Use locally sourced stones or repurpose rocks from your property to reduce material and delivery costs.
This simple addition instantly makes your garden beds look more organized and professionally finished.
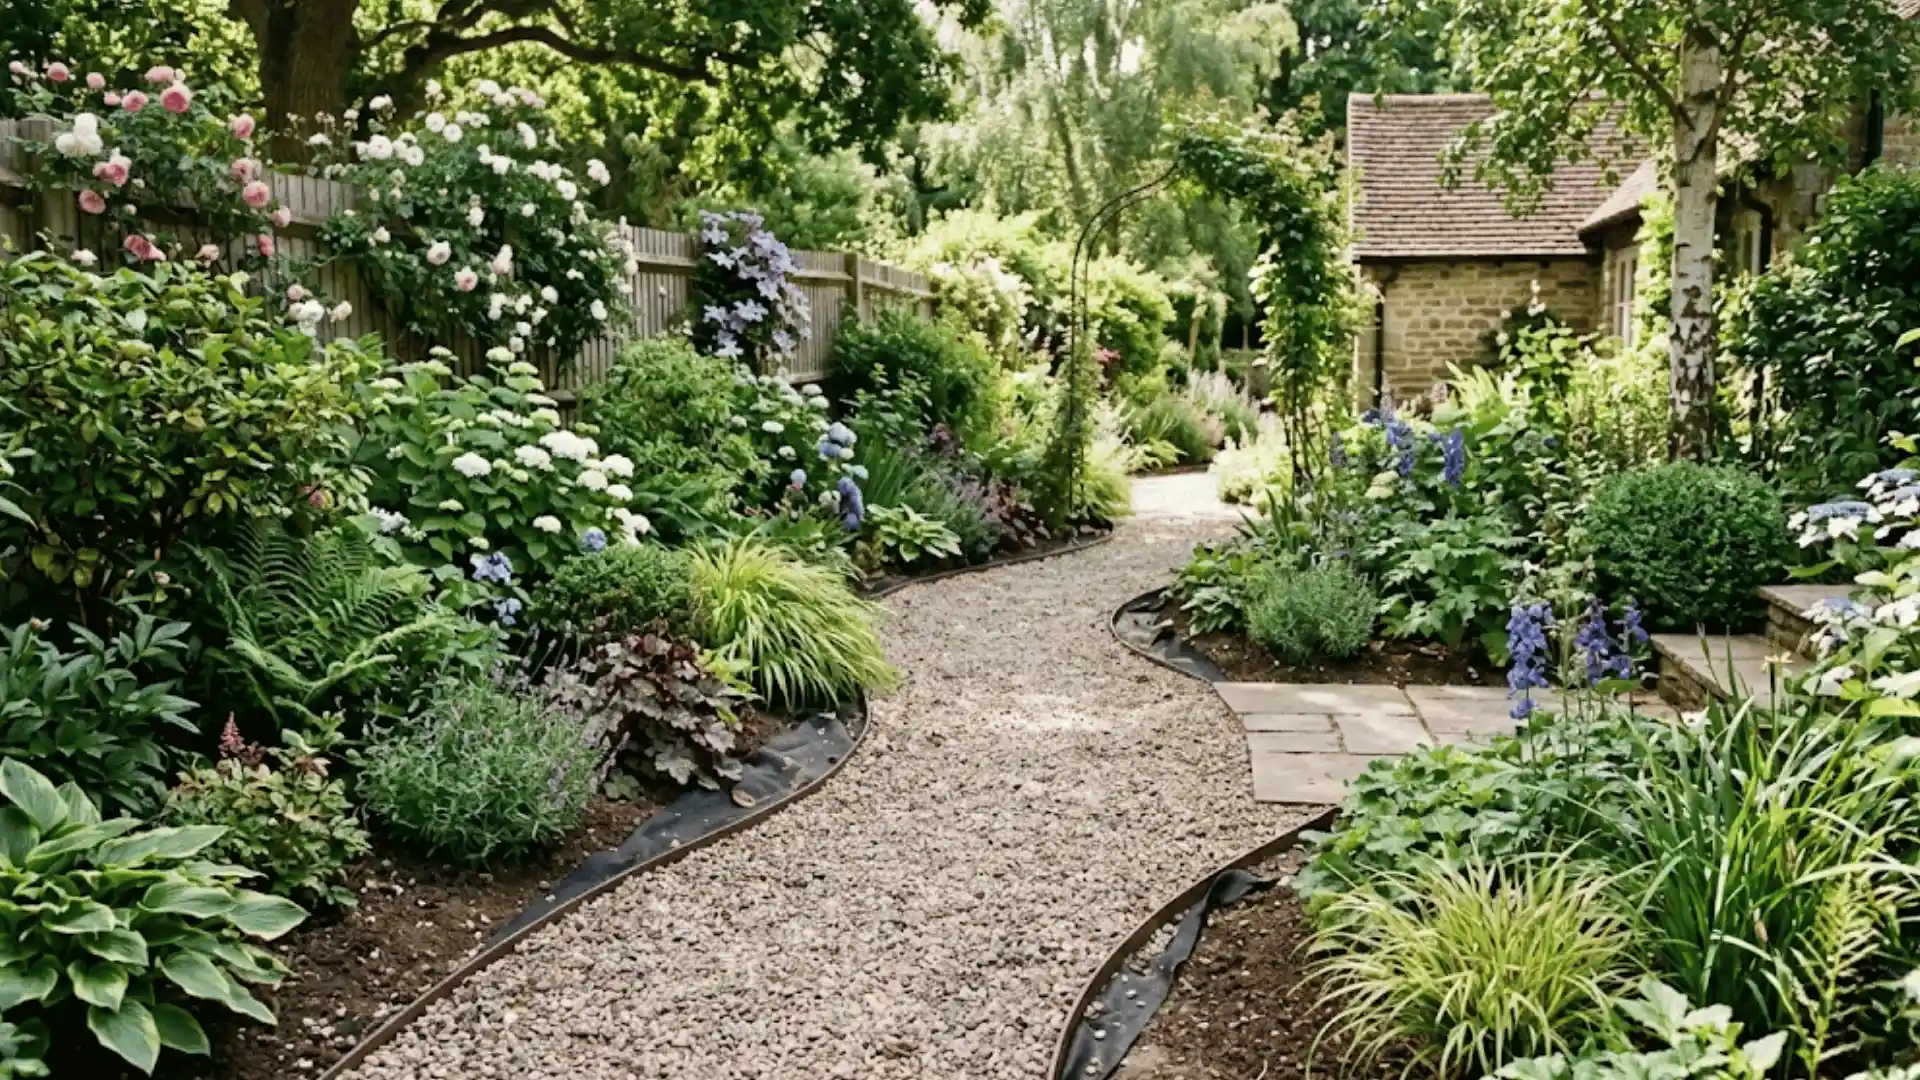
3. Dry River Bed Design
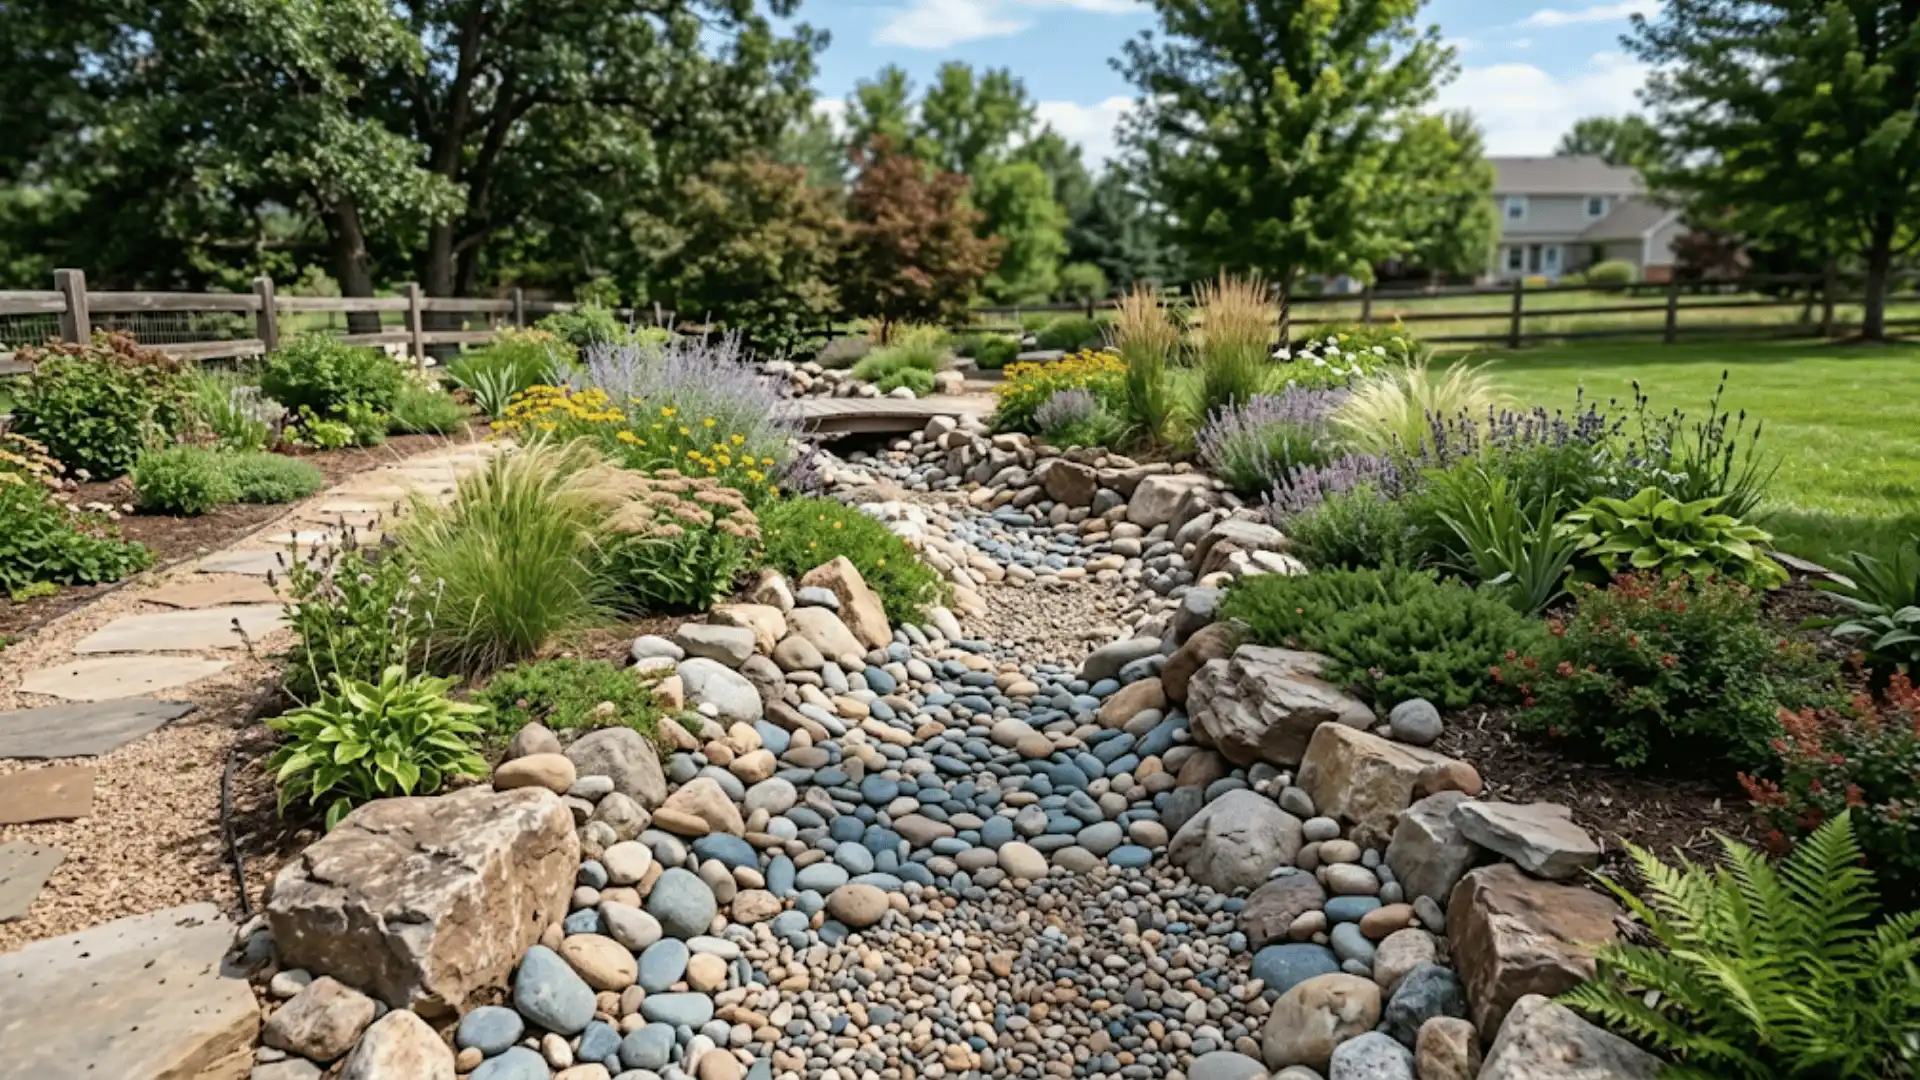
If you’re dealing with drainage issues or want to add movement to your space, this idea works both visually and functionally.
What to add:
- Layering system: fabric → gravel base → river rocks
- Vary the width and add curves for a natural look
- Use mixed stone sizes for realism
Upgrade line: Create gentle curves and vary rock sizes to mimic how natural water flows—this makes the design feel organic instead of artificial.
Cost / Save money tip: Use larger rocks only as accents and fill most of the area with smaller, cheaper gravel to keep costs down.
It’s a practical solution that doubles as a standout design feature in your yard.
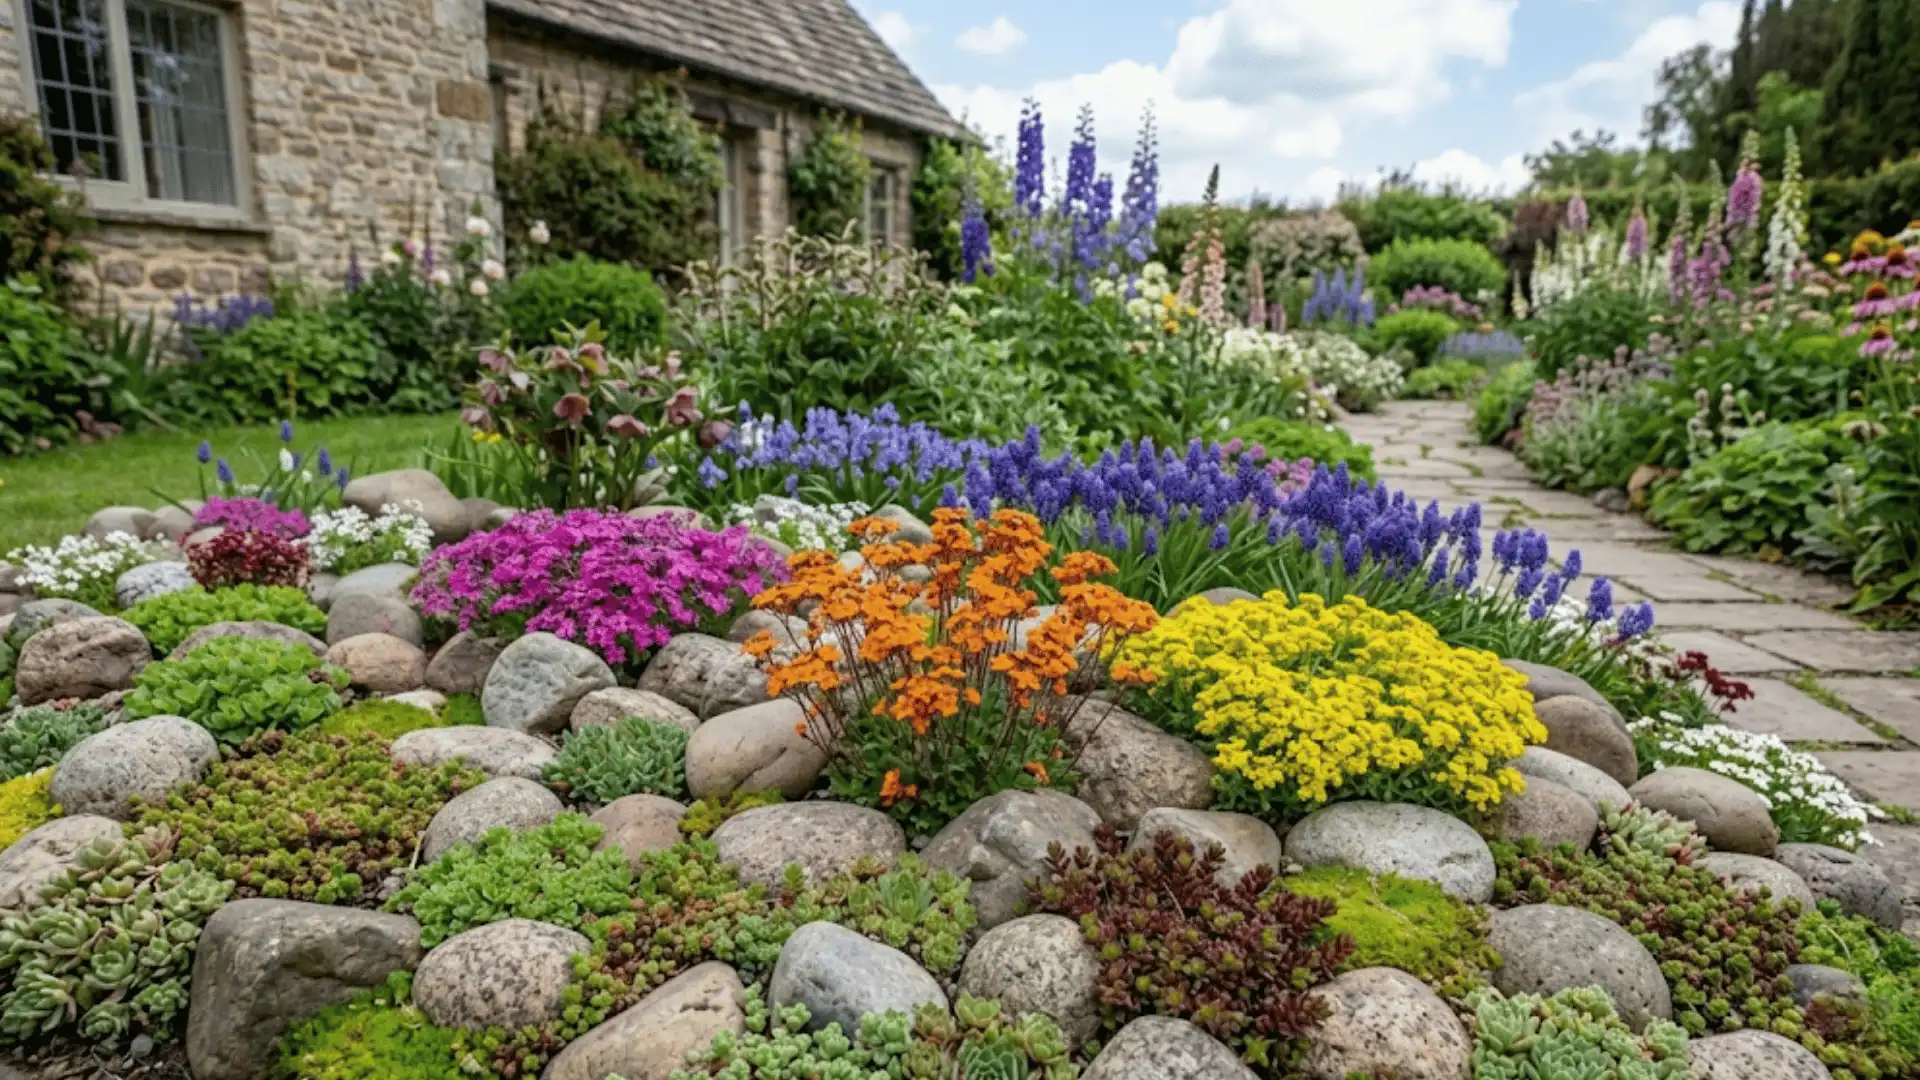
4. Rock Garden with Mixed Sizes
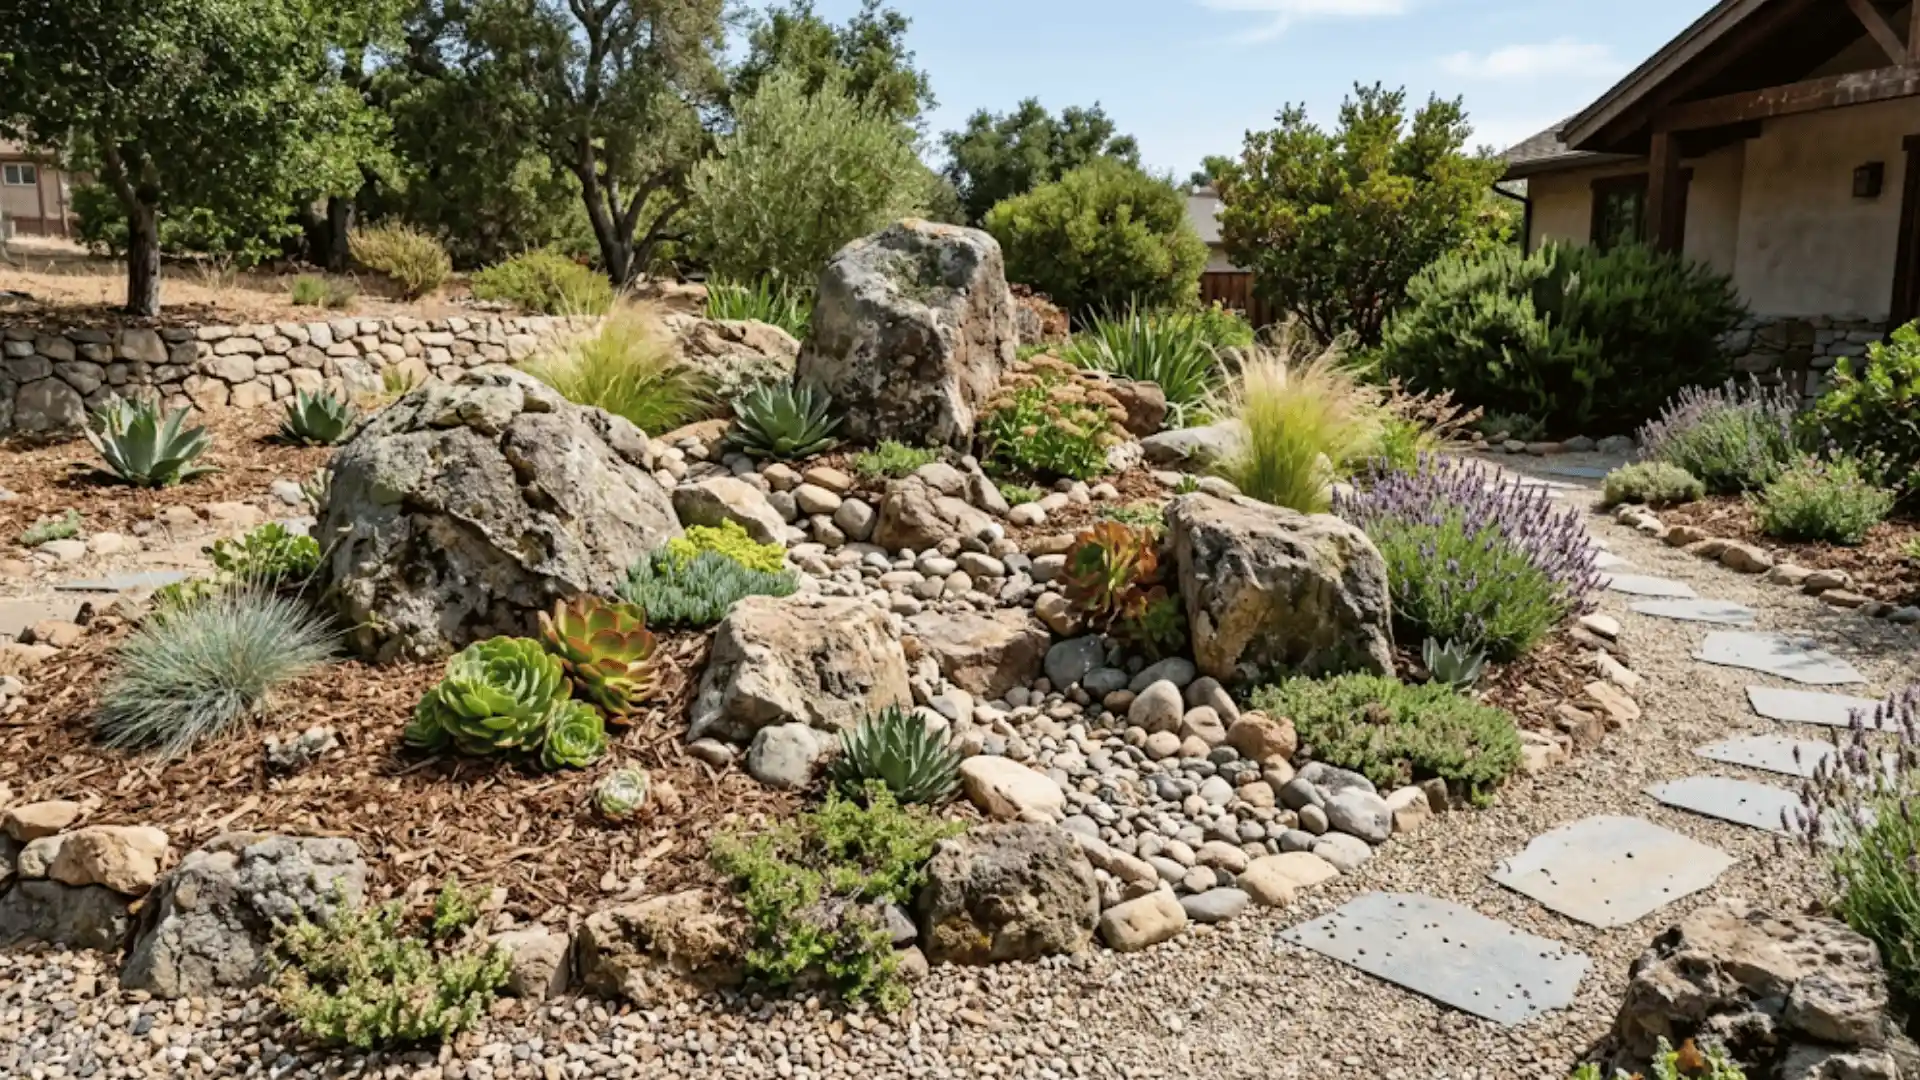
For areas where you want more visual interest without adding plants everywhere, a rock garden is a great option.
What to add:
- Use the rule of 3 (group rocks in odd numbers)
- Place the largest “anchor” rock first
- Leave space between elements to avoid clutter
Upgrade line: Partially bury larger rocks to make them look naturally embedded rather than placed on the surface.
Cost / Save money tip: Limit the number of large boulders, which are the most expensive, then fill the space with smaller, more affordable stones.
This approach gives your yard depth and character without increasing maintenance.
5. Fire Pit Area with Gravel Base
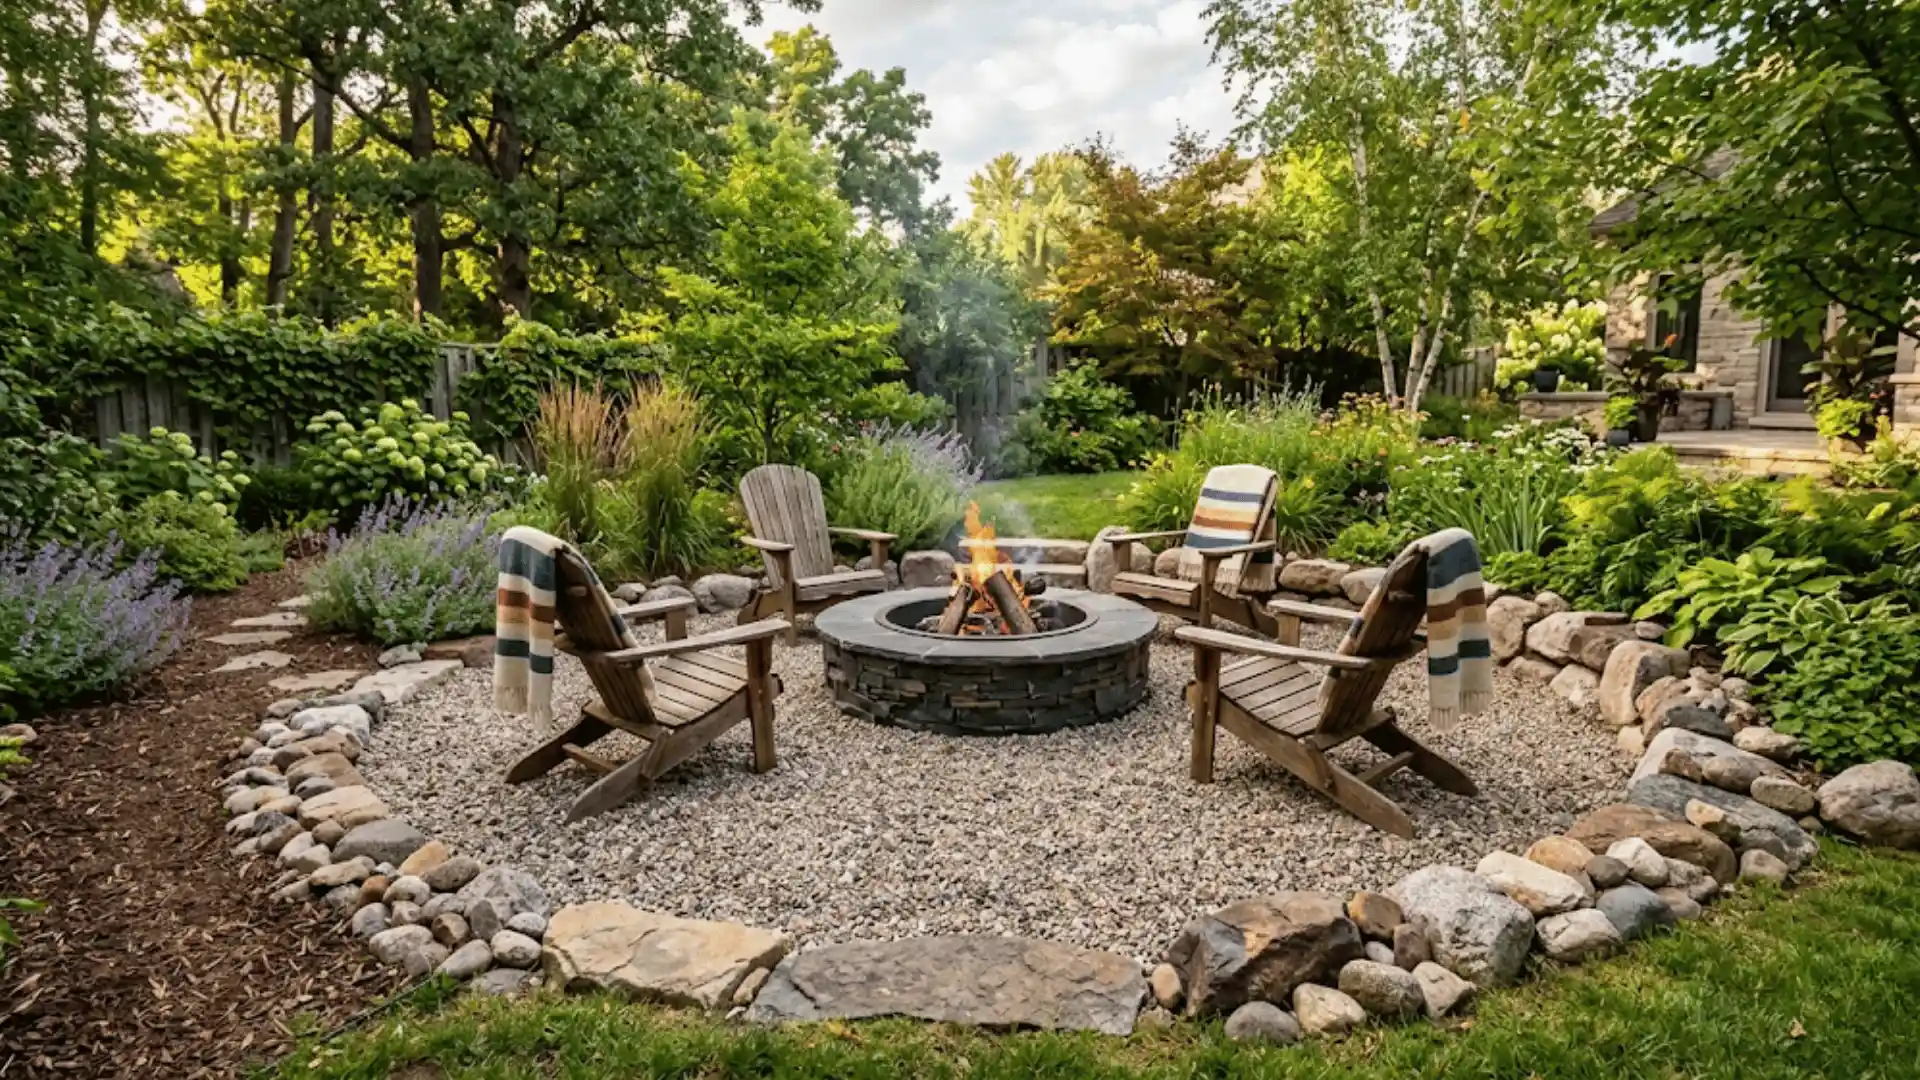
If you’re planning a functional gathering space, a fire pit area is one of the most rewarding additions.
What to add:
- Gravel depth: 2–3 inches
- Minimum radius: 4–6 feet around the pit
- Use compactable gravel for stability
Upgrade line: Use crushed gravel instead of smooth pebbles; it compacts better and creates a safer, more stable surface.
Cost / Save money tip: Skip expensive patio materials and use gravel as the main base; it delivers the same function at a fraction of the cost.
With the right setup, this becomes a low-maintenance space you’ll actually use regularly.
6. Minimal Lawn with Rock Sections
If you want to reduce maintenance long-term, rethinking how much lawn you actually need is a smart move.
What to add:
- Divide the yard into zones (grass + rock sections)
- Use different rock sizes for visual separation
- Add edging to define each section
Upgrade line: Define clear zones instead of random patches. This creates a structured, modern look that feels intentional.
Cost / Save money tip: Reduce lawn size strategically to cut long-term costs on water, mowing, and fertilizers.
Over time, this change saves both effort and money while keeping your yard visually balanced.
7. Stepping Stone Path with Pebbles
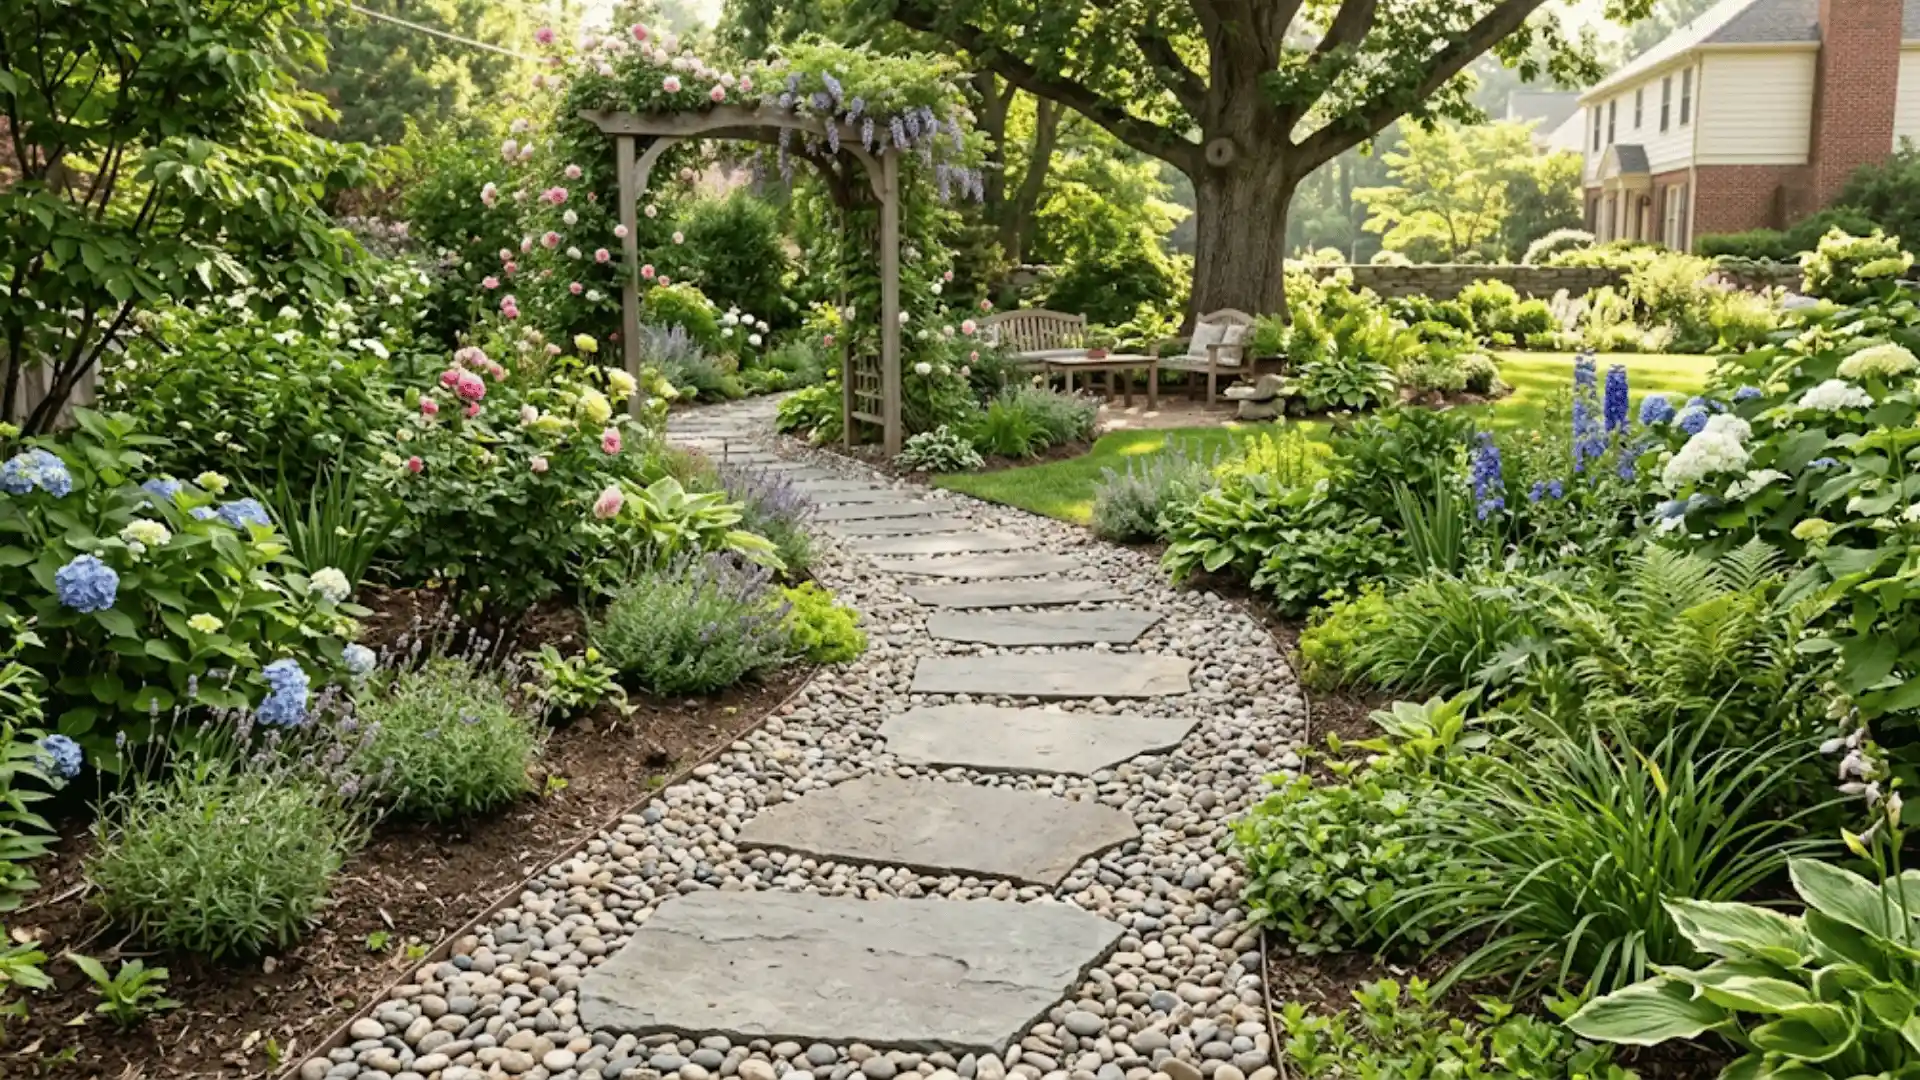
To tie different areas of your yard together, a stepping stone path adds both function and charm.
What to add:
- Ideal spacing: 18–24 inches (natural stride)
- Ensure stones are level with the ground
- Use stable, flat stones
Upgrade line: Set each stone flush with the ground to create a smooth, safe walking surface and a more polished finish.
Cost / Save money tip: Space stones slightly farther apart to reduce the number needed while still maintaining comfort and usability.
This final touch helps connect your entire landscape into one cohesive, well-designed space.
How to Choose the Right Landscaping Rocks
Choosing the wrong rocks can throw off your entire yard’s balance. Size, color, and function all play a critical role in making the right decision. Here’s what to focus on before you buy:
- Match the size to your space: Use large boulders in wide-open areas and smaller gravel or pebbles in compact or detailed sections to maintain visual balance.
- Choose colors that complement your home: Warm-toned rocks suit earthy or brick exteriors, while cool grey or white stones pair well with modern or white-rendered homes.
- Focus on function first: Decide whether you need drainage support, erosion control, or purely decorative fill. Your purpose should drive your rock selection.
- Consider texture and finish: Smooth, polished rocks feel modern and refined, while rough or jagged stones create a more natural, rugged outdoor character.
- Think about long-term maintenance: Lighter-colored rocks show dirt and algae more easily over time, so choose darker tones for high-traffic or shaded areas prone to moisture.
- Know your climate: In cold-weather regions, freeze-thaw cycles can cause some rocks (especially porous types like sandstone) to crack or shift over time. Granite and basalt hold up well in most climates. If you’re in a hot, sunny region, lava rock and decomposed granite tend to perform best.
The right rock isn’t just the one that looks good in the store; it’s the one that fits your space, suits your climate, and works with your home’s overall style.
Get those three things right, and your landscaping will look effortless for years to come.
How to Plan Your Rock Landscaping Budget
Now that you’ve explored different rock landscaping ideas and where you can save on each, the next step is planning your overall budget so you don’t overspend or run out of materials midway through the project.
A little upfront planning can make a big difference in how efficiently you use your money and resources. Here’s a practical breakdown to help you stay in control of your costs:
| Tip | Strategy | Estimated Cost | Potential Savings |
|---|---|---|---|
| Buy in Bulk | Purchase rocks by the ton from a supplier instead of bagged units from a retail store | $30 – $80 per ton | Save up to 60% vs. retail bags |
| Use Local Stones | Source rocks from nearby quarries or regional suppliers to reduce transport costs | $20 – $60 per ton | Save $15 – $40 per ton on delivery |
| Plan One Zone First | Start with one area and measure actual material usage before expanding | $50 – $150 per project zone | Prevents overbuying and wasted material |
| DIY Installation | Handle installation yourself using basic tools instead of hiring a crew | $0 labour cost | Save $200 – $800 in labor fees |
| Reuse + Combine Materials | Mix existing stones with new materials to reduce the total quantity needed | $0 – $20 | Significantly lowers overall spend |
| Choose Rock Type Early | Finalize your rock type before buying to avoid switching materials midway | Varies | Prevents duplicate purchases and waste |
With the right approach, budgeting becomes less about cutting corners and more about making smarter decisions.
Plan carefully, track what you use, and build your project one section at a time to get the best results without unnecessary spending.
Disclaimer: All costs listed above are approximate estimates for reference purposes only actual prices may vary significantly depending on your location, local supplier rates, rock type availability, and regional delivery charges.
Common Mistakes to Avoid
Even the best rock landscaping ideas can fall flat if a few critical steps are skipped. Knowing what not to do is just as important as knowing what to do.
Here are the four most common mistakes homeowners make, and how to avoid them from the start:
- Skipping the weed barrier: Without a proper landscape fabric underneath, weeds will push through your rocks within weeks, undoing all your work and creating ongoing maintenance.
Fix: Always install a high-quality weed barrier and secure it properly before adding any rock layer. - Poor drainage planning: Placing rocks without considering water flow can lead to pooling, flooding, and erosion over time.
Fix: Observe how water moves in your yard after rain and guide it using slopes or features like dry river beds. - Using only one rock type: Relying on a single size or texture makes your yard look flat and unfinished.
Fix: Combine different sizes and textures to create depth, contrast, and a more natural appearance. - Skipping layout planning: Placing rocks without a clear plan often results in an unbalanced, cluttered look.
Fix: Sketch your layout first or dry-place stones before final installation to test the design. - Ignoring scale: A common mistake in smaller yards is choosing rocks that are too large for the space. One oversized boulder in a compact front yard draws too much attention and makes everything else look cramped.
Fix: Use rocks that are proportional to your space. In compact areas, medium stones (fist to head size) create impact without overwhelming the design.
Avoiding these mistakes from the beginning will save you time, money, and frustration. Take the planning phase seriously, and your rock landscaping will look intentional, polished, and built to last.
Wrap Up
Looking back, it all started with one glance at a neighbor’s yard that stopped me in my tracks.
That single moment pushed me to learn everything I now know about rock landscaping ideas, from how rocks convert a space to choosing the right materials, planning a budget, trying ideas like gravel pathways and dry river beds, and avoiding the common mistakes that catch most beginners off guard.
What once felt overwhelming became surprisingly manageable once I broke it down step by step. Now it’s your turn. Start with one idea, keep it simple, and build from there.
Drop a comment below and tell me which rock landscaping idea you’re trying first. I’d genuinely love to hear how your yard turns out!
Frequently Asked Questions
What plants work well in a rock landscape?
Drought-tolerant and low-water plants work best with rock landscaping. Choose options like succulents, ornamental grasses, lavender, and creeping ground covers. Native plants are especially reliable since they adapt well to local conditions and require minimal upkeep once established.
How much does rock landscaping cost on average?
Costs vary by size and material, but most projects range from $100 to $1,000. Buying in bulk and doing the installation yourself can significantly reduce overall expenses.
What is the cheapest rock for landscaping?
Gravel, crushed stone, and pea gravel are usually the most affordable options. They are widely available, easy to install, and work well for pathways, fillers, and base layers.
Do you need landscape fabric under rocks?
Yes, placing landscape fabric underneath helps block weeds and keeps rocks from sinking into the soil. It also improves long-term stability and reduces maintenance.
How deep should landscaping rock be laid?
A depth of 2–3 inches works well for most areas. High-traffic zones may need a slightly thicker layer to prevent shifting and ensure better coverage.
How do you keep landscaping rocks from sinking?
Prepare a solid base using compacted soil or crushed stone, then add landscape fabric before placing rocks. This prevents shifting, sinking, and uneven surfaces over time.
How long does rock landscaping last?
Rock landscaping can last many years with minimal upkeep. Unlike mulch, it does not decompose, making it a long-term solution for both design and functionality.